For some people, programming comes naturally to them. For others, it’s a struggle or something that doesn’t click with the way they think. The same thing with hacking.
Hackers often complain about “script kiddies”, people who use tools without any clue about what they do. What’s the difference between someone who will become a good hacker and someone who will stay a script kiddie, forever?
I know the answer. Here it is. The number one trait for a successful hacker is the ability to reason about things one can’t directly observe.
Since a hacker is in the business of circumventing controls or discovering the unknown, they’re constantly in the blind. They have to reason about what they’re trying to hack though. If they can’t, they’ll never figure out the system they’re working on.
This innate ability to reason comes from a solid mental model. A mental model is your ability to quickly ask a question and have several guesses at an answer. When someone asks me a question, sometimes I have a few ideas. Other times I’m stuck. I’m stuck when I have no reference for the situation as described to me. Sometimes, I’m stuck because there are too many possibilities and I don’t have enough information to pick one. This is how I feel when with 99% of the Armitage “support requests” I get.
Where does a mental model come from? A mental model comes from knowing how something works. Reading, attending classes, and otherwise consuming information provide some of the pieces of a mental model, but inactive learning, by itself, will not build a mental model for you. To create a mental model, you have to do something active with these pieces. This active piece requires envisioning an outcome or goal, attempting it, failing, figuring out why, and going on to eventually succeed with the task. There’s an emotion that goes with this active learning process. It’s called frustration.
If you’re frustrated at different times while you’re learning or doing, but you still get the job done, then congratulations–you’re building your mental model.
When I was working on the browser pivoting feature for Cobalt Strike, I had the benefit of an unexpected learning experience. My proxy server would process a request, send a response, and close the socket. In local testing, this worked perfectly. When I used a port forward through Meterpreter, it would work most of the time. When I tried to browser pivot with Meterpreter tunneled through Cobalt Strike’s Beacon connected to Amazon’s EC2–requests failed 90% of the time.
What happened? Why was it failing? I could have thrown up my hands and said “it doesn’t work” or “this lousy performance is acceptable”. I went through each component of my system and tried to understand it. Eventually, I figured out that my call to closesocket would make a best effort to finish sending data in the socket’s outbound queue. Usually, this worked fine. As I introduced latency into my pivoting process, I increased the opportunity for data to get discarded. Before I released this feature, I was able to solve this problem.
This frustrating experience improved my mental model. I couldn’t just look at my code to solve the problem. I had to setup experiments and reason about parts of the system I didn’t write or have full knowledge of.
If you want to succeed as a hacker, learn to troubleshoot. Learn how the things around you work. If you can’t directly observe a detail, learn how to get the answer another way. If you run out of ideas, keep digging. The answer is out there.
Covert Lateral Movement with High-Latency C&C
High latency communication allows you to conduct operations on your target’s network, without detection, for a long time. An example of high-latency communication is a bot that phones home to an attacker’s web server to request instructions once each day.
High latency communication is common with advanced threat malware. It’s not common in penetration testing tools. I designed Cobalt Strike’s Beacon to provide penetration testers with a robust payload for high-latency communication. Today, you can conduct much of your engagement through Beacon.
In this post, I’ll show you how to abuse trust relationships to move laterally with Beacon. You will learn how to find targets with built-in Windows commands, escalate privileges, impersonate access tokens, and use the rights a token holds to run code on a remote system. I’ll show you how to carry out each of these steps from a Beacon configured with a high sleep time.
Reconnaissance
Beacon’s shell command will run a command on a host and post its output back to you. You can do a lot with this command alone. For example, to find out which domain you’re on:
At this point, we have a few targets to work with. The next step is to check if the current user is a local administrator on any of these systems. To check your rights, try to access an admin-only share on a target host:
shell dir \host\C$
If you get a directory listing, then your user is a local admin. You’re ready to get code execution.
Privilege Escalation
If your current user isn’t a local admin on a target system, then you will need to escalate your privileges to go further. To start this process, I like to use whoami /groups to find out which groups my current user is in. You can do this with the shell command too.
shell whoami /groups
If I’m living in a standard user context (a medium integrity process), but my user is a local admin on the current host—there’s an opportunity to escalate. Beacon includes its own version of the bypassuac attack that’s built for this situation. Bypass UAC elevates you from a medium integrity context to a high integrity context. The command to do this in Beacon is bypassuac.
bypassuac beacon listener
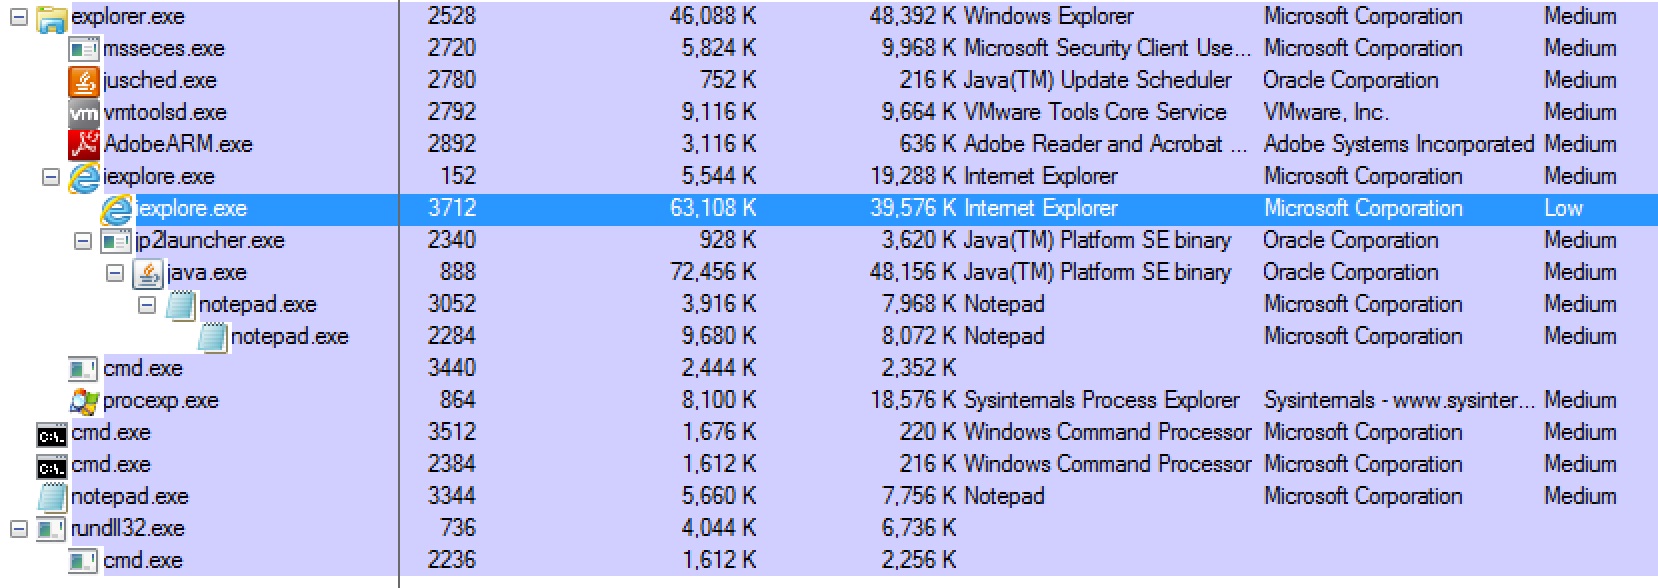
At this point, you will get a new Beacon. If all went well, this Beacon will show a * next to the username. This * is Beacon’s way to tell you that it’s running in a high integrity context. Remote Access Tools built for an XP world tend to omit this information. On a modern target, you have to know whether you’re in a high or medium integrity process.
Token Stealing
Now that we’re in a high integrity process, we can look for tokens to steal. An access token is a data structure that tracks the user’s rights and, if applicable, other information needed for single sign-on to work. There are different types of tokens, but I’d like to call your attention to impersonation and delegation tokens. An impersonation token allows a process or thread to carry out actions as the identified user on the current system. A delegation token allows a process or thread to carry out actions as the identified user on remote systems on the same domain.
We will use Beacon to steal a token from a process. Run the tasklist program to list processes on the system:
shell tasklist /v
Each process will have a user associated with it. If you see a process run by another domain user, use Beacon’s steal_token command to impersonate that token.
steal_token pid
You may now execute commands with the security context of the stolen token. Try to see if the impersonated user is a local admin on other systems within your reach. If the user is an admin elsewhere, we’re in luck and we can try to get code execution.
Generate Artifact
How do we get code execution on a remote host? Copy a file to the remote host and schedule it to run. These steps raise a question though. What do we want to copy and run? You could export an executable for Beacon that talks to your command and control server. I will caution you against this though.
As an attacker, you do not want every compromised system to call home to your command and control infrastructure on the internet. Some hosts can’t talk out to the internet. Other hosts (e.g., domain controllers) may get more attention from a network security monitoring team.
Not all Beacons have to connect to the internet. You may link Beacons together in a way that allows each Beacon to get its tasks and send output through its parent Beacon. Cobalt Strike’s Beacon uses named pipes to do this.
If you want to stay quiet, I recommend that you export a fully staged SMB Beacon and copy it to your target’s host and schedule it to run. A staged artifact is beneficial as it does not need to connect to us over the internet to download the rest of itself. Go to Attacks -> Packages -> Windows Executable (S) to export a fully staged Beacon. Choose the SMB Beacon as your Beacon type and select the type of output you would like. You may export a (staged) Beacon as a PowerShell script, DLL, executable, or Windows service executable. Press Launch and save the artifact.
File Copy
To copy a file, change Beacon’s current working directory to a folder that you can write to. If you’re a local admin in a high integrity context, try c:\windows\temp.
Use Beacon’s cd command to change the current directory:
cd c:\windows\temp
Use Beacon’s upload command to select a file from your local system and upload it to the current directory:
upload
To copy the uploaded file to the remote system, use the shell command. This command will copy foobar.exe to c:\windows\temp on the remote host.
shell copy foobar.exe \host\C$\windows\temp
Beacon queues its commands. If you have a high sleep time, don’t worry about typing one command at a time and waiting for output. Issue every command that you can think of. When Beacon checks in next, it will grab its tasking, execute the actions you gave it, and show the output to you.
Remote Code Execution
We need to to run foobar.exe on our target. There are many ways to do this. Here are four methods that I recommend that you learn about.
#1: WMIC
You may use wmic to run a process on a remote host. Here’s the syntax to do it:
shell wmic /node:host process call create “c:\windows\tempfoobar.exe”
#2: AT
You may also schedule a program to run with at. The at command is deprecated by Windows 8. You will not be able to use this option from or against a Windows 8 target. That said, the syntax for this option is easy to remember.
First, find out what time it is on the remote system:
shell net time \host
Next, use at to schedule foobar.exe to run sometime in the near future.
shell at \host HH:MM c:\windows\tempfoobar.exe
#3: SCHTASKS
Another option to run code on a target system is schtasks. The syntax for schtasks is a little more complicated, but why not:
The sc command requires an executable that responds to Service Control Manager commands. If you do not provide such an executable, your program will run, and then immediately exit. Cobalt Strike’s dialog to generate a staged executable gives you the option to generate a Service Executable. Make sure you pay attention to this detail.
Here’s the syntax to delete your service after it runs:
shell sc \host delete foobar
Establish Control
Once an SMB Beacon is run on a remote system, you may gain control of it with Beacon’s link command. From Beacon, use:
link host
This command will instruct the current Beacon to link to the remote Beacon over the SMB protocol. You will see a new Beacon show up in the Beacon console with the parent Beacon listed as its external address. From here, you may repeat this entire process. Look for tokens, impersonate them, see where you’re an administrator, and try to take those systems. That’s it.
Cobalt Strike 1.49 - HTTP Proxy Authentication? No Problem.
I spend a lot of time on the road in March and April—using my tools. During these months, I take careful notes of the usability issues I’d like to address and small tweaks that would make life better for Cobalt Strike’s hacker corps.
Today’s Cobalt Strike release is the result of notes and my first-hand experience from five different exercises. There’s a lot of great stuff here, particularly for Beacon users.
Beacon’s HTTP stager uses WinINet to communicate [even before this update]. This has a benefit. The HTTP stager will authenticate to a proxy server when stored credentials are available. Sometimes, the current process does not know the credentials needed to get through a web proxy server. Beacon’s HTTP stager now detects this situation and prompts the user for credentials. The dialog is the same one Internet Explorer uses. Between Beacon’s new HTTP stager and DNS stager—you now have the tools to defeat most tough egress restrictions.
Cobalt Strike’s Staged Executable Generator now gives you options to output Beacon as a raw blob of position independent shellcode. You also have the option to output a fully-staged Beacon as a PowerShell script too.
You may now assign a tiny note/label to each Beacon. This label is immediately visible to your teammates too. This makes Beacon management much easier.
Beacon’s process injection code now falls back to an alternate method when CreateRemoteThread fails. This means you’ll have an easier time injecting into explorer.exe and other processes across logon sessions.
Beacon’s session spawning now creates patsy processes in a suspended state. This allows you to use spawnto with almost any program you can think of. And hurrah! Beacon no longer uses notepad.exe as the default process to spawn and inject code into.
These changes are the highlights. For a full accounting of changes, give the Release Notes a read. Licensed Cobalt Strike users may use the update program to get the latest.
Survival Skills for Small Infosec Vendors
Information Security is a strange field. There are probably few professions with such a wide range of social skills and preferences as the information security profession. Personally, I think this is what’s fun. It’s pretty cool that an MC can take a shot of vodka before introducing a speaker at a conference. Unfortunately, the perceived anything goes nature of this field, leads some of us to take it too far.
If you do business in this industry, here are a few principles that you may want to adhere to:
Always project an image of success. No one wants to do business with failure. If folks like you enough, a sob story might get you some overflow work, but ultimately–it’s a losing strategy. Hold on to your self-respect and carry yourself the way you want the world to perceive you.
Treat everyone with respect. There are some extremely intelligent people in this field. Extremely intelligent people reading this, look around! You’re surrounded by other extremely intelligent people. Intelligence is not a right to disrespect others. People have memories. The person you disrespect today, because you’re a hacker rock star, may be the person who chooses not to refer work to your new venture.
Stay open to other ideas. None of us are going to solve security single-handedly. Period. Get used to the idea that others will have ideas and work on them. Sometimes their ideas will overlap with your area. Great! Don’t feel threatened. Continue to innovate, let them innovate, and see which ideas shake out. It’s best for everyone.
If you want something, ask. Unfortunately, business isn’t like a conference call for papers. Opportunities happen not because of a democratic process or merit. They happen because of hustle. If you want to get involved with something, ask. Do so politely and in private. If it’s not appropriate, you’ll receive a respectful and dignified response in return. If it is, you’ll be amazed at the doors that open up to you, all because you asked for an opportunity.
Keep your promises. If you commit to do something for someone, even if it means sending an email. Do it. If you find this is hard, learn to say no. You won’t damage relationships by saying no. You will damage relationships by failing to live up to things you promised.
Deal with rejection, privately. Didn’t get accepted to the conference of a lifetime? Were you slighted on twitter? Did someone blatantly and for no good reason trash your work on Twitter? Oh well. Rejection happens. It happens to everyone. If you take things personally, process it privately, and move on. Turning every perceived slight into an online slug fest will only further damage your self-esteem and cause others to lose respect for you.
Never insult your audience. This is an important public speaking tip. Some folks react to certain questions with disdain. Don’t. If someone asks a question, it means they don’t know the answer and probably others don’t either. Never treat your audience or professional community with disdain. Again, you’re surrounded by extremely intelligent people.
Never insult your peers. If we’re on stage together–don’t tell the audience “I did _______. There’s probably only one or two other people here who could do _________”. Some of us may disagree with your assessment of our skills and capability or the novelty of what you’re touting. These kinds of public statements rarely have positive ramifications.
Set a good example. Decide what your principles are. Decide how it is you want others to treat you. Treat others this way. It’s not always easy and we all falter. But, try to do your best. That’s all anyone can ask of you.
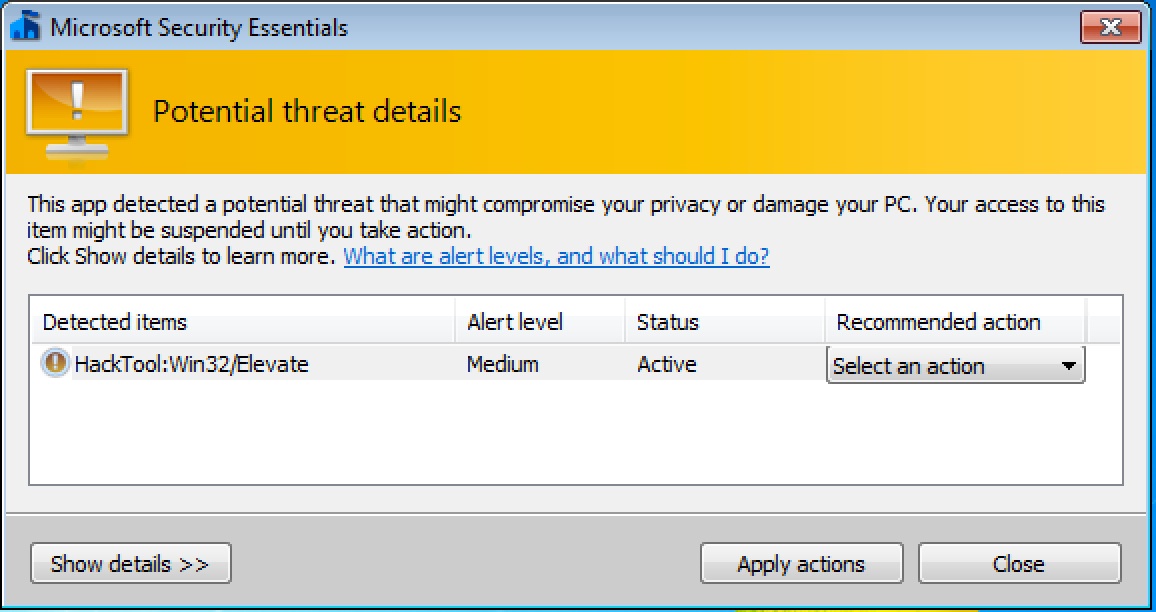
What happens when I type getsystem?
Meterpreter’s getsystem command is taken for granted. Type getsystem and magically Meterpreter elevates you from a local administrator to the SYSTEM user. What’s really happening though?
The getsystem command has three techniques. The first two rely on named pipe impersonation. The last one relies on token duplication.
meterpreter > getsystem -h
Usage: getsystem [options]

Attempt to elevate your privilege to that of local system.

OPTIONS:

-h        Help Banner.
-t   The technique to use. (Default to '0').
0 : All techniques available
1 : Service - Named Pipe Impersonation (In Memory/Admin)
2 : Service - Named Pipe Impersonation (Dropper/Admin)
3 : Service - Token Duplication (In Memory/Admin)
Let’s go through them:
Technique 1 creates a named pipe from Meterpreter. It also creates and runs a service that runs cmd.exe /c echo “some data” >\\.\pipe\[random pipe here]. When the spawned cmd.exe connects to Meterpreter’s named pipe, Meterpreter has the opportunity to impersonate that security context. Impersonation of clients is a named pipes feature. The context of the service is SYSTEM, so when you impersonate it, you become SYSTEM.
Technique 2 is like technique 1. It creates a named pipe and impersonates the security context of the first client to connect to it. To create a client with the SYSTEM user context, this technique drops a DLL to disk(!) and schedules rundll32.exe as a service to run the DLL as SYSTEM. The DLL connects to the named pipe and that’s it. Look at elevate_via_service_namedpipe2 in Meterpreter’s source to see this technique.
As the help information states, this technique drops a file to disk. This is an opportunity for an anti-virus product to catch you. If you’re worried about anti-virus or leaving forensic evidence, I’d avoid getsystem –t 0 (which tries every technique) and I’d avoid getsystem –t 2.
Technique 3 is a little different. This technique assumes you have SeDebugPrivileges—something getprivs can help with. It loops through all open services to find one that is running as SYSTEM and that you have permissions to inject into. It uses reflective DLL injection to run its elevator.dll in the memory space of the service it finds. This technique also passes the current thread id (from Meterpreter) to elevator.dll. When run, elevator.dll gets the SYSTEM token, opens the primary thread in Meterpreter, and tries to apply the SYSTEM token to it.
This technique’s implementation limits itself to x86 environments only. On the bright side, it does not require spawning a new process and it takes place entirely in memory.
Let’s say techniques 1-3 fail. You can always fall back to getting system by hand. All of these techniques rely on your ability, as a privileged user, to create or inject into a service. If these techniques fail, generate an executable for your payload and use sc or at to run it as SYSTEM. There you go, you’ve got system.
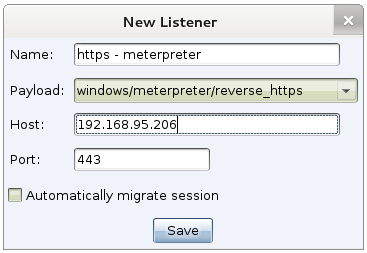
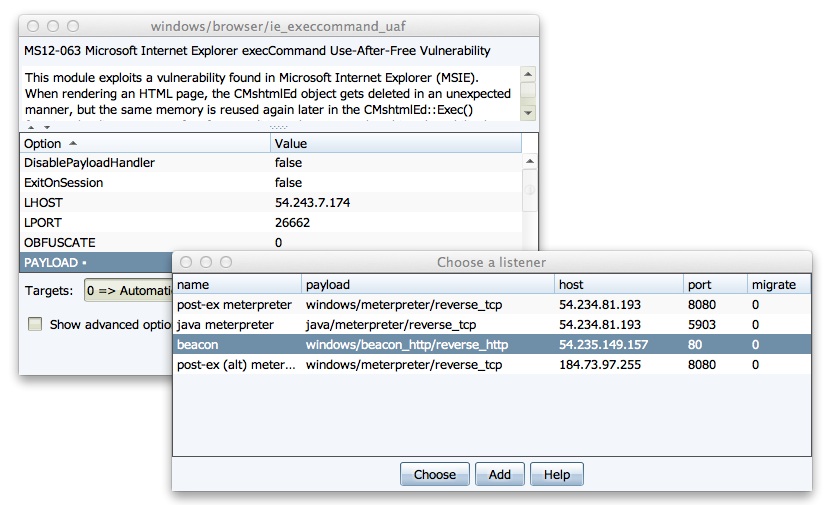
Listeners are Cobalt Strike’s abstraction in front of the Metasploit Framework’s payload handlers. A handler is the exploit/multi/handler module. This module sets up a server that waits for a payload on a compromised system to connect to you.
Cobalt Strike’s listeners feature is a way to configure handlers that start when Cobalt Strike starts. A listener consists of a user-defined name, a payload, a host, a port, and whether or not you would like the payload to automatically migrate.
Many Cobalt Strike features let you choose a listener to quickly configure a payload. When you take advantage of this, you’re certain that the information is correct. Here are the ways you can use listeners:
You can quickly configure a Metasploit Framework exploit to use a pre-defined listener. Double-click the PAYLOAD option to choose one of your listeners. This action will populate the module’s options for you.
When you task a Cobalt Strike Beacon to spawn a session—you get to choose a listener from any of the Cobalt Strike team servers you’re connected to. This is an incredibly seamless way to pass shells to different team servers.
Listeners are an abstraction. They’re the one-stop shop to set up handlers in Cobalt Strike. Given that this convention works well—Cobalt Strike’s Listener Management feature becomes the place to hook in Cobalt Strike-specific stuff.
Beacon is a good example of this. To Cobalt Strike users–Beacon feels like a first-class payload. It’s not an external tool or something that is awkwardly integrated. Beacon doesn’t exist in the Metasploit Framework though. It’s a Cobalt Strike payload that stages as the windows/dllinject/reverse_http payload when used with a Metasploit Framework feature. Listeners made it possible for me to define Beacon as a payload alongside Meterpreter’s various options.
Listeners are also my opportunity to expose some hidden functionality in the Metasploit Framework to my users. For example, not many people know that it’s possible to tunnel reverse_tcp payloads through a Meterpreter session. Cobalt Strike helps you do this through pivot listeners.
A Pivot Listener is a listener that is set up to route back to you through a Meterpreter session. This is really an incredible feature. A lot of privilege escalation actions will spawn a new session. If I care at all about stealth—I want to make as few outbound connections from a compromised system as possible. With a Pivot Listener—I can generate Cobalt Strike EXEs and DLLs that tunnel through an existing session. This is very powerful. Once the listener is set up, I just use it without having to recall the details behind it.
Cobalt Strike’s Listeners also setup stage encoding for Windows payloads as well. Once you get code execution, the stub of code sent with the attack downloads the rest of the payload to inject into memory. This transaction is easy to catch as the downloaded payload is a DLL with a little bootstrap code prepended to it. For nearly a year now, Cobalt Strike’s Listeners have helped users avoid detection by setting up stage encoding for them.
Listeners also make it possible to enjoy a wider variety of Metasploit Framework payloads. For example, if I want to do callbacks over IPv6, I can configure an IPv6 listener and provide it the right LHOST once. I don’t have to remember my IPv6 address every time I set LHOST. Cobalt Strike’s Listener keeps track of this information for me.
Listeners make Cobalt Strike redirector friendly too. A redirector is a server with iptables rules or port forwarding software that sends traffic to your attack server. Once you have redirector infrastructure setup—you can create Cobalt Strike listeners that call home to it. Redirectors are a way to obfuscate the true location of your attack server. You may assign a different redirector to each listener you create. After this initial setup, it just works. Cobalt Strike’s Beacon payload may also stage through a redirector and call home through multiple redirectors.
One danger with an abstraction, like Cobalt Strike’s listeners, is that they hide some output and information from you. Cobalt Strike mitigates this by making it possible for you to watch the output of any Metasploit Framework handler managed this way. Go to Cobalt Strike -> Listeners, right-click the listener, and choose Debug. Cobalt Strike will stop the handler and start it again in its own console. Through this console, you may see all output associated with that handler.
Listeners are the glue that holds Cobalt Strike together. They allow seamless cooperation between team servers, use of redirectors, and they save you and your team the trouble of remembering the configuration information for these shared assets.
User Account Control – What Penetration Testers Should Know
UAC is User Account Control. Introduced in Windows Vista, UAC is a collection of technologies that make it convenient possible to use Windows without administrator privileges and elevate your rights when needed. UAC has a lot of moving parts and encompasses a lot of things.
This post focuses on Windows Integrity levels and UAC elevation prompts. I will first explain some UAC concepts and then dive into three attacks to get past UAC.
Process Integrity Levels
In Windows Vista and later, processes run at three different levels of integrity: high, medium, and low. A high integrity process has administrator rights. A medium integrity process is one that runs with standard user rights. A low integrity process is very restricted.
A low integrity process can not write to the registry and it’s limited from writing to most locations in the current user’s profile. Protected Mode Internet Explorer runs with low integrity. The idea is to limit the amount of damage an attacker may do if they exploit the browser.
Most desktop applications run in a medium integrity process, even if the current user is a local administrator. Use Process Explorer to see which Integrity level your programs are running at.
UAC Settings
To perform a privileged action, a program must run another program and request the high integrity level at that time. If the user is an administrator, what happens next will depend on their UAC settings. There are four UAC settings:
Always Notify. This setting is the highest UAC setting. It will prompt the user when any program, including a built-in Windows program wants higher privileges.
Notify me only when programs try to make changes to my computer. This is the default UAC setting. This setting does not prompt the user when some built-in Windows program want higher privileges. It will prompt the user when any other program wants higher privileges. This distinction is important and it plays into the UAC bypass attack that we will cover in a moment.
Notify me only when programs try to make changes to my computer (do not dim my desktop). This is the same as the default setting, except the user’s desktop does not dim when the UAC elevation prompt comes up. This setting exists for computers that lack the computing power to dim the desktop and show a dialog on top of it.
Never notify. This option takes us back to life before Windows Vista. On Windows 7, if a user is an administrator, all of their programs will run with high integrity. On Windows 8, programs run at the medium integrity level, but anything run by an Administrator that requests elevated rights gets them without a prompt.
If the user is not an administrator, they will see a prompt that asks for the username and password of a privileged user when a program tries to elevate. Microsoft calls this “over the shoulder” elevation as someone is, presumably, standing over the shoulder of the user and typing in their password. If the UAC settings are set to Never Notify, the system will automatically deny any requests to elevate.
Who Am I?
When I get a foothold from a client-side attack, I have a few questions I like to answer right away. First, I like to know which user I’m currently executing code as. Second, I like to know which rights I have. With UAC this becomes especially complicated.
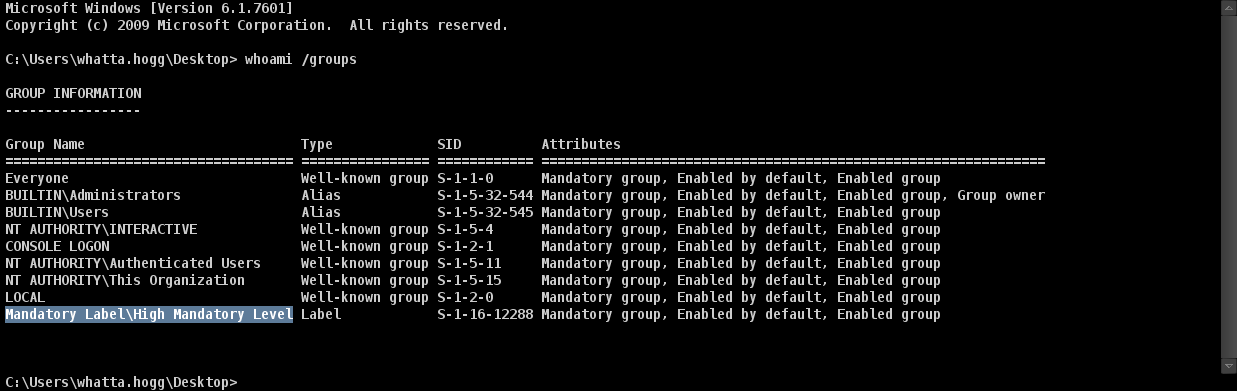
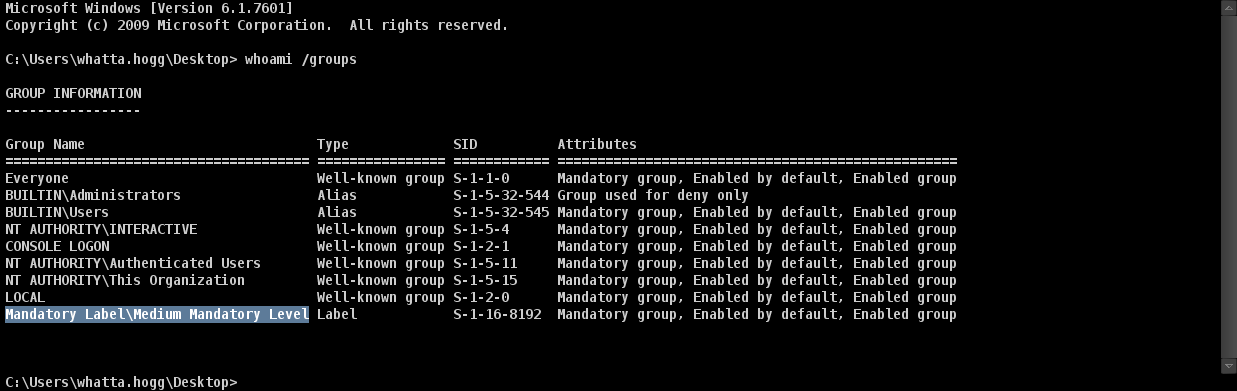
One way I like to sort myself out is with the Windows command: whoami /groups.
This command will print which groups my current user belongs to.
This command will also print which integrity level my command ran with. If my command ran in a high integrity context, I will see the group Mandatory Label\High Mandatory Level. This means I have administrator rights.
If my command ran in a medium integrity context, I will see the group Mandatory Label\Medium Mandatory Level. This means I have standard user rights.
RunAs
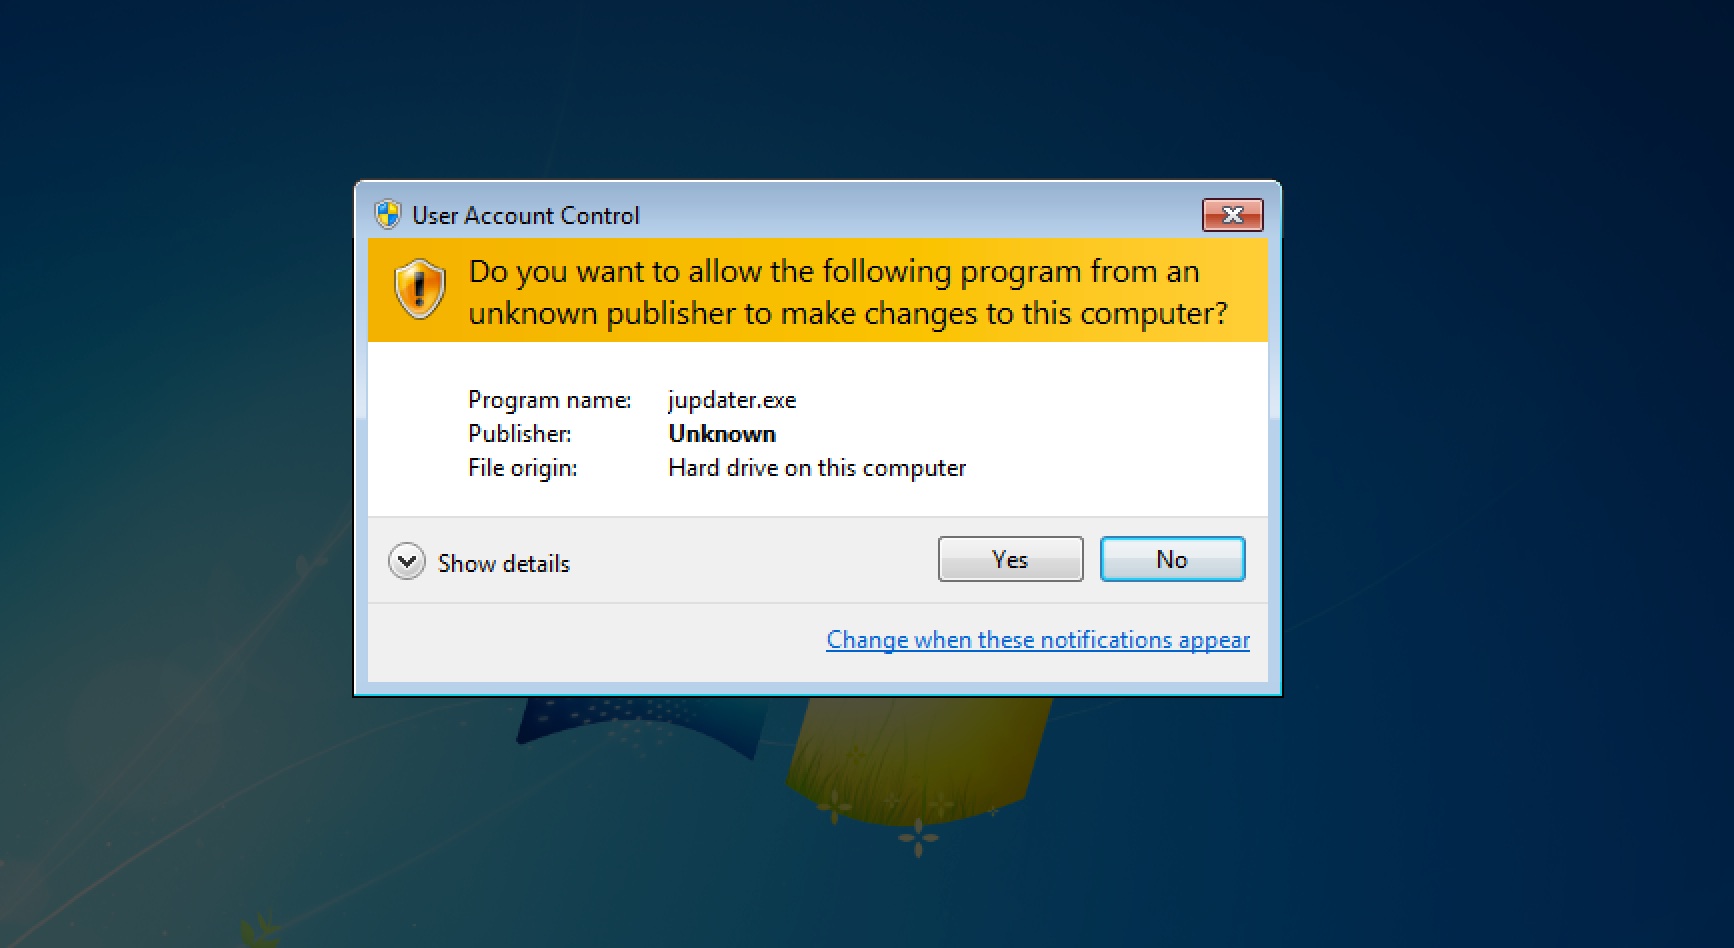
If I find myself in a medium integrity process run by a user in an administrators group, there is potential to elevate from standard user rights to administrator user rights. One option is to use the ShellExecute function with the runas verb. This will run a program and request elevated rights.
If UAC is set to anything other than Never Notify, the user will see a prompt that asks them if they would like to allow the action to happen. This is not completely implausible. Oracle’s Java Updater randomly prompts me all of the time.
The Metasploit Framework’s exploit/windows/local/ask module by mubix implements this attack for you. Make sure you set EXE::Custom to avoid anti-virus!
If the user accepts the prompt, the system will run my program in a high integrity context. Remember, medium integrity is standard user rights. High integrity is administrator rights and this is what we’re after.
Bypass UAC
The RunAs option prompts the user and that’s an opportunity to get caught. We want a way to spawn a high integrity process from a medium integrity process without a prompt. Fortunately, there is a way to do this, it’s the bypass UAC attack.
The bypass UAC attack requires that UAC is set to the default Notify me only when programs try to make changes to my computer. If UAC is set to Always Notify, this attack will not work. This attack also requires that our current user is in an administrators group.
Bypass UAC: How It Works
This is a fascinating attack whose inner workings are taken for granted. Please allow me the blog space to describe it in depth:
Our story starts with COM, the Component Object Model in Windows. COM is a way of writing components that other programs may use and re-use. One of the benefits of COM is that it’s language neutral. I find it extremely complicated and unappealing to work with. I suspect others share my feelings.
Some COM objects automatically elevate themselves to a high integrity context when run from a program signed with Microsoft’s code signing certificate. If the same COM object is instantiated from a program that was not signed by Microsoft, it runs with the same integrity as the current process.
The COM distinction between Microsoft and non-Microsoft programs has little meaning though. I can’t create a COM object in a high integrity context because my programs are not signed with Microsoft’s certificate. I can spawn a Microsoft-signed program (e.g., notepad.exe) and inject a DLL into it though. From this DLL, I may instantiate a self-elevating COM object of my choice. When this COM object performs an action, it will do so from a high integrity context.
Leo’s Bypass UAC attack creates an instance of the IFileOperation COM object. This object has methods to copy and delete files on the system. Run from a high integrity context, this object allows us to perform a privileged file copy to any location on the system.
We’re not done yet! We need to go from a privileged file copy to code execution in a high integrity process. Before we can make this leap, I need to discuss another Windows 7 fun fact.
Earlier, we went over the different UAC settings. The default UAC setting will not prompt the user when some built-in Windows programs try to elevate themselves. More practically, this means that some built-in Windows programs always run in a high integrity context.
These programs that automatically elevate have a few properties. They are signed with Microsoft’s code signing certificate. They are located in a “secure” folder (e.g., c:\windows\system32). And, they request the right to autoElevate in their manifest.
We can find which programs autoElevate themselves with a little strings magic:
cd c:\windows\
strings –s *.exe | findstr /i autoelevate
Now, we know which programs automatically run in a high integrity context AND we have the ability to perform an arbitrary copy on the file system. How do we get code execution?
We get code execution through DLL search order hijacking. The public versions of the bypass UAC attack copy a CRYPTBASE.dll file to c:\windows\system32\sysprep and run c:\windows\system32\sysprep.exe. When sysprep.exe runs it will search for CRYPTBASE.dll and find the malicious one first.
Because sysprep.exe automatically runs in a high integrity context (when UAC is set to default), the code in the attacker controlled CRYPTBASE.dll will execute in this high integrity context too. From there, we’re free to do whatever we like. We have our administrator privileges.
Holy Forensic Artifacts Batman!
I mentioned earlier that the Metasploit Framework’s bypassuac module uses Leo Davidson’s proof-of-concept. This module drops several files to disk. It uses Leo’s bypassuac-x86.exe (and bypassuac-x64.exe) to perform the privileged file copy from a medium integrity context. It also drops a CRYPTBASE.dll file to disk and the executable we want to run.
This module, when run, also creates a tior.exe and several w7e_*.tmp files in the user’s temp folder. I have no idea what the purpose of these files are.
When you use this module, you control the executable to run through the EXE::Custom option. The other artifacts are put on disk without obfuscation. For a long time, these other artifacts were caught by anti-virus products. A recent commit to the Metasploit Framework strips several debug and logging messages from these artifacts. This helps them get past the ire of anti-virus, for now.
A better approach is to use a module that has as little on-disk footprint as possible. Fortunately, Metasploit contributor Ben Campbell (aka Meatballs) is here to save the day. A recent addition to the Metasploit Framework is the exploit/windows/local/bypassuac_inject module. This module compiles the UAC bypass logic into a reflective DLL. It spawns a Microsoft-signed program and injects the UAC bypass logic directly into it. The only thing that needs to touch disk is the CRYPTBASE.dll file.
Bypass UAC on Windows 8.1
In this post, I’ve focused heavily on Windows 7. Leo’s proof-of-concept and the bypassuac modules in the Metasploit Framework do not work on Windows 8.1. This is because the DLL hijacking opportunity against sysprep.exe does not work in Windows 8.1. The Bypass UAC attack is still possible though.
A few releases ago, I added bypassuac to Cobalt Strike’s Beacon. I do not invest in short-term features, so I had to convince myself that this attack had a viable future. I audited all of the autoElevate programs on a stock Windows 8.1 to find another DLL hijacking opportunity. I had to find a program that would load my DLL before displaying anything to the user. There were quite a few false starts. In the end, I found my candidate.
Beacon’s Bypass UAC command is similar to Ben Campbell’s, it performs all of the UAC bypass logic in memory. Beacon’s UAC bypass also generates an anti-virus safe DLL from Cobalt Strike’s Artifact Kit. Beacon’s UAC bypass checks the system it’s running on too. If it’s Windows 7, Beacon uses sysprep.exe to get code execution in a high integrity context. If it’s Windows 8, it uses another opportunity.
If you’re having trouble with the alternatives, Beacon’s version of this attack is an option.
Bypass UAC on Windows Vista
The Bypass UAC attack does not work on Windows Vista. In Windows Vista, the user has to acknowledge every privileged action. This is the same as the Always Notify option in Windows 7 and later. The UAC settings in Windows 7 came about because UAC became a symbol of what was “wrong” with Windows Vista. Microsoft created UAC settings and made some of their built-in programs auto-elevate by default to prompt the user less often. These changes for user convenience created the loophole described in this post.
Lateral Movement and UAC
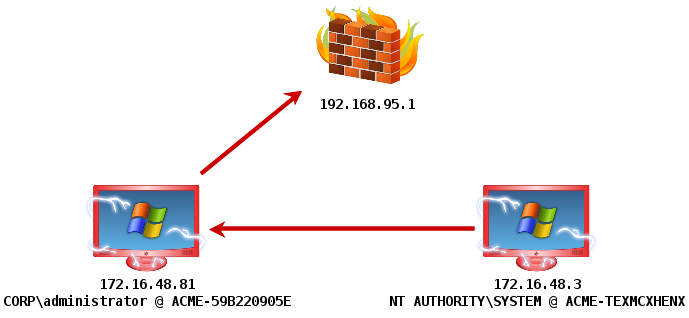
The concept of process integrity level only applies to the current system. When you interact with a network resource, your access token is all that matters. If your current user is a domain user and your domain user is a local administrator on another system, you can get past UAC. Here’s how this works:
You may use your token to interact with another system as an administrator. This means you may copy an executable to that other system and schedule it to run. If you get access to another system this way, you may repeat the same process to regain access to your current system with full rights.
You may use the Metasploit Framework’s exploit/windows/local/current_user_psexec to do this.
Summary
These UAC bypass attacks are among my favorite hacker techniques. They’re a favorite because they take advantage of a design loophole rather than a fixed-with-the-next-update memory corruption flaw. In theory, we will have these attacks for a long time.
I’m writing this from a New Hampshire Bed and Breakfast where I’ve apparently received the Jacuzzi suite. I’m here for a romantic weekend running psexec and managing Beacons inside of student networks for the North East Collegiate Cyber Defense Competition event. This is my seventh year with this event.
I made a lot of development progress early into my recent development cycle and I like to show up with my latest stuff, so everyone gets a Cobalt Strike update today. This release polishes the Cobalt Strike user experience and it adds a few features CCDC red teams will find very useful.
Export Staged Beacon Artifacts
You may now export an executable, service executable, 32-bit DLL, or 64-bit DLL with a fully staged Beacon. These fully staged artifacts are generated by Cobalt Strike’s Artifact Kit for anti-virus evasion.
This feature is a big win for stealthy lateral movement. Now you can copy SMB Beacon [the whole thing!] to a target host, schedule it to run, and link to it from another Beacon. This allows you to gain control of a system and control it over the SMB protocol only. You can do these things without ever lowering Beacon’s sleep time to something that could get caught.
A complete artifact is also an ideal candidate for persistence. Beacon is designed to call home to multiple sites. If one address doesn’t work, Beacon will try another one. If there’s an error, Beacon gracefully recovers from it and tries again. These are traits you want in a persistent agent.
Beacons don’t always have to call out though. Export an SMB Beacon and persist it on a host. So long as port 445 is open, you can link to that Beacon over an SMB named pipe. SMB Beacon is the perfect bind backdoor for Windows.
Timestomp
Beacon now includes its own timestomp command. This command will match the Modified, Accessed, and Created times for one file to another.
Cleaning House
This release also benefits from a thorough scrub of Cobalt Strike’s codebase. This cleansing changes how Cobalt Strike waits for results when it calls into the team server or requests information from the user. Now, in most cases, these actions will not block any other actions from taking place. The result is a snappier and more robust Cobalt Strike client. You will also notice that Cobalt Strike is better with large file transfers to and from the team server and that it also responds to disconnections better.
If you’re a Cobalt Strike license holder, use the built-in update program to get the latest. A 21 day trial of Cobalt Strike is also available.
CCDC Red Teams: Ten Tips to Maximize Success
The CCDC season is upon us. This is the time of year when professionals with many years of industry experience “volunteer” to hack against college students who must defend computer networks riddled with security holes.
For the second year, my company is making Cobalt Strike available to members of the National CCDC and Regional CCDC red teams. In this post, I’d like to share a few tips for red team members who plan to use Cobalt Strike at their event.
0x01: Learn how to use Cobalt Strike
Most offensive security professionals are instantly productive with Cobalt Strike. It leverages the Metasploit Framework, which most CCDC red teamers have had some exposure to. Cobalt Strike builds on Armitage which has a positive reputation for ease of use.
These things are deceptive though. Cobalt Strike is built for power users and it has a lot of depth. To get the most from the tool, it really requires some time spent to learn how to use it. You could stop reading now and sum up this post as “read the manual” and “learn to use the tool” before hand.
I publish all of my company’s training, for free, on the Cobalt Strike website. This is a great way to get a start with the tool. I will also mail a DVD with penetration testing labs to any CCDC red team member that asks for one (the announcement sent to the red teams has the link to request one).
0x02: Have a persistence strategy
Cobalt Strike does not ship with a persistence kit. Once you get on a system, you will need a strategy to fortify your access. If you do not persist, students will kick you out with the next reboot and likely, you’ll find it hard or impossible to get back in.
Good persistence is hard. It’s easy to make a mistake with a persistence mechanism. If you persist in a way that does not work, expect to spend most of your CCDC event without access.
Cobalt Strike’s scripting language, Cortana, is an opportunity to automate your persistence. This is a task that also makes sense for a local Metasploit module. Either way you go–make sure you prepare and test something before the event. Dirty Red Team Tricks I and II at DerbyCon both address past persistence strategies for CCDC.
0x03: Learn to use Beacon
Beacon is the star feature in Cobalt Strike. I built it to provide a low and slow lifeline to spawn Meterpreter sessions, as needed. It’s grown far beyond this original task. You can use Beacon to pivot into a network, to conduct post-exploitation on a host, and even as a named-pipe backdoor that you can use and re-use at will.
Spawning new sessions with Beacon is easy. Someone who has never seen Cobalt Strike or Beacon can understand how to do it after thirty seconds of training. The other use cases are power user features and require time spent with the tool and its documentation to take advantage of. Imagine sitting in front of a meterpreter> prompt for the first time. How to get the most out of the tool isn’t intuitive. It’s the same with Beacon.
0x04: Learn to Setup Beacon Infrastructure
Beacon is a multi-protocol remote access tool. It speaks HTTP, DNS A records, DNS TXT records, and it talks over SMB named pipes. There’s a time and place for each of these features (or they wouldn’t exist). If you use Beacon to egress a compromised network, you will want to set up infrastructure to receive your connections.
Let’s start with Beacon’s HTTP mode. Sure, you can configure Beacon to call home to your IP address. A few clicks and it’s setup. If you want to make your Beacon resilient to blocks and harder to detect–you will want it to call home to multiple IP addresses. In a CCDC environment, you can bind multiple IP addresses to a system and tell Beacon to use them. If your event has internet access, you can set up “redirectors” in Amazon’s EC2 to act as a proxy between your Cobalt Strike system and your blue networks. Either way, multiple addresses are a must.
DNS Beacon requires some setup as well. You need to own several domains and understand DNS well enough to delegate these domains or sub-domains to your Cobalt Strike system. DNS Beacon also has its nuances. By default, it stages over HTTP, but it is also possible to stage DNS Beacon over (go figure) DNS. The Beacon lecture in the Tradecraft course dives deep into how to set this up.
DNS Beacon is amazing for long-haul low and slow command and control. It’s very survivable and few blue teams look for abuse of DNS. If you’re not using this, you’re missing out on a great tool to challenge the strongest blue teams.
0x05: Plan an opening salvo
The best time to get access at a CCDC event is in the beginning, when the systems are most vulnerable. I don’t pre-script an opening salvo anymore. I do it by hand. Here’s my process to hook all Windows systems:
I run a quick nmap scan for port 445 only. I do db_nmap –sV –O –T4 –min-hostgroup 96 –p 445 [student ranges here]. I have this command pasted into a window and I press enter the moment I hear the word go.
Once the scan complete I highlight all hosts in the Cobalt Strike table view (Ctrl+A). If I know the default credentials, I launch psexec against all of the hosts.
If I don’t know the default credentials, I launch ms08_067_netapi. Once I get my first session, I run mimikatz to get the default credentials and I launch psexec against all of the hosts again.
These steps are simple enough that I can do them by hand. Doing these steps by hand also gives me flexibility to adapt, if I quickly notice something isn’t working.
I recommend that the red team lead designate someone to go through these steps. This same person should have a script ready to install persistence on the Windows hosts that they get access too. Ideally, you should have a similar process for the *NIX side too.
0x06: Decide how you want to organize your red team
What kind of experience do you want the students to get at your CCDC event? This question will drive how you organize your red team.
Do you want the students to experience a variety of attacks against all aspects of the networks they must defend? If so, I would organize your red team by function. Have a team that’s going after websites. Have a team that’s attacking Windows systems. Have another team that’s attacking wireless stuff.
Do you want the students to gain experience hunting a well embedded adversary? I would split your red team up into cells that each focus on an individual blue team. These teams will focus on maintaining access to blue systems and, in sync with the other cells, occasionally causing something catastrophic to happen (e.g., putting customer credit card information on the company’s website).
This model works well when each red cell has the support of one global cell in charge of an opening salvo and persistence. This way all teams are compromised the same way and each cell has a fallback to regain access to a network if they need it.
This model also solves another critical issue: feedback. If two red team members focus on one blue team, they will become an expert in that team’s strengths and weaknesses. At the end of the event, you can send your red team members out to their blue team for a very educational dialog.
It’s important to have a model in mind. Without a model, the red team will devolve into organized chaos with ad-hoc cells chasing targets of opportunity rather than deliberate actions that create educational value for the students.
0x07: Build infrastructure to support your red team’s organization
Once you decide how you will organize your red team, make sure you have infrastructure setup to support it. Cobalt Strike’s team servers are a convenient way to share access to systems and networks. This isn’t the whole picture though.
Your team will need a way to exchange information in real-time. Cobalt Strike’s team server has a chatroom, but in all the events I go to, I have never seen the Cobalt Strike (or Armitage) chatroom become the primary place to exchange information. IRC and Etherpad both work well for this purpose.
When you setup Cobalt Strike’s team servers, make sure you have enough to support your model. If you choose to organize your red team into cells that each focus on a blue team, have one team server per blue team. Also, provide your global access management team with two team servers to manage persistent Beacons through.
Whatever you do, do not run all red team activity through one team server.
0x08: Have a backup plan for persistence
I mentioned earlier that you should have a persistence plan. Whatever your plan is, it probably isn’t enough. Create a backup persistence plan. It’s dangerous to rely on one tool or method to stay inside of ten very closely watched networks.
I like configuration backdoors for persistence, a lot. These backdoors work, especially well, if you never have to use them. If you don’t use something, a blue team doesn’t get a hint that leads them to it.
If someone on your team is familiar with another persistent agent (or they wrote one)–move them to the persistence/access management cell and have them manage it for all of the blue teams.
A persistence plan that consists of Beacon, a few choice configuration changes, and an alternate agent is very robust.
0x09: Learn to pass sessions and connect to multiple servers
One Cobalt Strike client can connect to multiple team servers. Switching between active servers is easy. When the client tries to pass a session or task a Beacon, it sees listeners from all of the servers it has a connection to.
This simple concept makes it possible for cells on a red team to overlap and work with each other. For example, let’s say my job is access management and persistence. I have low and slow Beacons for all Windows systems at my disposal. If a cell needs a session from me, I connect to their team server (or perhaps, I was already on it) and I simply task the appropriate Beacons to send a session to the listener that they setup. That’s it.
Tradecraft, lecture 9, talks about the mechanics of session passing and distributed ops in detail.
0x0A: Learn how to interoperate between Cobalt Strike and non-Cobalt Strike users
If you run a red team–I do not recommend that you force-feed one toolset to your team. If you want to do this, do it with a toolset other than mine. It’s possible to derive 95% of Cobalt Strike’s sharing and distribution benefits–even if some red teamers don’t use Cobalt Strike.
To share network footholds, become familiar with how to set up a Metasploit and Beacon SOCKS server. These SOCKS servers will allow someone else on your red team to tunnel their tools into your network. They can do it through the Proxies option in Metasploit or with the proxychains command on Linux.
You may also pass accesses to another Metasploit user with great ease. The way to do this is hacky, but it works. Create a dummy team server and connect to it. On this team server, create listeners with host, port, and payload values that match payload handlers that your other teammates use. The team server will start a handler for the listener you define, but, when you task it–the session will go to the teammate not using Cobalt Strike.
The Key Ingredients
Despite the joke in the opening paragraph, CCDC is hard. It’s easy to get into networks early on. It’s hard to stay in those networks and challenge the student teams throughout the event.
In this post, I brought up a number of things to consider for red team success at a CCDC event. With or without Cobalt Strike, a successful engagement requires a strategy and an active commitment to prepare for and follow through on that strategy. I hope these tips will help you prepare for your event.
Good luck!
Cobalt Strike 02.27.14 - Details Matter
Cobalt Strike 1.48 (02.27.14) is now available. This release is the byproduct of a very intense development cycle. The theme of this release is: details matter. Read on for a sense of what I mean by this.
Pivot Listeners
This Cobalt Strike update introduces pivot listeners. A pivot listener is a handler for a reverse payload that stages and tunnels through an existing Meterpreter session.
Because Cobalt Strike is built for targeted attacks, I always assume that my users are external to their target’s network. One way to keep a low profile is to limit how many connections you make to your command and control infrastructure. Unfortunately, a lot of post-exploitation actions you take will require a new session. Privilege escalation and lateral movement are prime examples.
A pivot listener allows you to spawn sessions through an existing Meterpreter session. Pivot listeners work anywhere you would use a normal Cobalt Strike listener. This gives you a way to limit your post-exploitation activity to one channel out of your target’s network.
Stager Tweaks
A topic that is near and dear to my heart is egress filtering. Cobalt Strike now uses a custom HTTP stager to deliver its Beacon. This custom stager takes steps to disguise itself as Internet Explorer. The native Metasploit Framework stager sends a blank User-Agent which is an opportunity for a proxy server to stop you or a defense team to catch you.
If you can get Beacon on a system, you’re just one step away from Meterpreter. Type ‘meterpreter’ and Beacon will act as a tunnel to stage and communicate with your session. Beacon’s ‘meterpreter’ command now uses a custom stager that avoids a popup from the Windows firewall.
Token Stealing and Privilege Escalation
This release also adds token stealing to Cobalt Strike’s Beacon payload. The usual repertoire of getuid, rev2self, and steal_token are present. The ability to steal tokens is key for lateral movement.
Before you can steal tokens, you need the ability to escalate your privileges. I’ve added getsystem to go from an administrator user to SYSTEM on a box, through Beacon.
UAC Bypass
Speaking of privilege escalation, this release adds bypassuac to Beacon as well. This command spawns a session in a process with elevated rights. This privilege escalation technique takes advantage of a loophole in the default UAC settings on Windows 7 and later. This command will not work if the current user is not in the Administrators group or if UAC is set to its highest setting.
The UAC Bypass attack has several steps to it. The last step is to get code execution through DLL search order hijacking of a program that automatically elevates itself to full rights. The public versions of this attack rely on a hijacking opportunity that works in Windows 7 only. Beacon’s UAC bypass uses different opportunities for Windows 7 and Windows 8.
Beacon’s UAC Bypass is also evasion friendly. The one DLL it drops to disk is made by Cobalt Strike’s Artifact Kit. All other UAC bypass logic happens in memory. And yes, the UAC Bypass cleans up after itself.
Details matter
Tools that succeed in production have to pay attention to details. Sometimes, new research makes it into Cobalt Strike. Other times, the work in this product is on the details. The small stuff that makes a big difference when you’re on an engagement.
You can grab a 21-day trial of Cobalt Strike. Licensed users should use the update program to get the latest. Consult the release notes file for a full list of changes.