Talk to your children about Payload Staging

Time to time, I find myself in an email exchange about payload security and payload staging. The payload security discussion revolves around Beacon’s security features. Once it is running on target, Beacon takes steps to authenticate its controller and establish a session-specific key to decrypt tasks and encrypt output. I discuss these security features at the end of the Infrastructure lecture in Advanced Threat Tactics. Questions on this topic are usually easy to field.

Payload Staging is a different animal though. Payload Stagers are tiny programs that connect to a controller, download a payload, and run it. Payload Staging is helpful to pair large payloads (e.g., Beacon, Meterpreter, etc.) with attacks that have size constraints. The payload stagers in Cobalt Strike do not authenticate the controller or verify the payload they download. Questions on this topic usually spawn discussion.

In this post, I’ll explain why Cobalt Strike’s stagers are the way they are. I’ll also discuss ways you can adapt your use of Cobalt Strike to limit payload staging over a hostile network.

The Threat Model

People who ask questions about staging and payload security have a threat model in mind. They assume that there is an actor present in the communication path between their targets and their Cobalt Strike controller. They also assume that this actor has the ability to observe and manipulate data that traverses this communication path.

This is a fair assumption. A traceroute between a target system and an externally hosted Cobalt Strike team server will yield many systems that you and your customer do not control.

A malicious actor, present in your payload communication path, could man-in-the-middle the staging process and deliver their payload stage to your target. This would give the malicious actor access to your target. That’s no good!

A payload stager could mitigate this problem in one of two ways. The stager could authenticate the server that hosts the stage. Or, the stager might take steps to verify that the stage it receives is the one you intended to send.

Simple enough. Why don’t Cobalt Strike’s stagers authenticate their controllers or verify the payload stage after staging completes? Let’s discuss that.

Size Matters

My first excuse to deflect this discussion is size. The larger a payload stager becomes, the fewer attacks you can use it with. This limits our ability to stick security features into a payload stager.

The above statement is true, but the excuse is somewhat thin with my product. Why? Cobalt Strike isn’t an exploit development framework. Cobalt Strike does have size constrained attack vectors, but the size constraints I deal with are nothing like what you’d see in an unforgiving memory corruption exploit.

Ok, if that’s all true, then why does Cobalt Strike use small stagers with no security features? Cobalt Strike uses these stagers to stay compatible with the Metasploit Framework. Remember, until 3.0, Cobalt Strike was a collection of features built on top of the Metasploit Framework. The easiest way to make Beacon work with the Metasploit Framework’s exploits and modules was to stay compatible with the Metasploit Framework’s staging process.

Even with Cobalt Strike as a separate platform, this compatibility with the Metasploit Framework has its benefits. For example, it’s quite easy to use a Metasploit Framework exploit to deliver a Cobalt Strike Beacon payload. Just set PAYLOAD to a Meterpreter payload that uses the same stager, point LHOST/LPORT at Cobalt Strike, and fire away!

The Chicken and the Egg

You may not buy the size excuse, that’s fine. Earlier, I mentioned that the purpose of payload staging is to pair a large payload with a size-constrained attack. Let’s assume that we have a stager with amazing security features. Let’s also assume that this attack is a file that the target downloads from your controller.

To reach your target, the attack with your secure stager must travel over a potentially hostile network. If we apply the same threat model to the attack delivery process, we find ourselves in a hopeless position. The attacker might choose to replace our secure stager in the attack with another stager that acts according to their wishes. We lose anyways.

This is the chicken and the egg problem. If we can’t securely deliver the stager that securely downloads our payload, then how can we trust the stager?

Sometimes there’s a Chicken. Let’s protect the Egg.

If you’ve read this far, you might feel the discussion is getting a little academic. Sure, if an attacker is at the vantage point where they can manipulate the stager, then all bets are off. There are situations where the “chicken and the egg” assumptions don’t apply.

Many of my customers work assume breach engagements. These engagements focus on the target’s detection and response capability, not their patch management or phishing awareness. In an assume breach engagement, the red team is often given a foothold to work from. It’s quite feasible to deliver an attack package over a channel that bypasses our hostile network described above.

If the red team’s foothold was setup in a secure way AND the red team’s payload is up to the task, then we can assume the red team has a safe channel to work with. In this case, the chicken and the egg problem doesn’t apply. The open question is, if these assumptions are in play, what are the best ways to operate with less staging risk? Let’s dig into that.

HOWTO: Reduce Network Staging in Your Operations

Last week, I wrote a blog post about stageless payloads and discussed why you might find this feature valuable. I mentioned that stageless payloads are attractive when the risks of payload staging are not acceptable to your organization. Here’s why: A stageless payload artifact contains Cobalt Strike’s Beacon payload and its configuration in one file. Stageless payloads don’t use stagers. If you can securely deliver and run a stageless payload artifact on your target, you benefit from Beacon’s security features right away.

Access

In assume breach engagements, use a stageless payload artifact to seed your foothold. Attacks -> Packages -> Windows EXE (S) exports a stageless payload artifact. Cobalt Strike has several stageless payload artifact options. You can export Beacon as an executable, a DLL, a service executable, a PowerShell script, or shellcode. One of these options is bound to work for your target. Once a stageless Beacon is on target, you have a (presumably) secure channel to work with.

Staging isn’t just initial access though. Staging is a very convenient tactic and it’s present in many post-exploitation workflows. Multiple toolsets use staging in their session passing, privilege escalation, and lateral movement workflows. With some adjustments, it’s possible to perform these actions without staging a payload over a hostile network.

Session Passing

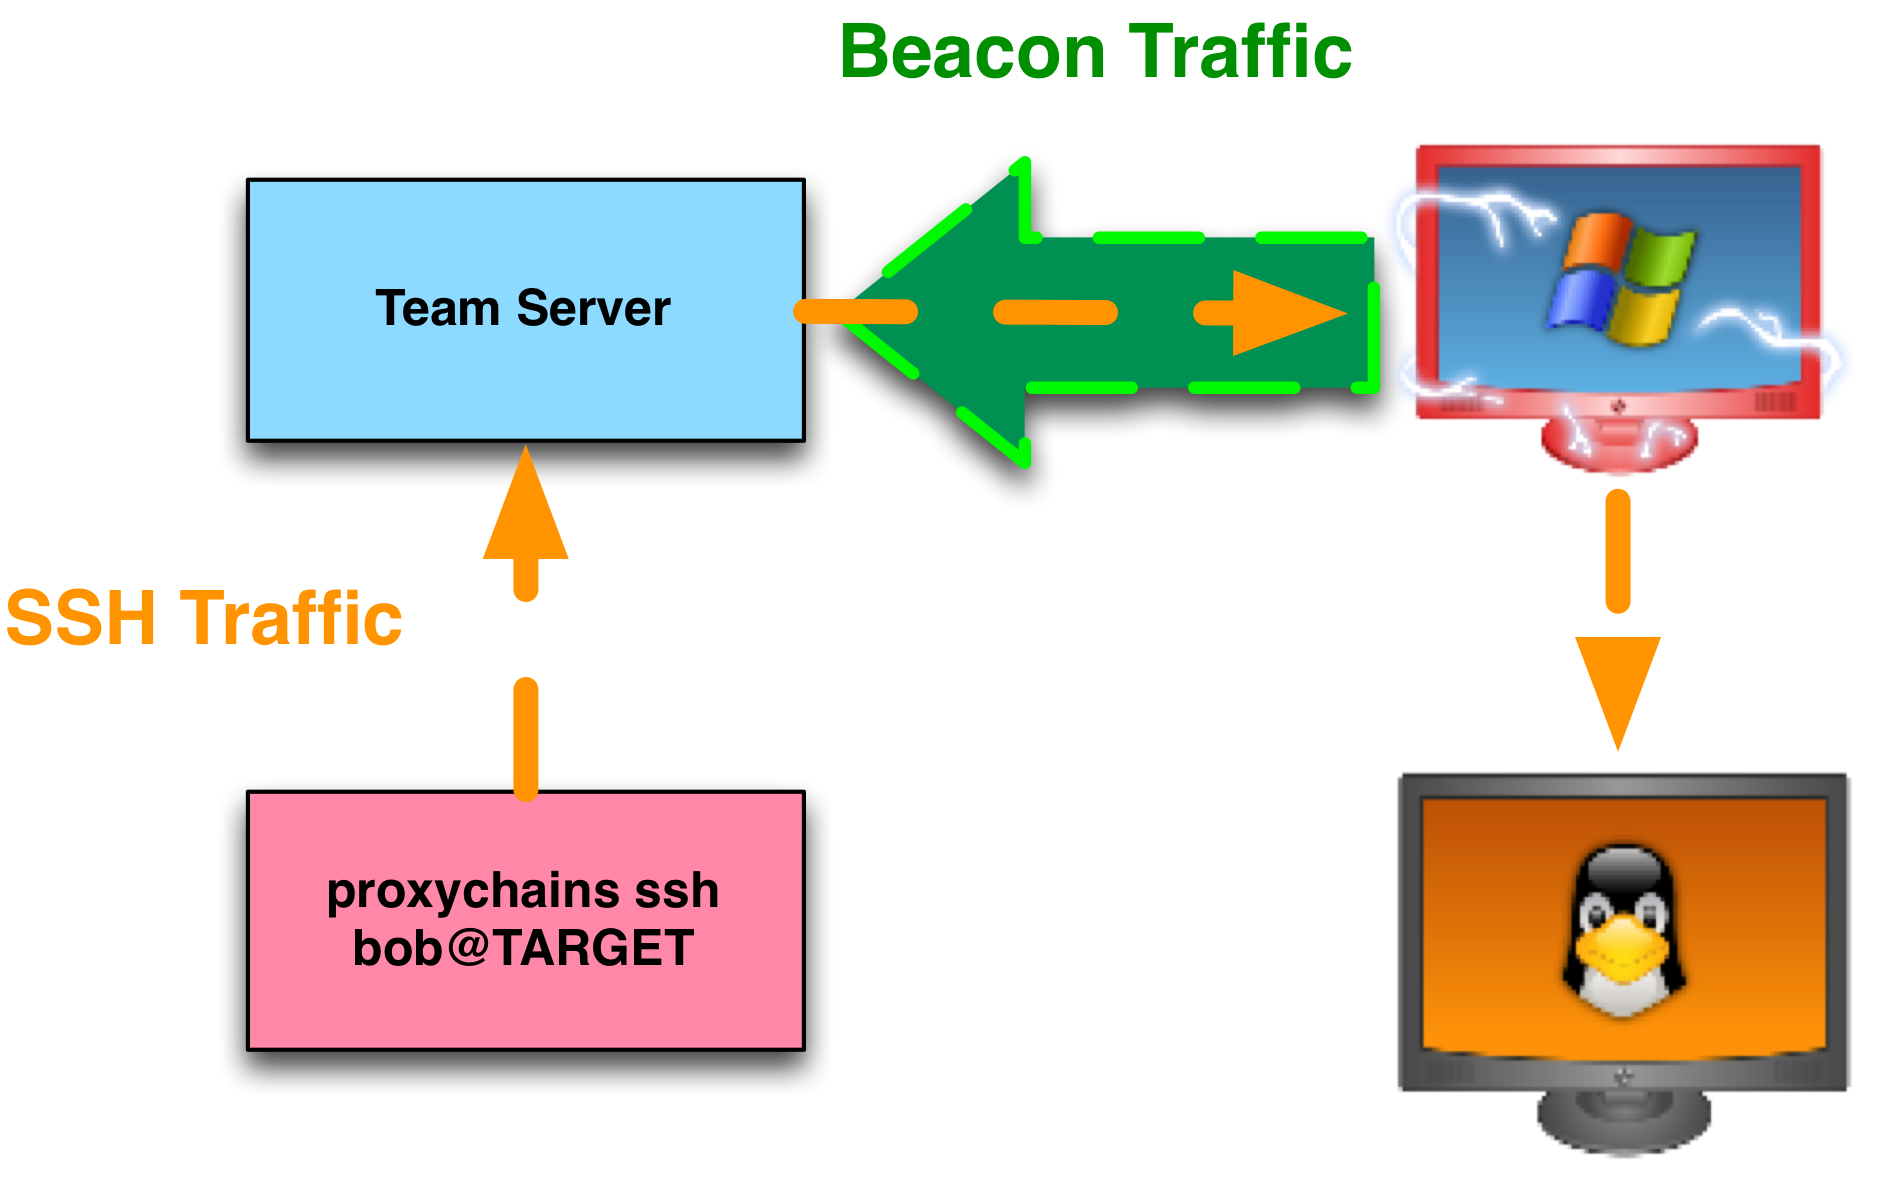
Let’s start with session passing. This tactic is a way to use an active payload to spawn another payload. Beacon’s spawn and inject commands are designed to pass sessions via stagers. It’s possible to pass sessions in Cobalt Strike without staging. Go to Attacks -> Packages -> Windows EXE (S) and export a raw stageless payload artifact. This file is essentially a large-blob of shellcode that contains the Beacon payload. Use the shinject command in Beacon to inject this shellcode into a process and run it. You can export and use shinject with the x86 and x64 raw stageless payload output.

Privilege Escalation

What about privilege escalation? Beacon’s elevate, spawnas, and bypassuac commands target a listener. These commands do not have alternatives to work with a stageless payload artifact. How do we avoid the risks of staging an elevated payload over a hostile network? Create a listener for Cobalt Strike’s SMB Beacon payload. For actions on the local target, this payload will use a stager that sets up a listening socket bound to localhost. The Beacon, running on the target, will then connect to that stager’s listening socket, send the payload stage, and the stager will clean itself up and run the stage. The stager and the stage communicate through Beacon’s existing communication channel. If you’re worried about the risks of staging an elevated payload over a hostile network, this is one way to work. Bonus: the SMB Beacon is the preferred payload to use with Beacon’s privilege escalation features anyways.

Be aware, there is a potential race if an adversary is co-habitating with you. An adversary, on the same system, might connect to the stager socket first and elevate their payload instead of yours. This isn’t part of the original threat model that provoked this discussion. 🙂

What about privilege escalation based on misconfigurations? For example, you might find that you have an opportunity to elevate via a service with weak permissions. One way to take advantage of this is to drop a service executable to disk, reconfigure the service, and start it with your executable. How do you avoid staging in this case? Use a stageless windows service exe artifact.

Lateral Movement

How about lateral movement? You have options here too. Cobalt Strike’s psexec, psexec_psh, winrm, and wmi commands each depend on payload stagers. That said, you do not have to use this built-in automation for lateral movement. I do most of my lateral movement by exporting a stageless payload artifact, dropping it to an intermediate session, and using built-in Windows capability to copy the artifact to my target and run it. This plays very well with Cobalt Strike’s ability to steal tokens and create tokens from various types of credential material.

What are options to run a payload on a remote system? Look at PowerShell’s Invoke-Command, wmic, sc, schtasks, and at. There’s more, but this is a good starter set of options. I wrote a blog post with various lateral movement recipes a few years ago. The material is still relevant. If you use stageless payload artifacts for lateral movement, you can avoid staging a payload over a hostile network.

Update 8 December 2016

Cobalt Strike 3.5.1 added a host_stage option to Malleable C2. Set this option to false and Cobalt Strike will not host a public HTTP/HTTPS/DNS stage. This option will also remove HTTP/HTTPS/DNS stagers from Cobalt Strike’s workflows.

The Talk

Some of you will read this post and scratch your head. “What is Raphael talking about? I stage payloads all day long, and I like it”. The point of this post is twofold.

First, I hope to get you thinking about your tools, how they work, and the potential risk associated with that. This will allow you to evaluate the risk and make the best decision for your situation. You may decide that the one-off risks of payload staging are worth the benefits. That’s fine.

You may decide otherwise though. This gets to the second point. I have customers who care a great deal about this particular risk. They adjust their operations to work without it. This post is my opportunity to disseminate best practices for future and existing customers with this particular need. If this is you, I hope you found this post useful.

Epilogue: What about TLS Certificate Pinning?

This section doesn’t fit into the narrative of this post, but I field questions on this too:

Earlier, I mentioned that one way to add protection to the staging process is to authenticate the staging server. Last year, the Metasploit Framework gained an optional HTTPS stager that does this. This stager ships with the expected hash of the staging server’s SSL certificate. When the stager connects to the staging server, it checks the server’s SSL cert hash against the value it expects. If they don’t match, it doesn’t download and act on the payload. If they do, it assumes things are good. Pretty neat, right? Ignoring the chicken and the egg problem, this is a way to solve this problem for one protocol.

Occasionally, I get asked, “Raphael, why don’t you add this to Cobalt Strike?” While I think this technique is interesting, I don’t feel this is the right approach for Cobalt Strike. Here’s why:

This technique applies to only one protocol: HTTPS. The HTTPS Beacon isn’t as heavily used as other Beacon options. The HTTPS Beacon’s default self-signed certificate is likely to stick out like a sore thumb. It’s possible to bring a valid certificate into Cobalt Strike, but this is a barrier to fully benefiting from the HTTPS Beacon payload. My customers tend to rely on the HTTP Beacon much more. Thanks to Malleable C2 it’s easy to disguise your Cobalt Strike HTTP traffic to look like something innocuous. The HTTP Beacon isn’t “less secure” than the HTTPS Beacon either. After staging, Beacon’s payload security features are in effect, no matter which data transport you use. If I were to tackle the problem of secure staging, I’d rather focus on an implementation that is transport agnostic.

This verification technique relies on an API specific to WinHTTP. Windows has two APIs for easily making HTTP requests: WinHTTP and WinINet. The Beacon payload and its stagers use WinINet for communication. This is the preferred option for desktop applications. The Metasploit Framework offers the WinHTTP stager (with the verification option) and WinINet stagers with no verification built-in. The Metasploit Framework offers both options because there are certain types of proxy servers that the WinHTTP APIs don’t do well with. Consult The ins and outs of HTTP and HTTPS communications in Meterpreter and Metasploit Stagers for more on this. I don’t believe the benefits of this choose-the-right-stager-API approach outweigh the complexity it would add to Cobalt Strike. Again, this is an opinion specific to my product and user community.

What is a stageless payload artifact?

I’ve had a few questions about Cobalt Strike’s stageless payloads and how these compare to other payload varieties. In this blog post, I’ll explain stageless payloads and why you might prefer stageless payload artifacts in different situations.

What is payload staging?

A stageless payload artifact is an artifact [think executable, DLL, etc.] that runs a payload without staging. To understand stageless payloads, it helps to understand payload staging first.

Many of Cobalt Strike’s attacks and workflows deliver a payload as multiple stages. The first stage is called a stager. The stager is a very tiny program, often written in hand-optimized assembly, that: connects to Cobalt Strike, downloads the Beacon payload (also called the stage), and executes it.

The payload staging process exists for a reason. Staging makes it possible to deliver Beacon [or another payload] in an attack or artifact that has a size constraint. For example, several of Beacon’s lateral movement commands run a PowerShell one-liner to kick off the payload you specify. This PowerShell one-liner is limited to the maximum length of a Windows command + arguments. I can’t stuff a ~200KB payload stage into this space. A payload stager that is a few hundred bytes works just fine though.

What is a stageless payload artifact?

A stageless payload artifact is an artifact that contains the payload stage and its configuration in a self-contained package. Cobalt Strike has had the option to export stageless Beacon artifacts since its March 2014 release. I used to call these “staged” artifacts, but I adopted Metasploit’s nomenclature when the framework gained this capability. Stageless Beacon artifacts include: an executable, a service executable, DLLs, PowerShell, and a blob of shellcode that initializes and runs the Beacon payload.

Why would I use stageless payload artifacts?

Stageless payloads are beneficial in many circumstances. Stageless payloads are a way to work without the staging process. Payload staging is a fragile process and some defenses mitigate it. Stageless payloads allow you to benefit from Beacon’s security features, right away. Beacon authenticates its team server and encrypts communication to and from the team server. Beacon can do this because it does not have the same size constraints a stager has. Cobalt Strike’s stagers do not have any security features. If an attacker can intercept and manipulate the staging process, they can replace your stage with theirs. This is a concern in some situations.

What’s inside of a stageless payload artifact?

Cobalt Strike’s stageless payload executables and DLLs are not much different from its stager-delivering counterparts. Cobalt Strike’s Artifact Kit builds artifacts for stageless payloads and payload stagers from the same source code. The difference is the executables and DLL templates for stageless payloads have more space to hold the entire Beacon payload.

The common denominator for Cobalt Strike’s stageless payload artifacts is the raw output. Think of this as a big blob of shellcode that contains and runs Beacon. When you export a stageless payload artifact, Cobalt Strike patches this big blob of shellcode into the desired artifact template (PowerShell, executable, DLL, etc.).

What’s inside of the raw stageless payload artifact?

The raw stageless artifact is a self-bootstrapping Reflective DLL. A Reflective DLL is a Windows DLL compiled with a Reflective Loader function. The Reflective Loader function is like LoadLibrary, except it can load a DLL that resides somewhere in memory. Stephen Fewer developed the Reflective DLL loader that Cobalt Strike and other toolsets use.

Cobalt Strike’s Beacon is compiled as a Reflective DLL. This allows various payload stagers and the stageless artifacts to inject Beacon into memory.

Now, let’s discuss the self-bootstrapping part. If you’re with me so far, you understand that a Reflective DLL is a DLL with this loader function built into it. This does not make the Reflective DLL self-bootstrapping.

The way the Reflective DLL becomes self-bootstrapping is to overwrite the beginning of the DLL with a valid program that does the following things:

(1) Resolve the memory address where the (currently running) bootstrap program/Reflective DLL resides

(2) Call the Reflective Loader with (1) as an argument. The Reflective Loader lives at a predictable offset from (1). When you see “Offset is: 4432” in the Cobalt Strike console, that’s Cobalt Strike resolving the offset to the Reflective Loader within a DLL.

(3) After the Reflective Loader initializes a DLL, it calls the DLL’s DllMain function. This is when control is passed to Beacon.

In summary, the raw output of Cobalt Strike’s stageless payload is a Reflective DLL with a valid program patched in over the PE header. The patched in program performs steps (1), (2), and (3). This valid program is what makes the Reflective DLL blob self-bootstrapping.  This self-bootstrapping blob is a stageless Cobalt Strike payload.

Session Passing from Cobalt Strike

Session passing is using one payload to spawn another payload. Sometimes, the payloads are from the same toolset. Other times, they’re not. Session passing options allow you to hand-off accesses between toolkits and infrastructure.

In this blog post, I’ll take you through the session passing options in Cobalt Strike.

Multi-server Cobalt Strike (Beacon)

If you want to pass access from one Cobalt Strike instance to another, the best option is to connect your Cobalt Strike client to both servers. Go to Cobalt Strike –> New Connection. Once you connect, Cobalt Strike will show a server switchbar at the bottom of the Cobalt Strike window. This allows you to choose which Cobalt Strike server to work with.

When Cobalt Strike connects to multiple servers in this way, listeners from all servers are available in Cobalt Strike’s workflows. To pass a session from a Beacon on one server to a Beacon on another server, go to [beacon] -> Spawn and choose the listener on the other server. That’s it.

This form of session passing works with Cobalt Strike’s x86 and x64 Beacon. It also takes advantage of any Malleable C2 configuration associated with the payload stager (e.g., the User-Agent).

Foreign Listeners (Meterpreter)

Foreign Listeners are Cobalt Strike’s way to define a listener for a payload handler that is not in your immediate control. The foreign listener generates a stager that downloads and runs a payload from the host and port you specify. Cobalt Strike’s foreign listeners are compatible with the Metasploit Framework’s staging process. This means you can use a foreign listener to easily pass Meterpreter sessions to Metasploit Framework users.

You may use a foreign listener throughout Cobalt Strike’s workflows. To quickly pass a session, try the spawn command in Beacon. I also recommend that you look at the inject command too. The inject command will let you inject a payload listener (foreign or not) into a specific process.

Unmanaged PowerShell Injection (PowerShell Empire)

Beacon’s powerpick command runs a process and injects a DLL that runs PowerShell scripts via a .NET API, no powershell.exe needed. This command is one way to run a loader for a PowerShell agent (e.g., PowerShell Empire). Another option is the psinject command. The psinject command is like powerpick, except it injects into a process you specify. This is a way to spawn a PowerShell agent without creating a new process.

Shellcode Injection (Session Passing without Stagers)

Finally, there’s the shinject command. This command injects a local file containing shellcode into a process of your choosing. Use this to run payloads that have stages or stagers available as a binary blob of position-independent code.

The shinject command is also a way to pass Cobalt Strike sessions without a stager. Go to Attacks -> Packages -> Windows Executable (S) and export a stageless Beacon with raw output. This file is a position-independent blob of code that loads the Beacon stage and runs it. This file is ready-to-use with shinject. This method is the only way to pass SMB Beacon sessions between team servers.

Reflective DLL Injection

Beacon’s dllinject command will inject a Reflective DLL into a process of your choosing. Cobalt Strike is smart enough to pull the architecture from the DLL’s PE header. If you try to inject an x86 DLL into an x64 process it will complain. The dllinject command is a great way to spawn payloads compiled as a Reflective DLL.

Whatever your needs, Cobalt Strike has many options to spawn a payload into another process.

HOWTO: Port Forwards through a SOCKS proxy

Recently, I’ve had multiple people ask about port forwards with Cobalt Strike’s Beacon payload. Beacon has had SOCKS proxy pivoting support since June 2013. This feature opens a SOCKS proxy server on the team server. Each SOCKS server instance is associated with an individual Beacon. All requests and traffic sent to a Cobalt Strike SOCKS server are sent to the Beacon to take action on.

SOCKS pivoting is a no-brainer with a SOCKS aware application, such as a web browser. Simply point the application at your Cobalt Strike team server, put in the right port, and away you go.

SOCKS pivoting is also easy on Linux, thanks to the magic of proxychains. The proxychains program will run a program, intercept outbound network connections from that program, and force the connection through the SOCKS proxy set in a global configuration file (/etc/proxychains.conf).

These options work well in many cases, but they do not cover all cases. What happens if you need to tunnel the Windows RDP client through the Beacon payload? How about interacting with a target network share from a red Windows asset tunneled over Cobalt Strike’s Beacon payload?

One way to meet the above needs is to use a commercial tool, like ProxyCap, to make your Windows system proxy aware. [Thanks Meatballs, for the tip on this one]. This will allow you to force Windows tools and clients through the Beacon payload.

Another option is to create a port forward on your team server that reaches the target host and port through your Beacon. There’s one problem here. Beacon does not have a port forward command [it does have reverse port forwards]. I may add this in the future, but it’s not a big omission. You can use socat to create a port forward that goes through a SOCKS proxy. Here’s the syntax to do this:

socat TCP4-LISTEN:<listen port>,fork SOCKS4:<team server host>:<target>:<target port>,socksport=<socks port>

Let’s say you want to port forward 3389 on your team server in red space to 192.168.1.100:3389 in blue space. Let’s assume the Beacon SOCKS proxy lives on port 9999. Here’s the syntax to do this:

socat TCP4-LISTEN:3389,fork SOCKS4:127.0.0.1:192.168.1.100:3389,socksport=9999

And, that’s how you turn a SOCKS proxy server into a port forward. This works equally well with the SOCKS pivoting available over SSH. In fact, Advanced Threat Tactics, part 7 – Pivoting, covers the topics in this post. If you liked this post, I recommend that you check out that lecture. [The whole course is chock-full of other goodness too]

Raffi's Abridged Guide to Cobalt Strike

This blog post is a fast overview of Cobalt Strike. I assume that you are familiar with Meterpreter, Mimikatz, and make use of Offensive PowerShell in your work. This post does not replace the documentation or videos, but it’s a quick way to become familiar with Cobalt Strike concepts that are not immediately obvious.

Starting Cobalt Strike

Cobalt Strike ships as a client program and a server program. The server is the team server. The team server must run on Linux with Java installed. To start it:

$ ./teamserver [your IP address] [team password]

The Windows, Linux, and MacOS X packages for Cobalt Strike include a launcher to start the client. Launch the client, put your name in the user field, set everything else properly and press Connect. You’re up and running.

Malleable Profiles

Cobalt Strike supports a concept of user-defined network indicators in its Beacon payload. This feature is Malleable C2. I do not recommend that you use Cobalt Strike with the default profile. Several example profiles are on Github. Use something from the normal folder. Specify the profile you want to use when you run your team server:

$ ./teamserver [your IP address] [team password] [/path/to/profile]

Listeners

Cobalt Strike refers to its payload handlers as listeners. Go to Cobalt Strike -> Listeners. Press Add. Fill in the information for your team server host. The HTTP and HTTPS Beacon are straight forward to configure. You will want to read the documentation before you try out the DNS Beacon. Once a listener is setup, Cobalt Strike’s team server is listening for connections.

The First Foothold

“where are the exploits?” “how do I scan targets?” “how do I get that first Beacon on target?” Cobalt Strike is designed for engagements where you work as an external actor. It’s my assumption that you either have a foothold, through another means, or that you will gain one through a targeted attack. Cobalt Strike has tools to help with the targeted attack process.

User-driven Attacks

Cobalt Strike has several user-driven attack options to get a foothold in a target
network. These options exist under Attacks -> Packages and Attacks -> Web Drive-by. Each of these features ask you to choose a listener. This is the payload the attack will deliver.

Metasploit Framework Exploits

Optionally, you may use a Metasploit Framework exploit to deliver Beacon. Pick a Windows exploit, point LHOST and LPORT at your listener, and set PAYLOAD to windows/meterpreter/[type of stager]. Cobalt Strike is compatible with Metasploit’s staging protocol. So long as you match stagers, this process should work. I recommend setting PrependMigrate to True as well.

The Beacon Console

When you get an access, right-click on it and press Interact. This will open the Beacon console. You will spend most of your time here.

Asynchronous Post Exploitation

Beacon is an asynchronous agent. This means commands you type will not execute right away. Instead, they go into a queue. When the agent checks in, Beacon downloads them, and executes them [mostly] in order. Beacon then presents output to you. In between check-ins, Beacon goes to sleep. Your Malleable C2 profile sets the default sleep time. The sleep command changes it.

Beacon Help

Meterpreter users will feel at home with Beacon. The two have many commands in common. Type help to see a list of commands. Type help and a command name to get more information on a command.

Running Commands

The cd command changes Beacon’s current working directory. Don’t put quotes around the folder name (even if there are spaces). The shell command will run the command you specify with cmd.exe and present its output to you. The powershell-import command imports a local PowerShell script into Beacon. This command does not execute or check the script. Use the powershell command to evaluate your imported script and run the cmdlet and arguments you specify. The powerpick command does the same thing, but without powershell.exe.

Migrate

Beacon does not have a migrate command. In general, you should not need this. Many post-exploitation tasks (e.g., screenshot, keylog) will inject into a process you specify and feed results back to your Beacon. Use the inject command to inject a Beacon into an x86 or x64 process.

Loot

Use the download command to download files. Downloaded files are stored on the team server. Go to View -> Downloads to see downloaded files. Highlight one or more files in this dialog and press Sync Files to bring files to your local system.

If you take screenshots or log keystrokes, be aware that Cobalt Strike presents these under View -> Screenshots and View -> Keystrokes. These windows will auto-update when there is new data.

Privilege Escalation

Cobalt Strike has a few options to aid privilege escalation. The bypassuac command runs the Bypass UAC attack. Use this if your user is a local admin, but you’re in a medium integrity context. The spawnas command will let you use known credentials to spawn a session as another user. PowerUp works well with Beacon’s powershell and powerpick commands.

Credential Harvesting

Once you elevate, use hashdump to recover local account password hashes. Type logonpasswords to harvest credentials with mimikatz. The mimikatz command will run arbitrary mimikatz commands. Credentials are available under View -> Credentials.

x64 vs. x86

It helps to match Meterpreter’s architecture to the native architecture of your Windows target. Many post-exploitation actions fail otherwise. This is not necessary with Cobalt Strike. Beacon executes some of its post-exploitation tasks in new processes. If a task is architecture sensitive, Beacon will spawn a process that matches the native architecture and inject the post-exploitation capability into it.

Pivoting

Cobalt Strike supports SOCKS proxy pivoting. Type socks [port] to create a SOCKS server tied you to your Beacon. Use sleep 0 to ask Beacon to speed up its communication. The SOCKS server runs on your Cobalt Strike team server. Connection requests and traffic sent through this SOCKS server are passed to the associated Beacon to take action on.

Network Reconnaissance

The portscan command runs Beacon’s built-in port scanner. Beacon’s net computers command maps computer accounts in the domain’s Domain Computers group to IP addresses. PowerView works well with Beacon’s powershell and powerpick commands too. Known host and service information is available under View -> Targets.

Access Token Manipulation

When you interact with a remote target through Beacon, Windows will use the credentials from your access token’s Logon Session or the contents of your Kerberos Tray to authenticate you. Cobalt Strike has commands to manipulate these items.

The steal_token command impersonates a token from another process. The make_token command creates an access token to pass the plaintext credentials you provide. The pth command creates an access token to pass the domain, username, and password hash you provide.

Confusingly, the make_token and pth commands will report your current username, regardless of the user you specify. This is not a bug in Cobalt Strike. This is a by-product of how Windows creates tokens to pass unverified credentials. The make_token and pth commands create a new Logon Session to pass the credential material you specify. They then attach the Logon Session to a copy of your current token. The Logon Session’s contents only affect interactions with remote targets. Your identity on the current system is still the same. This is why your token’s username does not change.

Cobalt Strike relies heavily on token manipulation for lateral movement and interactions with remote targets. These commands allow you to execute manual or automated lateral movement actions with a different identity.

Lateral Movement

Beacon commands for lateral movement include: psexec, psexec_psh, winrm, and wmi. Each command accepts a target and a listener name. The psexec command requires that you specify a share (it drops an executable to that share).

While these commands are nice, I tend to execute lateral movement steps by hand. I feel this gives more flexibility. Here’s my process: (1) Go to Attacks -> Packages -> Windows Executable (S) to export a stageless Beacon payload. Choose the right artifact for your lateral movement method. (2) Use the upload command to upload that artifact to Beacon. (3) Use shell copy artifact \\target\C$\whatever to copy the lateral movement artifact to your target. (4) Use at, schtasks, sc, or wmic through Beacon’s shell command to start the artifact on the remote target. (5) If you ran an SMB Beacon this way, use link [target] to assume control of it.

Named pipe Pivoting

The SMB Beacon uses named pipes to receive commands and route output through another Beacon. Named pipes are a Windows method for inter-process communication. Processes may communicate with other processes on the same system or on remote systems. Windows encapsulates remote process-to-process communication in the SMB protocol. This is why I call the Beacon that communicates over named pipes the SMB Beacon.

One Beacon may control multiple Beacons over named pipes. You may also use an SMB Beacon to control other SMB Beacons. Cobalt Strike users often chain Beacons together, multiple levels deep. Beacon’s SOCKS pivoting and other features work well, even through a deep chain.

The SMB Beacon is ideal for privilege escalation. Target an SMB Beacon listener with bypassuac, elevate, or spawnas and your new access will stage and communicate through your current Beacon.

This feature is also nice for lateral movement. It allows you to control systems that can’t or shouldn’t egress through an existing access in the target’s network.

Cobalt Strike -> Set Target View -> Pivot Graph draws a nice picture that depicts your named pipe pivot chain. This will help you understand which Beacons are linked to each other. This feature is indispensable for complex pivoting situations.

Agentless Post-Exploitation

I’m a fan of agentless post-exploitation techniques to control hard targets (e.g., Invoke-Command, Invoke-WMICommand, and others). Cobalt Strike’s Access Token Manipulation capability and PowerShell integration makes Beacon a nice platform for these techniques. As you use Cobalt Strike, think beyond the commands built into Beacon. Native tools are a big part of Cobalt Strike’s offensive process.

Logging

Cobalt Strike logs everything on the team server. This logging happens regardless of whether a client is connected or not. To find the logs, go to the folder you ran the team server from. The logs live in a folder called logs. The logs folder is organized by date and then target. There are individual files for each Beacon session. Cobalt Strike saves screenshots and keystrokes here too.

Where to go from here…

This blog post is a quick orientation to Cobalt Strike. If you’d like to learn more, there are other resources. The product manual is kept up to date with each release. The 9-part Advanced Threat Tactics course is six hours of material on the concepts in this post. The Cobalt Strike Support page also documents individual features with most having a short demo video.

Cobalt Strike 3.3 - Now with less PowerShell.exe

The fourth release in the Cobalt Strike 3.x series is now available. There’s some really good stuff here. I think you’ll like it.

Unmanaged PowerShell

How do you get your PowerShell scripts on target, run them, and get output back? This is the PowerShell weaponization problem. It’s unintuitively painful to solve in an OPSEC-friendly way (unless your whole platform is PowerShell).

Cobalt Strike tackled this problem in its September 2014 release. Beacon’s PowerShell weaponization allows operators to import scripts, run cmdlets from these scripts, and interact with other PowerShell functionality. Beacon’s method is lightweight. It doesn’t touch disk or require an external network connection. It has a downside though: it relies on powershell.exe.

In December 2014, Lee Christensen came out with an Unmanaged PowerShell proof-of-concept [blog post]. Unmanaged PowerShell is a way to run PowerShell scripts without powershell.exe. Lee’s code loads the .NET CLR, reflectively loads a .NET class through that CLR, and uses that .NET class to call APIs in the System.management.automation namespace to evaluate arbitrary PowerShell expressions. It’s a pretty neat piece of code.

This release integrates Lee’s work with Beacon. The powerpick [cmdlet+args] command (named after Justin Warner’s early adaptation of Lee’s POC) will spawn a process, inject the Unmanaged PowerShell magic into it, and run the requested command.

I’ve also added psinject [pid] [arch] [command] to Beacon as well. This command will inject the Unmanaged PowerShell DLL into a specific process and run the command you request. This is ideal for long-running jobs or injecting PowerShell-based agents (e.g., Empire) into a specific process.

I took a lot of care to make powerpick and psinject behave the same way as Beacon’s existing powershell command (where possible). All three commands are friendly to long-running jobs and they will return output as it’s available. All three commands can also use functions from scripts brought into Beacon with the powershell-import command.

More One-Liners for Beacon Delivery

One of my favorite Cobalt Strike features is PowerShell Web Delivery. This feature generates a PowerShell script, hosts it, and gives back a one-liner that you can use to download and execute a Beacon payload. These one-liners have many uses: they seed access in assume breach engagements, they help turn an RDP access or command execution vulnerability into a session, and they’re great for backdoors.

Cobalt Strike 3.3 extends this feature. The PowerShell Web Delivery dialog is now Scripted Web Delivery with one-liners to download and run payloads through bitsadmin, powershell, python, and regsvr32. Each of these options is a different way to run a Cobalt Strike payload.

The bitsadmin option downloads and runs an executable. The python option will download and run a Python script that injects Beacon into the current python process. The regsvr32 option uses a combination of an SCT file with VB Script and a VBA macro to inject Beacon into memory. The regsvr32 option is based on research by Casey Smith and I really didn’t appreciate the power of this until I played with it more.

Search and Filter Tables with Ctrl+F

This release adds Ctrl+F to tables. This feature allows you to filter the current table on a column-by-column basis. Even when this feature is active, updates to the table will still show in real-time, if they match your criteria.

The feature is built with special search syntax for different column types. For example, you can specify CIDR notation or address ranges to filter host columns. You can use ranges of numbers to filter number columns. And, you can use wildcard characters in string columns.

073606_Targets

*phew*. That’s a lot. Would you believe there’s more? Check out the release notes to see a full list of what’s new in Cobalt Strike 3.3. Licensed users may use the update program to get the latest.

User Exploitation at Scale

Some hackers only think about access. It’s the precious. How to get that first shell? I don’t care too much about this. I’m concerned about the problems that come from having a lot of accesses. One of these problems has to do with user exploitation. If you have access to 50 or more systems at one time, how do you monitor what the users on those systems are up to?

At a certain point taking screenshots and logging keystrokes, one system at a time, isn’t very tractable. There is the analysis problem. How do you analyze and watch all of this information with few red team operators?

There is also the capability deployment problem. If you have 50+ accesses, it’s probably from lateral movement. If your payload is on a target in a SYSTEM context, you’re probably in no position to observe keystrokes or screenshots without migrating your payload or deploying your capability to the right process. Going through targets, one by one, to deploy a screenshot tool or keystroke logger is time consuming.

Cobalt Strike takes a stab at both of these problems. In this blog post, I’ll take you through Cobalt Strike’s post-3.0 model for user exploitation at scale.

winning

The Data Browser

If one of your teammates takes a screenshot or starts a keystroke logger, the first question is: where do the results of these actions go? In Armitage, the answer is nowhere. Armitage’s model of collaboration isolates each operator from the post-exploitation actions other operators took. If a teammate takes a screenshot, there is no way for you to view that screenshot in Armitage. I see this as a shortcoming.

Cobalt Strike 3.0 does things much different from Armitage. Screenshots and Keystrokes in Cobalt Strike 3.0 are now dumped to one interface. I call it a data browser. Go to View -> Screenshots or View -> Keystrokes to access this information.

databrowser

Through the data browser, any team member may watch screenshots and keystrokes as they show up. The data browser makes these post-exploitation features more collaboration friendly. It also aids analysis too. Depending on the workload, you may devote one team member to watching this information as it comes in and tipping off the rest of the team to systems/users they should pay attention to, right now.

Mass Deployment

I thought I was Mr. Clever when I implemented Cobalt Strike 3.0’s data browser. Then the deployment problem reared its ugly head. Post-exploitation features like screenshot tools and keystroke loggers are very dependent on the context of the process that they’re run in. On Windows, the desktop session you’re in matters a great deal. If the user’s processes are run in session 1 and your payload is hanging out in session 0, you’re not going to see any keystrokes. It’s very important to conduct post-exploitation from the user’s context.

Some penetration testing payloads offer a migrate capability. I hate payload migration. It’s a great way to lose your access. I prefer to inject my post-exploitation capability into a user’s process and have the capability report results back to my payload which continues to live in its SYSTEM-level context. This is Cobalt Strike’s approach to post exploitation.

Fortunately, Cobalt Strike 3.0 introduces a way to push post-exploitation features to the right process on many systems at once. This is done through the Process Browser.

Cobalt Strike’s Process Browser is designed to show processes for multiple sessions at one time. Simply highlight all of the accesses you want to deploy post-exploitation tools to. Right-click, go to Explore -> Show Processes. Cobalt Strike will ask each session to return a list of processes. As these sessions report back with information, the Process Browser will update.

Once all of your accesses have called home, simply sort by process name and scroll down to explorer.exe. You will now see all of the explorer.exe instances across all sessions that have called home.

massdeploy

Highlight the explorer.exe instances you want to inject Cobalt Strike’s post exploitation tools into. Press the Screenshot button to ask these sessions to deploy the screenshot tool to their respective explorer.exe processes. Press the Log Keystrokes button to deploy the keystroke logger to the highlighted explorer.exe processes.

That’s Cobalt Strike’s model for mass deployment of post-exploitation tools. With Cobalt Strike 3.0, you now have the tools to know what’s happening on each compromised system. Part 4 of Advanced Threat Tactics covers Post Exploitation with Cobalt Strike 3.x in more detail.

Aggressor Script’s Secret mIRC Scripting Past

Aggressor Script is the scripting engine in Cobalt Strike 3.0 and later. If you want to learn more about it, I recommend reading the documentation. In this blog post, I’ll provide some history around Aggressor Script so you can better understand it and where it comes from.

The mIRC Factor

mIRC is a popular client for Internet Relay Chat. In the mid-nineties, I was part of a community of enthusiastic computer users who would interact with each other online. Through this community, I had mentors and I was exposed to Linux early on as well. mIRC was more than a GUI client to connect to IRC though. mIRC was also a programming environment. User scripts could create new IRC commands (aliases), respond to events, and even modify the presentation of mIRC’s output. This gave power users a lot of room to make mIRC their own.

How did we use this power? It depends on the user. Some would write theme scripts to express their artistic prowess. mIRC became their canvas, Cp437 characters their brushes. Others would write scripts to task multiple mIRC instances (clones) to send messages to a friend that elicit an automatic response. This friend’s automatic response to all mIRC instances would cause the IRC server to disconnect them for malicious flooding. These flooding games, among friends of course, were a popular use of mIRC scripting.

The jIRCii Factor

Inspired by my use of mIRC, I set out to build a cross-platform IRC client, jIRC. Later, I renamed this project to jiRCii. jIRCii was my first large software project. It was also my longest running project. I worked on variations jIRC/jIRCii from 1999 through my last update in 2011.

jiRCiinormal

jIRCii was also scriptable AND it had an active scripting community for a time too. Users wrote theme scripts, integration with third-party programs, and various utilities to make it easier to manage IRC channels.

When I built jIRCii’s scripting features, I really wanted to capture the elements of mIRC scripting that I felt worked. I also wanted to do away with the elements that didn’t work for me. Aliases (the alias keyword) were a good abstraction to define new commands. This concept worked and it made its way into jIRCii. Events (the on keyword) were a good abstraction to respond to events from the IRC server and the IRC client itself. These made it into jIRCii as well.

mIRC scripters had a heavy desire to theme mIRC and present IRC events in different ways. Arguably, this theme was the identity of the script. Early on, scripts would couple the theme information and the script’s functionality together. This tied a script to one theme though. Later, scripts would feature custom theme files that separated the presentation of output from the script’s other functionality. The early implementations of these themes were aliases (these did double-duty as subroutines in mIRC) that followed a naming convention. For example:

alias SET_CHANNEL_TEXT {
     return < $+ $1 $+ > $2-
}

Scripts would hook the different mIRC events, execute their normal logic for these events, and finish up by calling the appropriate theme function and reporting its results back to the user. The popularity of this convention informed jIRCii’s set keyword. jIRCii’s set keyword allows scripters to define how the client presents any of its output to the user. In fact, the client doesn’t have a default presentation of anything. The client’s defaults are defined in a built-in script.

ss_slurge

Delegating default presentation to a script also streamlined jIRCii’s development process. I could focus on core features without thinking too much about the aesthetics of a feature. When it came time to work on the aesthetics, I could try things without restarting the client.

I applied the same concepts to jIRCii’s menubar and context-sensitive popup menus as well. jIRCii doesn’t define these things in its code, it delegates all of them to the default script. Again, jIRCii’s abstraction for user-defined menus, popups, and menu items were inspired by mIRC’s scripting engine.

jIRCii’s Scripting Language

Early into jIRCii’s life, I dabbled with different ways to give users control over the client. In the late-90s and early-2000s, there were not a lot of scripting engines built on top of Java. There was Beanshell, whose goal was to stay as close to Java as possible. There was Jacl, which was TCL on Java. While TCL was used as a scripting engine in some IRC clients, I wasn’t able to wrap my head around it at the time. Years later, I appreciate TCL much more. And, there was Jython which was a Python implementation for Java.

I wasn’t in love with any of the above options as an embedded scripting language. I really wanted a small language that I could extend with new constructs that exposed my application’s features. My goal with the scripting feature set was to court mIRC users. To do so, I needed a solution that didn’t feel aesthetically alien to mIRC scripters. I also wanted something a first-time programmer could reasonably pick up on his or her own.

The Sleep Factor

I didn’t expect that I would write jIRCii’s general purpose scripting language. I also didn’t expect that Armitage/Cobalt Strike would evolve into a stand-alone offensive platform either. Sometimes, when you decide to see a project through, you sign up for much more than you expected. Here’s the story behind the Sleep scripting language.

A common exercise for undergraduate Computer Science students is to build a simple programming language. Like other Computer Science students, I went through the exercise of building a simple LISP-like language interpreter in LISP. This learning exercise was my first exposure to BNF, recursive descent parsers, Abstract Syntax Trees, and interpreters. This exercise clicked with me and it very much whetted my appetite to explore these ideas further.

After I turned in the above assignment, I decided to sequester myself in a campus computer lab for the weekend. I set out to define a small language with aesthetical similarities to my then-favorite language, Perl. I built a lexical analyzer, a parser, and an interpreter for this simple language in a few days. This was the first version of Sleep. That was 2002.

sleepfirstver

I saw Sleep as a potential solution to my scripting conundrum for jIRCii. I would build Sleep as a small extensible language to embed into other applications. My initial target application was jIRCii. In a way, Sleep and jIRCii co-evolved with each other.

I started work on Sleep 2.0 around 2005. To me, a change in major version represents a change in fundamental assumptions and a strategic shift. Cobalt Strike’s early versions dabbled in a lot of ideas beneficial to red teaming. Cobalt Strike 2.0 was a concrete shift towards threat emulation with Malleable C2. Cobalt Strike 3.0 re-built Cobalt Strike as a platform for Red Team Operations and Adversary Simulations without the Metasploit Framework. Sleep 2.0 was a similar major shift. Sleep evolved from a very simple language to one that could call into Java’s APIs. This gave my scripters benefits similar to the ones PowerShell scripters enjoy calling the .NET API from PowerShell. I also added closures, coroutines, and continuations as language features. These additions gave Sleep a lot of power.

Sleep’s last update was in 2009. I stopped working on Sleep because at that point, the project met its original goals. It was also stable and feature complete to a reasonable point.

Since the mid-2000s, I’ve used Sleep quite a lot. When I was at the Air Force Research Lab, I used Sleep as a scripting engine in my various project prototypes. I kept Sleep integrated into jIRCii and as I mentioned previously, jIRCii had a healthy scripting community. I built a web application container for Sleep and for a time, I used Sleep for limited web application work. I also built the After the Deadline software service in Sleep. Finally, I tried to use Sleep as an application language. The lucky project to receive this treatment? Armitage.

I consider that a failed experiment. Much like other scripting languages, Sleep has a concept of a Global Interpreter Lock. Sleep’s GIL is a nuisance when building a multi-threaded GUI application that needs to interact with a server component. My choice to use Sleep is partially responsible for Armitage’s tendency to deadlock and some of the performance issues. Cobalt Strike 3.0 and later do not use Sleep as the application implementation language.

Cortana

Cortana is the scripting engine in Armitage. This was a seven-month effort funded by DARPA’s Cyber Fast Track program. It was Mudge’s intent that CFT fund new efforts, not enhancements to existing ones. To pitch Cortana for CFT, I had to have an angle. Armitage was already a decent effort exploring red team collaboration among human actors. Why not take this to the next level and explore red team collaboration ideas between humans and bots? This was the idea behind Cortana.

Fortunately, Cortana was not my first scriptable application rodeo. I had experience with a base language (Sleep). I also knew what it would take to integrate this base language into an application (thanks jIRCii). This made it easy to explore the ideas that were the meat of the effort (positive control concepts, a headless client for bots, etc.)

Cortana brought some of jIRCii (and mIRC)’s scripting concepts into Armitage. It had events to respond to things that happened on the team server and within the client. I had one milestone focused on APIs for the Armitage GUI itself (e.g., popup menus and the like). I also had a milestone to strip Armitage to nothing and re-implement Armitage’s features in Cortana. I wanted to see if I could push the balance of “default script” stuff much further than jIRCii. I wasn’t happy with the results of this particular experiment and decided against adopting this for production Armitage. Consequently, production Armitage delegated nothing to its built-in scripting engine.

I released Cortana at DEF CON 20. Not only was it the largest audience I’ve spoken to in one room. It was also the one time I lost my voice before a talk as well.

The Cortana technology in Cobalt Strike (prior to 3.0) was mostly the same as the Cortana technology in Armitage. Over time though, I noticed that Cobalt Strike users had a much higher interest in Cortana than Armitage users. I had a non-trivial number of customers who had unzipped the cobaltstrike.jar file, figured out the Beacon RPC API, and were building scripts with this to automate and control Beacon. This was a lot of effort for these users to go to. I tried to meet these users half-way by publishing a partial Cortana API to script and control Beacon. All of this was a big obvious sign that I needed to expose a way to script Cobalt Strike’s features.

The Dark Corners of Cobalt Strike 3.0

Cobalt Strike 3.0 was a ground-up rewrite of Cobalt Strike’s GUI client and team server, notably without dependence on the Metasploit Framework.

I’m often asked why I changed X or Y in Cobalt Strike 3.0. I’m sometimes asked why did I bother with such large changes to a mature product? Depending on the context, I give different answers. The full answer is this: I learned a lot about my red team user base while selling and building Cobalt Strike 2.5 and its predecessors. These lessons included things my product didn’t do well and things my product would need to handle, eventually, to stay relevant to that user base.

One example of this is logging and reporting. Prior to 3.0, Cobalt Strike’s logging was borderline useless. Also, prior to 3.0, Cobalt Strike’s reporting was potentially beneficial to a penetration tester, but it didn’t show much imagination for the red teaming use case. There are a lot of reasons these things were the way they were, but ultimately, the 3.0 work was a chance to set some of these things right. Today, the reporting and logging are cited as one of the strengths in Cobalt Strike 3.0 and later.

No single insight, feature, or need drove the development of Cobalt Strike 3.0. It was the accumulation of all the user needs I wanted to tackle, but couldn’t with the old codebase and its dependencies. I didn’t take this decision lightly though…

I’m a big fan of Joel Spolsky’s Joel on Software blog. One post that sticks with me is Things You Should Never Do, Part I. In this post, Joel describes this mistake as the single worst strategic mistake any company can make. What is it? It’s to rewrite their code from scratch. I, as a single developer, knowingly decided to commit this very sin. The decision to rewrite Cobalt Strike could have ruined my company and destroyed my professional efforts going back to late-2011. Bluntly, people do their jobs with this toolset and they pay fairly for the privilege. My biggest fear is that my instincts were off and I was investing in the wrong ideas.

Six months later, all signs seem to indicate that Cobalt Strike 3.0 was the right move. The new product is very stable and performs much better than its predecessors. To many of my users, 3.0 was business as usual. I seem to have kept the things they used Cobalt Strike for, added some things they wanted, and discarded what they didn’t use. I’ve used 3.0 a few times now and I’ve been very happy with it. It’s a good product and it’s fun to use.

Aggressor Script

Scripting is one of those places where Cobalt Strike 3.0 gave me a second chance. Aggressor Script is the Cobalt Strike 3.0 successor to Cortana. Aggressor Script is not compatible with Cortana. It can’t be. Cortana builds on Armitage’s interface to the Metasploit Framework. Aggressor Script builds on Beacon and Cobalt Strike 3.0’s team server.

During Cobalt Strike 3.0’s development, I had a rule: no experiments. I knew the risk I was (already) taking with the rewrite. I wanted to stick with my lessons learned and my personal best practices as much as possible.

Cobalt Strike 3.0’s first milestones were a team server and a simple GUI client. The team server would act as a broker to receive messages from clients, broadcast messages to clients, and play previous messages back to new clients. On this initial foundation, I built Cobalt Strike 3.0’s first feature: the event log.

I remember demoing this early progress to a customer. I had a /names command, /msg, and /me. I also had the ability to redefine Cobalt Strike’s presentation of event log output through a default script. I joked that my goal was to replace Cobalt Strike 2.5 with a very nice, very expensive, IRC client.

All joking aside, I borrowed a lot of concepts from jIRCii in the design of Cobalt Strike 3.0. This is especially evident with Aggressor Script. Aggressor Script uses the set keyword to define how the client presents output to the user. Aggressor Script uses the on keyword to respond to events. Aggressor Script also uses the alias keyword to define new commands in Beacon. I also use scripting conventions from jIRCii to script menus and keyboard shortcuts. Much like jIRCii, Cobalt Strike 3.0 defines its representation of events and menu structure in a default built-in script. A lot of these conventions in jIRCii were heavily inspired by mIRC scripting.

So there you have it, that’s Aggressor Script’s Secret mIRC scripting past. There’s an irony here. In the 90s, some folks would use the scripting engine in their chat program to build hacking tools. Now, 20 years later, I use the scripting engine in my hacking tool to build chat tools. Pretty funny.

Pics or it didn't happen...

One of the most important things in a red teamer’s job is evidence. If you can’t demonstrate impact and make a risk real, it’s as if you didn’t find the problem. Screenshots go a long way towards this.

Cobalt Strike has several options to capture screenshots during your engagement. In this post, I’ll quickly take you through them.

Ctrl+P

The Ctrl+P shortcut snaps a picture of the current sessions in Cobalt Strike. If the pivot graph is active, you will get the whole graph (regardless of size) in one image.

010943_PivotGraph

Ctrl+T

The Ctrl+T shortcut takes a screenshot of the current Cobalt Strike tab.

010945_Beacon172.16.20.805944

Ctrl+Shift+T

The Ctrl+Shift+T shortcut takes a screenshot of your whole Cobalt Strike window.

010946_CobaltStrike

Where do my screenshots go?

This is the best part. Cobalt Strike pushes these screenshots to the team server. This way, your screenshots and your team’s screenshots are in one place. The screenshots are located in the [/path/to/cobaltstrike]/logs/[date]/screenshots folder. Each screenshot’s name includes the time it was taken and the context it was taken from (e.g., the title of the tab).

where

Note: Target screenshots, taken during your post-exploitation activities, are organized and stored on the team server as well. These are located in:
[/path/to/cobaltstrike]/logs/[date]/[target]/screenshots.

Linux, Left out in the Cold?

I’ve had several folks ask about Linux targets with Cobalt Strike 3.0 and later. Beacon is a Windows-only payload. The big question becomes, how do you use Cobalt Strike to operate against Linux, BSD, and other UNIX flavored targets?

Cobalt Strike is not the master unified interface for all hacking tasks. Rather, Cobalt Strike is a toolset to facilitate targeted phishing, covert post-exploitation, and lateral movement in a typical Windows enterprise environment. I didn’t forget about other targets though. Beacon has a built-in port scanner to help find them. I also provide options to use Beacon as a communication layer to bring other tools into the engagement (when it makes sense).

It’s quite easy to use Cobalt Strike as a jumping off platform to reach UNIX server targets. In this blog post, I’ll share a few recipes to do so.

Access Strategies

Cobalt Strike does not have tools to find vulnerabilities in and exploit UNIX targets. If there’s an exploit or attack you want to use, tunnel it through Cobalt Strike’s Beacon.

Optionally, target a system administrator’s Windows workstation and use that access to steal trust material to take a UNIX target. There are a lot of options here.

Cobalt Strike has keystroke logging and screenshot tools designed for long-term operations. The Red Team Field Manual has an interesting recipe to log all keystrokes and output from Putty sessions. You can also look at tools like, PuttyRider, which lets you inject into Putty and do interesting things.

Finally, if you observe a user interacting with a web interface to a device or server, try a browser pivot to interact with that site, as them. Browser Pivoting is Cobalt Strike’s man-in-the-browser session hijacking capability.

Tunnel SSH over Beacon

Cobalt Strike’s Beacon exposes a SOCKS interface for pivoting. SOCKS is a standard for proxy servers and proxy-aware clients. To create a SOCKS interface tied to a Beacon:

1. Interact with a Beacon

2. Type sleep 0 to ask to the Beacon to check-in multiple times each second. A high check-in time will introduce latency into your tunneled traffic.

3. Type socks 1234 to create a SOCKS proxy server on port 1234 of your team server.

At this point, you have a listening socket, on your team server, ready to receive connections from proxy-aware clients. The Beacon associated with this SOCKS server will initiate any connections requested by a SOCKS client. Once a connection is made, Cobalt Strike relays all traffic between the SOCKS client and the new connection via Beacon’s communication path (whatever it is).

proxychains

Some applications have built-in support for SOCKS. Other applications do not. If you want to use an application that is not SOCKS aware, try out proxychains.

The proxychains program accepts a program name and program arguments as its arguments. Any outbound TCP connection made the specified program is forced through a proxy server. This proxy configuration is specified in a global configuration file (/etc/proxychains.conf).

To tunnel SSH through a SOCKS proxy server with proxychains:

4. Open /etc/proxychains.conf with your favorite text editor.

5. Scroll to the bottom of the file.

6. Change the lines under [ProxyList] to:

socks4 127.0.0.1 1234

7. Save the file.

8. In a new terminal, type: proxychains ssh user@target

Your SSH session will now tunnel through Cobalt Strike’s Beacon payload.

Tunnel Beacon over SSH

You may run into a situation where you need to tunnel Cobalt Strike’s Beacon through a compromised Linux target to attack a Windows network. I’ve had this happen and I’ve heard stories from others with a similar situation. I can’t say this is something you’ll see often, but it’s a good exercise in tunneling flexibility.

Here’s the scenario:

I can reach a Linux target over SSH. This Linux target can talk to a Windows network I want to attack. I have credential material for the Linux target. I also have credential material for a Windows target. I want to attack the Windows target with Cobalt Strike.

Here are the steps:

1. From a red Linux asset, run: ssh –D 1080 user@linux_target. This command will create an SSH session and a SOCKS proxy server, bound to port 1080 on the red Linux asset, that forwards all connections through the SSH tunnel. In effect, this proxy allows us to make connections from the compromised Linux target.

2. On the red Linux asset, forward port 445 to reach a Windows target through the SSH SOCKS Proxy server. Here’s the socat recipe for this: socat TCP4-LISTEN:445,fork SOCKS4:127.0.0.1:TARGET:445. Anything that touches this red Linux asset on port 445, will now reach the Windows target on port 445.

3. Run a Beacon on a red Windows asset. Cobalt Strike’s attacks are deployed to and run by Beacon directly. This plays well with Cobalt Strike’s model of offense.

4. Create a named pipe listener in Cobalt Strike. Go to Cobalt Strike -> Listeners. Press Add. Choose the windows/beacon_smb/bind_pipe payload.

5. Through the red asset Beacon, create an access token from credential material for an Administrator user on the target Windows system. Use make_token [DOMAIN\user] [password] if you have credentials. Use pth [DOMAIN\user] [hash] if you have an NTLM hash.

6. Attack the Windows target (via the Linux port forward) with psexec or psexec_psh .

beaconoverssh

Cobalt Strike will run Beacon, stage it, and assume control of the host over port 445. Since we’re targeting a port forward on a pivot system, this process will ride over our SSH tunnel. You now have a Beacon foothold, in another network, tunneled through a Linux target.

Control UNIX Targets with PowerShell

rvrsh3ll published an Invoke-SSHCommand PowerShell cmdlet. This script runs a command over SSH and returns its output to you. Here’s how to use this script with Beacon:

1. Download the Misc-PowerShell Scripts repository from Github

git clone https://github.com/rvrsh3ll/Misc-Powershell-Scripts.git

2. Interact with a Beacon

3. Use powershell-import /path/to/Invoke-SSHCommand.ps1 to import rvrsh3ll’s script into Beacon.

4. Run powershell Invoke-SSHCommand –ip [target] –username [user] –password [password] –command “uname –a”

These steps will run the uname –a command on a target of your choosing. Be aware that this script does require .NET 3.5 on the target or it won’t work.

If you find it cumbersome to type these commands again and again, you can use Aggressor Script to define an ssh alias in Beacon:

# beacon> ssh [target] [user] [pass] "[command + args]"
alias ssh {
($bid, $target, $user, $pass, $what) = @_;
bpowershell_import($bid, script_resource("Invoke-SSHCommand.ps1"));
bpowershell($bid, "Invoke-SSHCommand -IP $target -Username $user -Password $pass -Command \" $+ $what $+ \"");
}

The Post Exploitation and Pivoting lectures of Advanced Threat Tactics covers many of the concepts in this blog post.