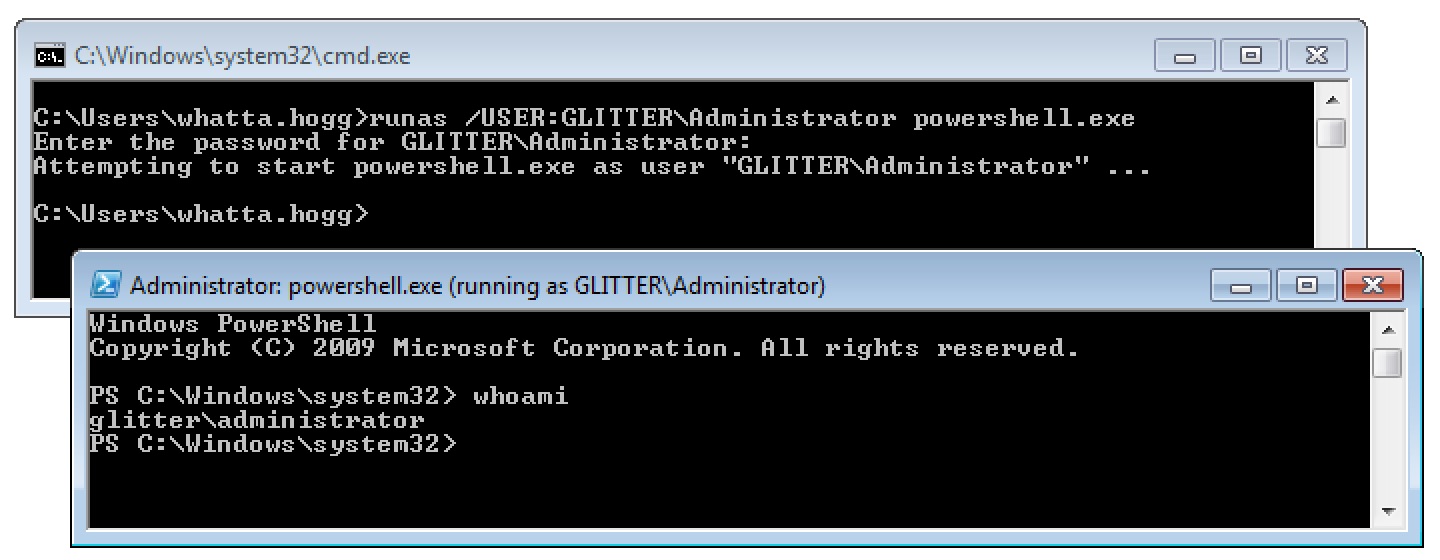
I’d like to call your attention to the humble runas.exe program on Windows. This program allows a Windows user to spawn another program with another user’s credentials.
It’s a little painful to use runas.exe from a remote access tool. This program doesn’t accept a password as an argument. Cobalt Strike’s Beacon has a built-in runas command to give you similar functionality.
The process that runas starts has an access token populated with the same single sign-on information you would expect from access tokens made by a normal login. You can steal a token from a program started by runas and use that token to interact with local and remote resources.
The runas capability is great for situations where you want to create a process as a local user on the current system or as a domain user from a trusted domain. This covers a lot of situations, but not all.
What happens if you need to interact with a remote resource as a local user on another system? How do you interact with a remote resource as a domain user when there’s no trust relationship with that domain? These problems have a solution.
The Curious /NETONLY Flag
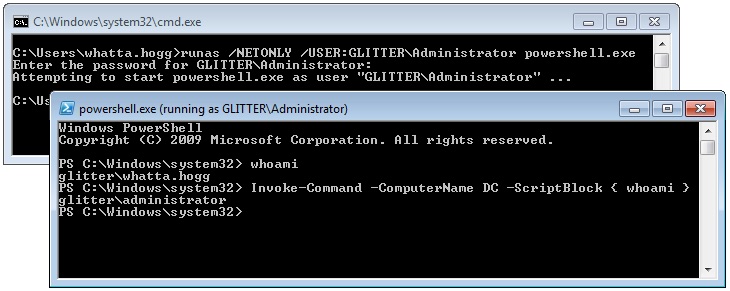
The runas program has a /NETONLY flag. This flag tells runas that the specified credentials are for remote access only. Windows will not try to validate these credentials. Instead, Windows will create a copy of your current access token and update it to use the new credentials when Windows interacts with a remote resource. Windows will then create the new process with this doctored token.
This has a curious effect. The new program is run as the current user. On the current system, there is no change in your rights, permissions, or identity. But, when you interact with a remote resource, you are the specified user.
Logon Sessions and other Access Token Trivia
I hope I’ve raised some questions so far. Questions like, how does runas.exe /NETONLY work?
Windows manages identity and security information in a structure known as an Access Token. These data structures contain things like: your username, groups, privileges, and other information. An Access Token may also contain information to restrict your rights. When working with Windows, it’s important to understand that an access token isn’t a single thing that represents a user’s identity. An access token is an instantiation of an identity with a lot of variables thrown in.
An easy example of this is User Account Control. A local administrator user may run most processes in a medium integrity context. The tokens associated with their processes have an Integrity level field set to 0x2000 which is SECURITY_MANDATORY_MEDIUM_RID. Processes run by the same local administrator in a high integrity context have access tokens with their Integrity level set to 0x3000. These tokens represent the same user, but different rights. The point here is that Windows may have multiple access tokens, with different configurations, for a user and that’s normal.
This blog post isn’t a deep dive into access tokens though. It’s a walk down the garden path about single sign-on information. Let’s jump into that.
An Access Token contains your identity on the current system and it states what you can and can’t do on the current system. An Access Token also references the information Windows uses to automatically authenticate to remote systems.
Now I hope you’re asking: what part of an Access Token determines who you are on a remote system? This question is the whole point of this blog post.
Each Access Token references a Logon Session. The Logon Session references credential material for single sign-on purposes. When Windows authenticates to a remote system, it uses the Logon Session’s credential material to authenticate. A Logon Session is made after authentication is successful. Logon Sessions go away when there are no more tokens that reference them.
When you use the /NETONLY flag with runas.exe, Windows will create a new Logon Session with the credential material you provide. It will then copy your current token and substitute the default logon session for the new one. The specified program is then run with this new token.
The program run by runas looks like it’s running as your current user. That’s because it is. The new program was run with a copy of your user’s access token! When you interact with a network resource, Windows does not authenticate as your Access Token’s user. Windows uses the credential information referred to by the new Logon Session. In this case, the credential material in this new Logon Session does not necessarily match the identity in your current Access Token.
If you’d like to see a list of Logon Sessions on your current system, take a look at the logonsessions utility by Mark Russinovich.

Implications for Beacon Users
Beacon’s runas command is similar to the default behavior of the runas program built into Windows. What about the /NETONLY flag? Beacon has something like this too. It’s the make_token command.
The make_token command uses the LogonUser function in Windows with the LOGON32_LOGON_NEW_CREDENTIALS flag. This API creates a Logon Session from the specified credentials, copies your Access Token, associates the new Logon Session with the new Access Token, and makes this new Access Token available. Beacon then impersonates this new token.
What’s the effect of this? You have a new token that is locally indistinguishable from your previous token. When you use Beacon’s getuid command to query your token’s identity, you get back the current user. When you type shell whoami, you get back the current user.
What happens when you interact with a network resource? Windows authenticates with the credentials you specified to make_token. Why? Because the Logon Session in the current Access Token references the credentials you provided to make_token. In this case, the Logon Session information does not match the local identity of your current token.
The make_token command in Beacon works this way to allow you to use a local account from another system to interact with it. This mechanism also allows you to authenticate to a system as a domain user when there’s no trust relationship with that domain.
The pth command in Beacon is a similar story. The pth command asks mimikatz to: (1) create a new Logon Session, (2) update the credential material in that Logon Session with the domain, username, and password hash you provided, and (3) copy your Access Token and make the copy refer to the new Logon Session. Beacon then impersonates the token made by these steps and you’re ready to pass-the-hash.
Again, with pass-the-hash, the side effects are similar. The new token is locally indistinguishable from your current user. That’s because you are your current user! When you interact with a network resource, Windows uses the material from the Logon Session to authenticate. In this case, it’s the information you provided to the pth command.
Frequently Asked Questions
This blog post is the result of many questions I’ve had about the make_token and pth commands in Beacon. Common questions include: Do pth and make_token work with local accounts? Yes. Do pth and make_token work with domain user credentials when there’s no trust relationship with the specified domain? Yes. Why do the make_token and pth tokens report themselves as the current user? That’s just the way it is.
Windows is a complicated animal. I appreciate that its design sometimes results in non-obvious or confusing behavior. I hope this blog post clears up some of the confusion about the make_token and pth commands for you.
If you’d like to learn more about this topic, to include how to use make_token and pth in an operation, consult the Lateral Movement lecture from the Advanced Threat Tactics course.