This blog is all about experimenting and having fun with the new CS REST API and the generative AI ecosystem.
We’ll demonstrate how we used Claude Desktop and its Model Context Protocol (MCP) integration to automate and orchestrate attacks through the CS REST API. We will also share the following internal (vibe-coded) experiments, intended to serve as inspiration for future community projects:
- Calling the REST API from the Cobalt Strike GUI.
- A Cobalt Strike WEB UI.
- AI Assistance for Data Analysis.
So, grab a coffee and let’s dive in!

Experiment 1: Using Cobalt Strike with Claude Desktop
Anthropic recently published a blog post titled “Disrupting the first reported AI-orchestrated cyber espionage campaign”, where they break down how a cyber-crime group used agentic AI to run a sophisticated espionage operation. The attackers used the models not just to gather intelligence, but to plan and execute parts of the intrusion itself. Therefore, it is essential for Red Teams to be able to simulate these attacks so that they can better understand the role of AI augmentation in offensive security and better help clients with their defensive thinking.
We don’t mean to state the obvious, BUT, if you want to experiment with Cobalt strike and LLMs, be careful on exposing sensitive customer data to external services. In the examples below, we rely on Anthropic’s Claude for simplicity. The general concepts apply also to a local self-hosted model.
Model Context Protocol (MCP)
The Model Context Protocol (MCP) is an open-source standard introduced by Anthropic that makes it possible to connect AI applications to external systems. Anthropic refers to MCP as a “USB-C port for AI applications” meaning that it provides a standardized way to connect AI applications like Claude or Chat GPT to third-party components like Cobalt Strike.
MCP follows a client-server architecture, where an MCP Host coordinates and manages one or more MCP Clients that each connect to a single MCP Server that provides context about the external component. Put simply, the MCP Server is essentially a proxy between Claude and the external service.
Claude Desktop is Anthropic’s chat application that runs locally and interacts with the Claude LLM. In addition to general chat functionality, it can also act as an MCP Host which makes it possible to quickly and easily integrate third-party MCP Servers.
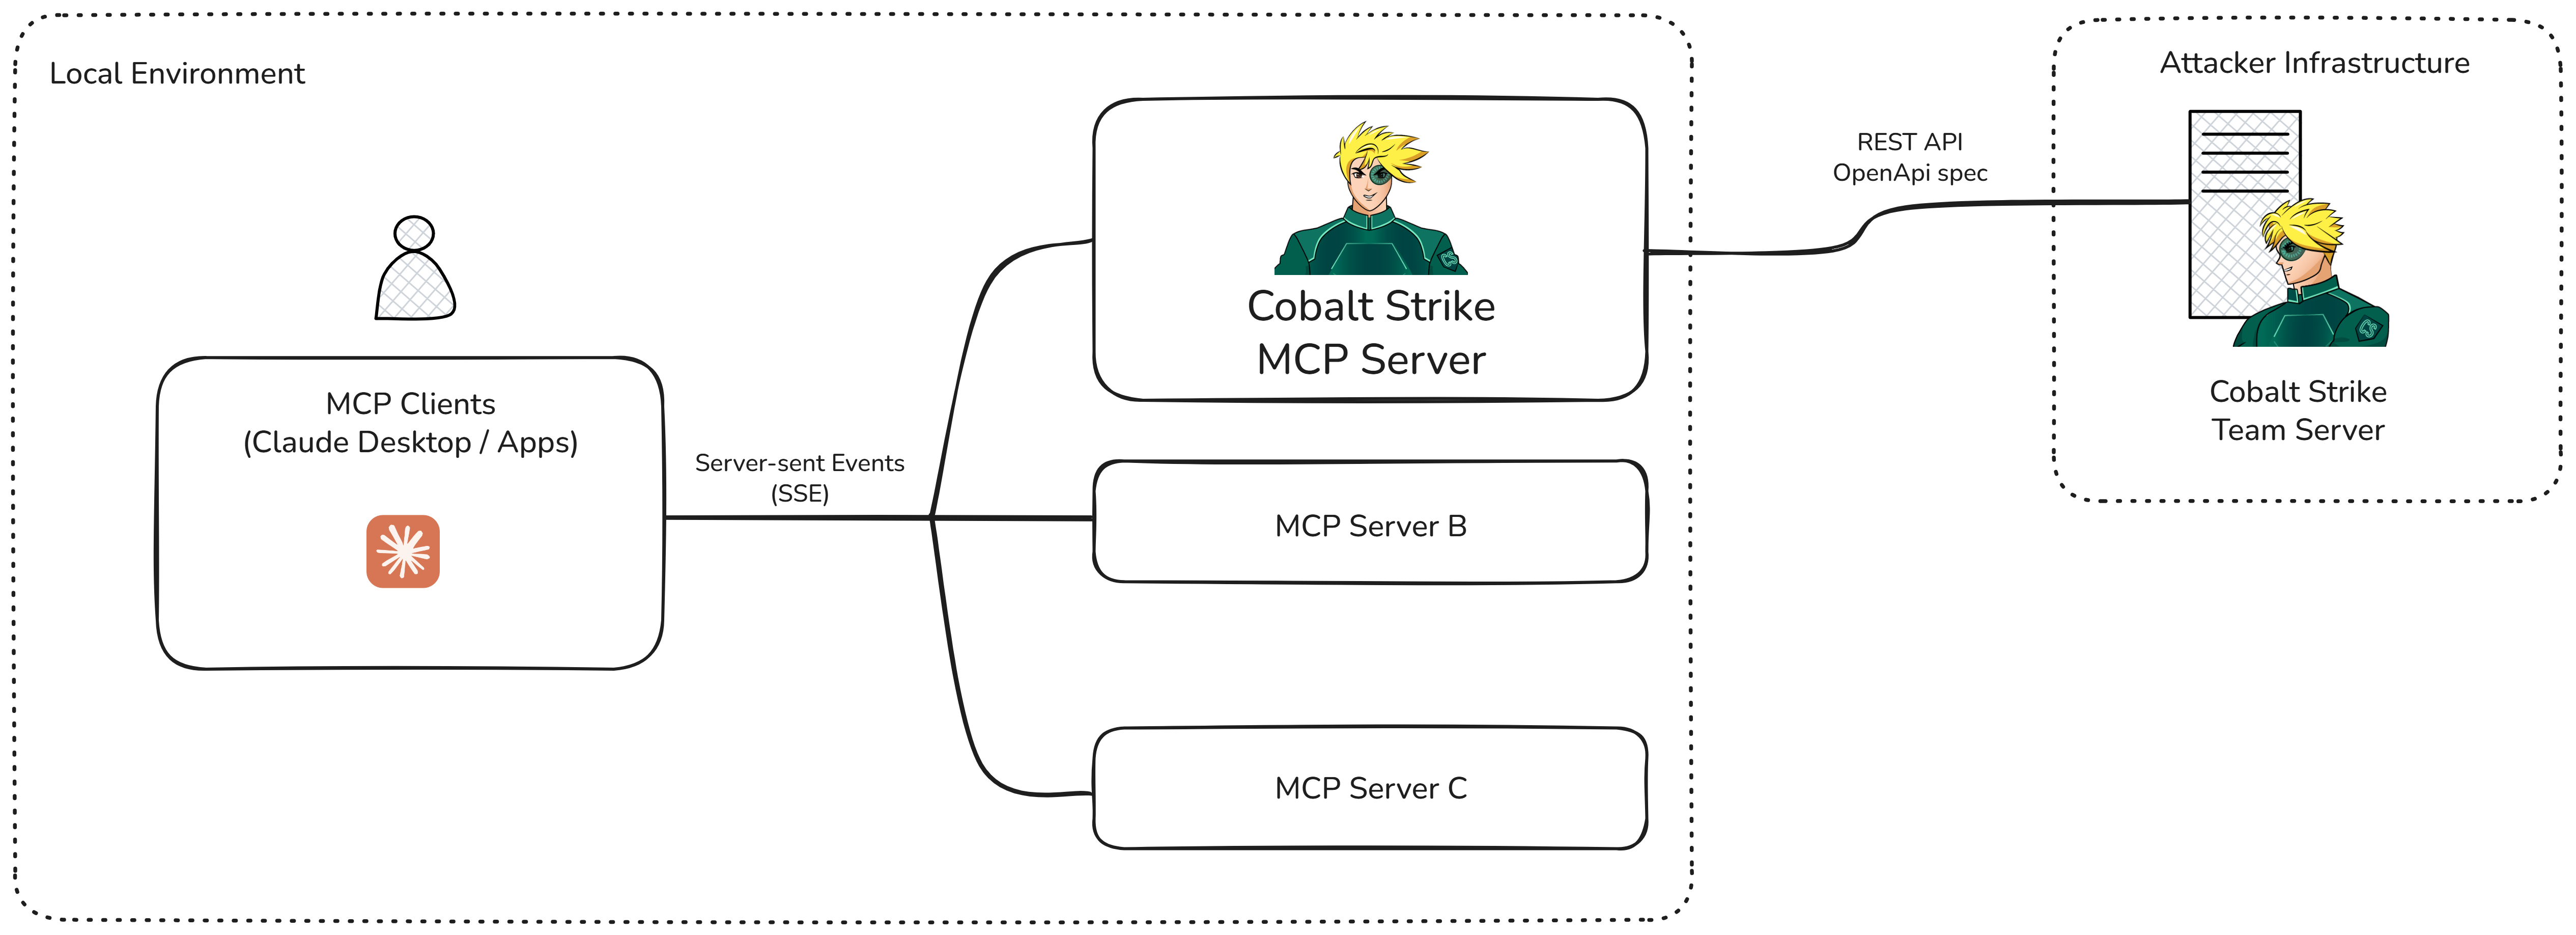
To experiment, we created a Cobalt Strike MCP Server that allows Claude Desktop to interact with the Cobalt Strike REST API so that it can understand and act on prompts like:
- “List all Beacons”
- “Execute a command in Beacon X”
- “Harvest credentials”
- “Query listeners”
A high-level architecture diagram of Claude, the Cobalt Strike MCP Server, and the REST API can be seen below.
Integration with Cobalt Strike
We built the MCP Server using FastMCP, which loads an OpenAPI schema and automatically turns endpoints into “MCP Tools” which are functions that the LLMs can call— reducing manual setup. This means REST endpoints like updateHTTPsListener become available to Claude.
The short python script below fetches the OpenAPI spec (which can be found at /v3/api-docs in the REST API) and creates the FastMCP server from it.
# Fetch the OpenAPI specification
openapi_spec = await self.cs_client.fetch_openapi_spec(spec_url)

# Get the authenticated HTTP client for FastMCP to use
http_client = self.cs_client.get_authenticated_client()

# Create the FastMCP Server from the OpenAPI spec
# Exclude authentication endpoints since MCP handles auth automatically
create_kwargs = {
    "openapi_spec": openapi_spec,
    "client": http_client,
    "name": self.server_name,
    "tags": {"openapi", "cobalt-strike"},
    "route_maps": [
        RouteMap(tags={"Security"}, mcp_type=MCPType.EXCLUDE),
        RouteMap(pattern=r"^/.*/config/resetData", mcp_type=MCPType.EXCLUDE),
    ],
}


#
self._mcp_server = FastMCP.from_openapi(**create_kwargs)

#
if self.instructions:
    self._mcp_server.instructions = self.instructions

return self._mcp_server
When the FastMCP server is run (mcp_server.run()), Claude will automatically register the tools published by the MCP Server created above.
In the provided example, we excluded the authentication route as well as
resetData (via MCPType.EXCLUDE). To apply additional “guard rails” to the Cobalt Strike MCP Server update cs_server.py file following the FastMCP documentation.The CS API’s granular endpoints let you implement command restrictions. For example, you can define exactly what actions the model can perform which provides control over its capabilities. For example, we could use Claude to augment our workflow and help with host enumeration (ps/ls/reg/etc) but only perform high impact actions ourselves manually.
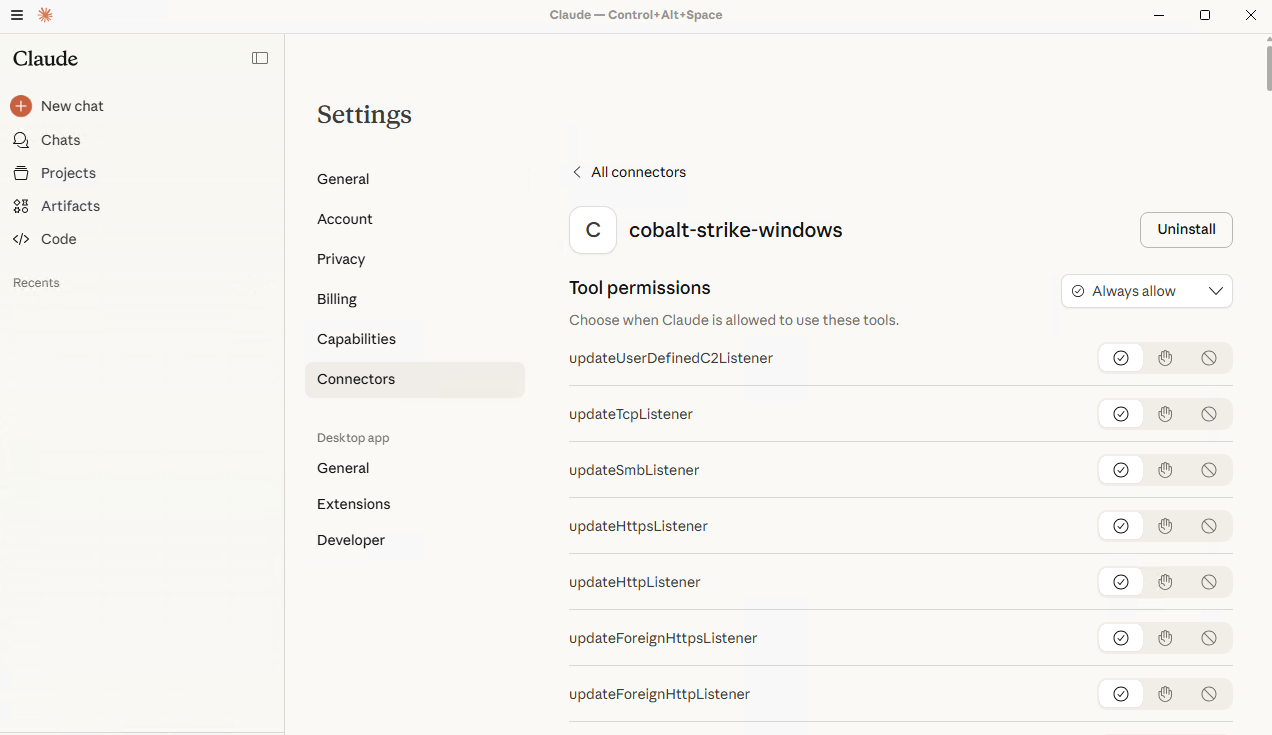
To connect Claude Desktop to our newly created MCP Server, we simply update the Claude Desktop config file (see README for details). Once configured, Claude sees the list of MCP Tools. From Claude’s perspective, these simply appear as functions it can call. In the picture below you can see the list of available tools listed in Claude Desktop:
Claude understands the structure of the tools and the types of arguments required, so it can build complex attack chains autonomously (independently but not uncontrolled).
For example:
- Identify the Beacon running on a user workstation.
- Query its process list.
- Attempt credential harvesting.
- Parse the output.
- Add the harvested credentials to the inventory to later laterally move on another host.
- Report back.
This approach is very similar to the one published by Ibai Castells a.k.a. kreep, developed independently but inspired by the same idea.
Seeing it in Action
To test this experiment, we connected Claude to our Cobalt Strike MCP Server and provided the following prompt:
You are assisting a Red Team operator during an internal engagement. The objective is to simulate a realistic intrusion scenario to evaluate detection, response and resilience capabilities of the target environment.
I have established initial access on several machines and am operating through Beacon sessions in Cobalt Strike.
I need your help to make an analysis of the processes in the compromised targets. Besides that, if you find a machine with a logged in user, run a search in his files and folders looking for clear text passwords.
When possible, use native commands instead of launching Operating system shell. Leverage the MCP Servers you have available.
Video 1: A PoC MCP Server for Cobalt Strike.
In response, Claude performed the following actions:
- Listed available Beacons: It found our foothold on the user workstation.
- Inspected the environment: It looked at processes, user sessions, and domain info.
- Triggered credential harvesting: The MCP Server called the correct REST endpoint, returning creds that the model could immediately reason on about.
- Analyzed the harvested data: Claude checked which credentials could be used for lateral movement, the likely reachable hosts, and privilege levels.
- Executed lateral movement: Using the allowed tools (and staying within the access boundaries we configured), it pivoted to a second machine.
All via the REST API, with the MCP Server mediating every step. The result is a safely executed, fully autonomous, controlled attack flow.
Closing the Loop: Augmenting, Not Replacing
These workflows give Red Team operators smarter assistants that can enrich data, propose next steps, and handle repetitive tasks, all while humans remain in control of strategy and decision-making.
The combination of the Cobalt Strike REST API and modern LLM/AI tooling unlocks a brand-new space for Red Teams.
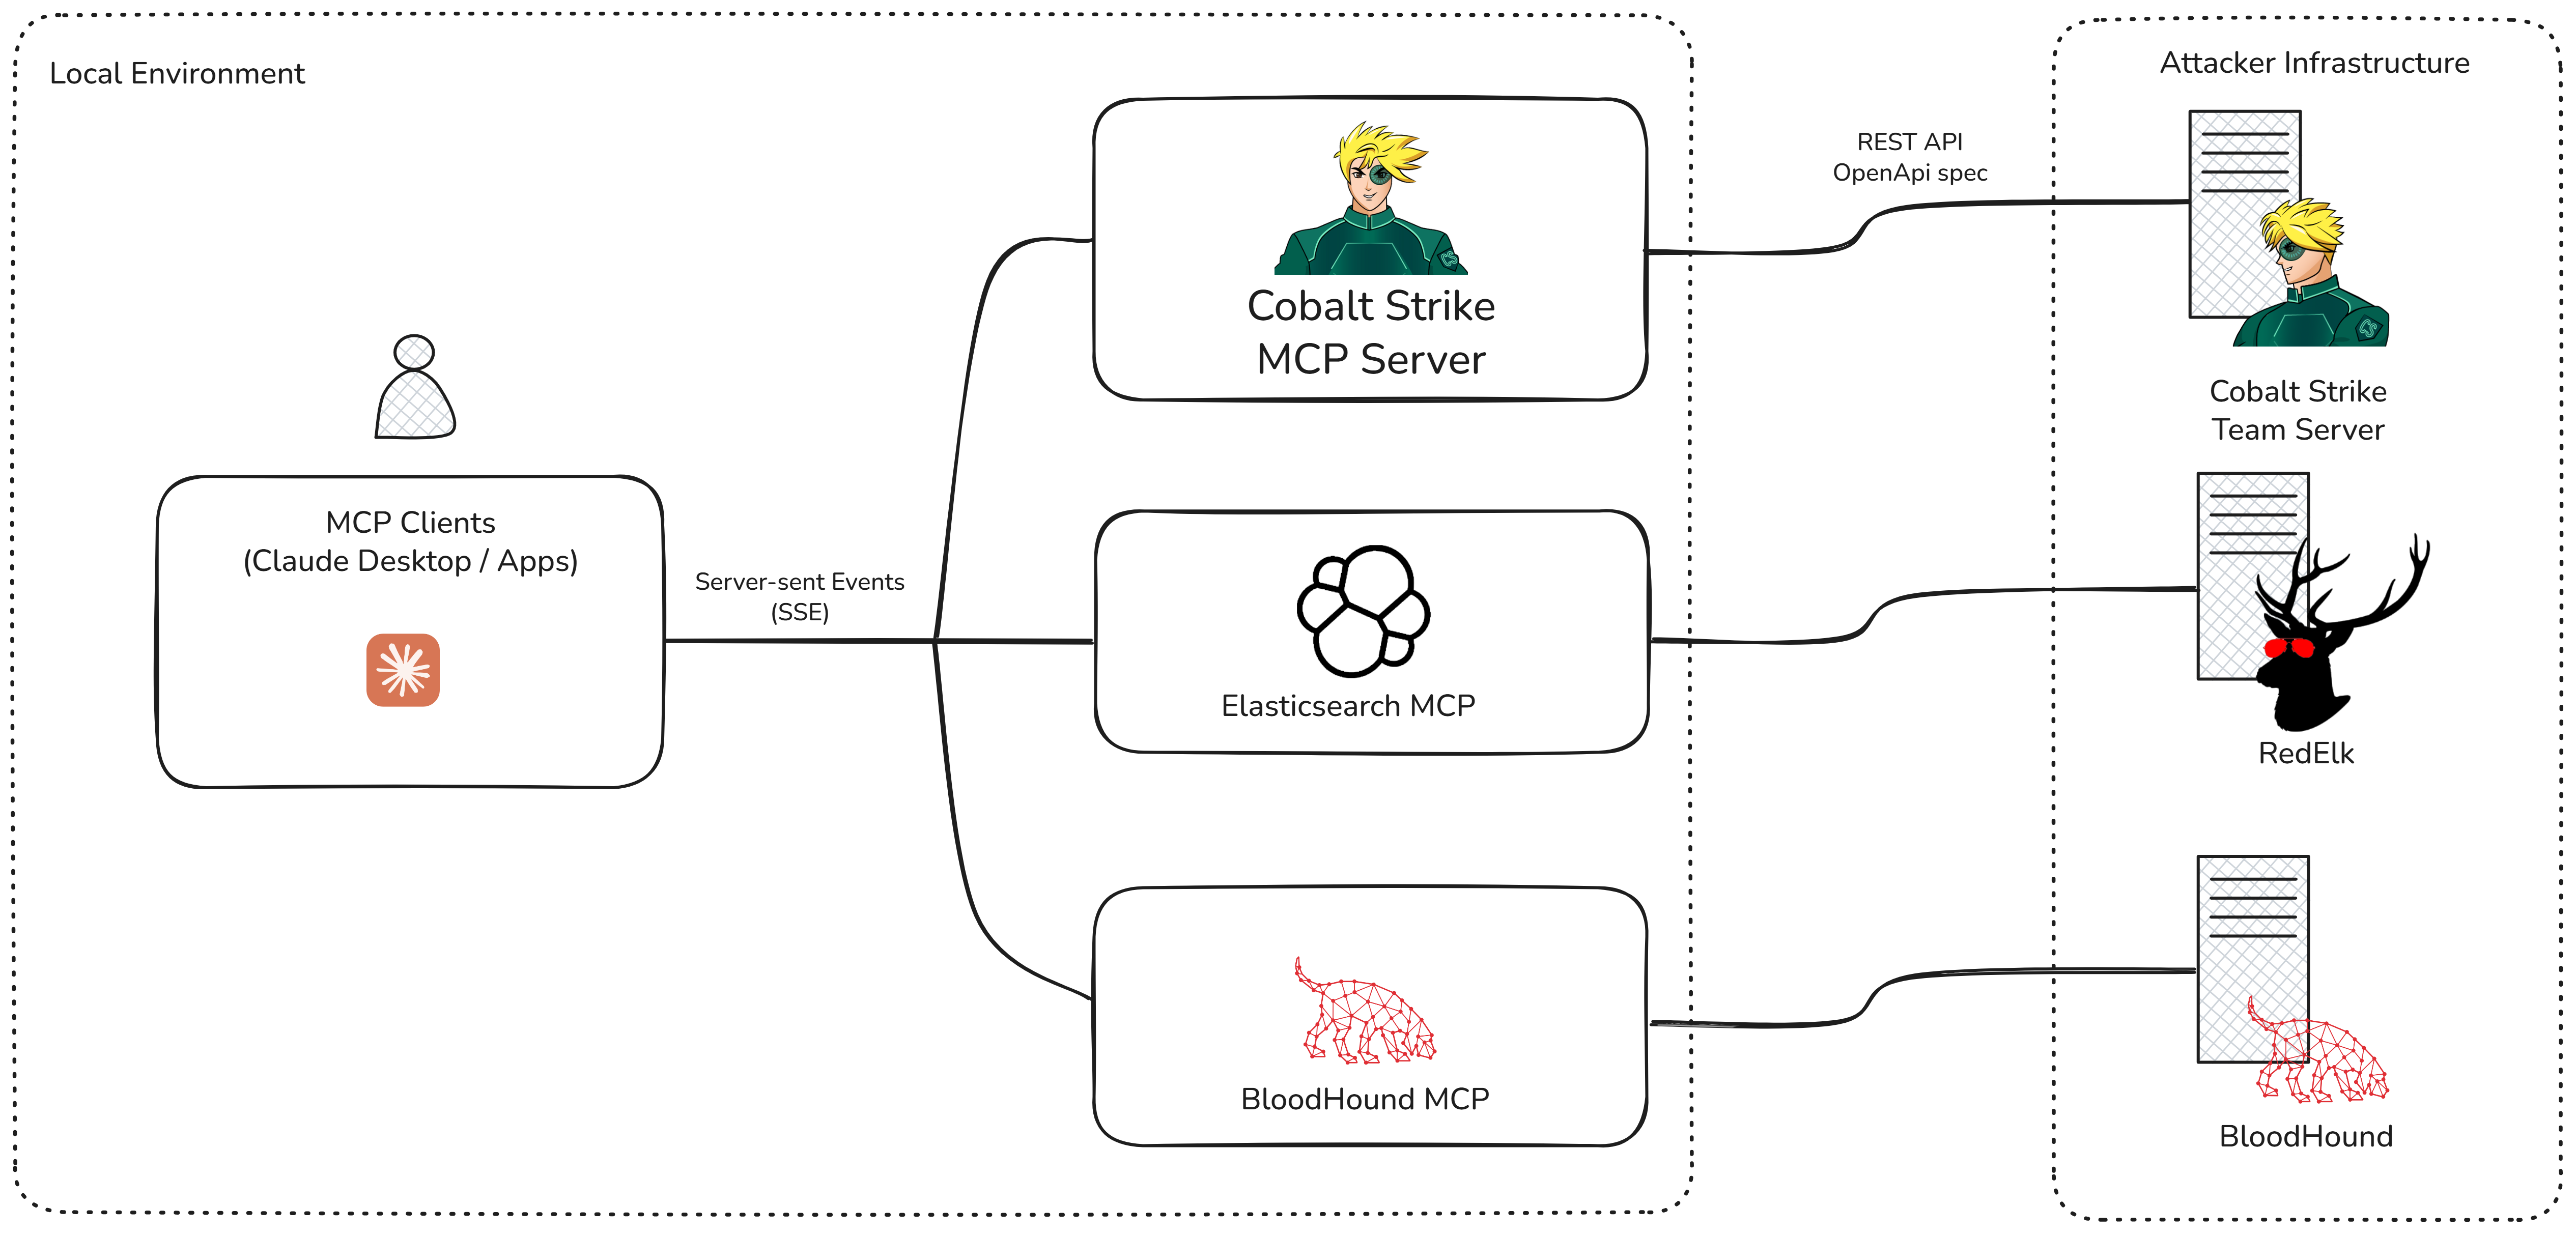
We’ve only scratched the surface here, but mixing them together offers new opportunities for operators to enhance and streamline their existing workflows but also create new and interesting ways to tackle problems.
For example, a setup like the one shown below, in which LLMs consume data from multiple sources like Nemesis, Bloodhound, Cobalt Strike, Red Elk and/or VirusTotal to support and augment Red Team engagements.
Experiment 2: Calling the REST API from the Cobalt Strike Client
The REST API provides centralized artifact management so that all users can operate with the same payloads/tools etc. However, server-side storage is not currently supported natively in the Cobalt Strike GUI . Therefore, in this experiment, we wanted to bridge the gap between the Cobalt Strike client and the REST API to show how users can extend their client-side workflows without leaving the familiarity of the Cobalt Strike interfaces (or their new favorite theme).
To make that task easier, we have released the Sleep2Rest prototype, a library that provides Aggressor Script functions for interacting with the REST API from the Cobalt Strike client. It supports authentication, GET/POST/PUT/DELETE requests, and automatic parsing of JSON responses into native Sleep hashes and arrays.
Below is a short example aimed at showing how to use the Sleep2Rest library to call the REST API from Aggressor Script.
#import sleep2rest
include(script_resource("cs_rest_api_lib.cna"));

# Authenticate and get beacons
$response = apiGET("/api/v1/beacons");
if ($response["status"] == 200) {
    $beacons = $response["content"];
    println("Beacons: " . $beacons);
} else {
    println("API error: " . $response["status"]);
}

# POST example
$beacon_id = "123456789";
$body = '{"command": "ps"}';
$response = apiPOST("/api/v1/beacons/".$beacon_id."/consoleCommand", $body);
if ($response["status"] == 200) {
    println("Response: " . $response);
    $statusUrl = $response["content"]["statusUrl"];

    # Get task result
    $task_response = apiGET($statusUrl);
    $status = $task_response["content"]["taskStatus"];
    println("Final GET Response: " . $task_response);
} else {
    println("API error: " . $response["status"]);
}
To enable Cobalt Strike users to access the REST API’s centralized storage from the Cobalt Strike GUI we have created two prototypes:
- Server-side payload generation: This script adds a menu to generate Stager Payloads, Stageless Payloads and to download previously generated server-side payloads. The full code can be found here.
Video 2: Server-side payload generation from the Cobalt Strike client.
- Server-side artifact execution: This script adds a new command that provides the capability to run server-side stored .NET assemblies. It can be easily extended to run BOFs. The full code can be found here.
Video 3: Server-side .NET assembly execution from the Cobalt Strike client.
Experiment 3: Vibe-coding a Web/Mobile User Interface for Cobalt Strike
It’s Sunday evening, your laptop is stowed away, but you need to act quickly after receiving a notification that a phishing email was clicked—and you need to deploy persistence…
In this experiment, we wanted to see if the CS REST API makes it realistic for users to create their own UIs and run basic actions (despite the lack of event subscription). However, in the spirit of this post, we put away intellisense and vibe-coded a web/mobile app to see if we could continue to operate engagements in unexpected situations.
An introduction to vibe-coding and how it works is beyond the scope of this blog. However, we started with a simple prompt in Copilot from Visual Studio Code and then refined it to create the cobaltstrike-web-client prototype.
The following video shows the Web UI running through a web browser on a mobile device to demonstrate the new capabilities enabled by the REST API.
Video 4: Cobalt Strike Web client prototype.
Experiment 4: AI Assistance for Data Analysis
In a previous blog post, we introduced the py2rest project to show how to interact with the REST API with Python (from a Jupyter notebook).
In this experiment, we built upon py2rest to integrate it with Google Gemini and demonstrate an alternative approach to the model we used in our experiments with Claude. In the following sections, we will show how we can use py2rest to enumerate a host via the CS REST API and then enrich the output via Generative AI.
The key difference from the MCP Server described earlier is that, in this scenario, the AI has no direct access to Cobalt Strike and operates purely as a typical LLM-driven chatbot. This approach allows us to enhance our findings with generative AI without directly connecting our Cobalt Strike instance to an LLM. It also provides an opportunity to anonymize/remove any sensitive data before making a request.
We used Google Gemini for this example, but it would be easy to port it to any LLM that has an API.
To interact with Google Gemini via the API, we can send a POST request with a JSON structure containing our prompts, and it will respond back. Below you can see a basic example of a JSON body that takes a single text input:
{
    "contents": [
      {
        "parts": [
          {
            "text": "How does AI work?"
          }
        ]
      }
    ]
  }
To handle the integration with Google Gemini, we created the GenAIClient class shown below. This class contains a single generate() function that takes a prompt, creates the required JSON structure, sends the request to the Gemini API endpoint and gets the response.
import requests,json

class GenAIClient:
    def __init__(self, api_key: str):
        self.api_key = api_key
        self.url = "https://generativelanguage.googleapis.com/v1beta/models/gemini-2.5-pro:generateContent"

        # Create a persistent session
        self.session = requests.Session()
        self.session.headers.update({
            "x-goog-api-key": self.api_key,
            "Content-Type": "application/json"
        })

    def generate(self, prompt: str):
        payload = {
            "contents": [
                {
                    "parts": [
                        {
                            "text": prompt
                        }
                    ]
                }
            ]
        }

        response = self.session.post(self.url, json=payload)
        response.raise_for_status()
        return response.json()["candidates"][0]["content"]["parts"][0]["text"]
genai_client = GenAIClient(api_key="<YOUR GOOGLE GEMINI API KEY>") # Replace with your Google Gemini API Key
To enumerate the target host from the py2rest Jupyter notebook, we called some specific routes defined by the REST API. For example, ps, ls, …
def get_files_in_system_data(bid):
    interesting_directories = ["C:\\Windows\\System32\\drivers","C:\\Windows\\sysnative\\drivers", "C:\\Program Files","C:\\Program Files (x86)", "C:\\Users\\Public"]
    folders_data = {}
    for directory in interesting_directories:
        mylsdto=openapi_client.models.LsDto(path=directory)
        file_and_registry_api = openapi_client.FileAndRegistryApi(cs_api.api_client)
        task_result = file_and_registry_api.execute_ls(bid=bid, ls_dto=mylsdto)
        final_result=get_task_result(task_result.status, task_result.task_id)
        if final_result:
            folders_data[directory] = [b.__dict__ for b in final_result[0].actual_instance.contents]
    return folders_data

def get_processes_in_system_data(bid):
    […]
    return processes_data

def get_domain_info_data(bid):
    [..]
    return domain_info_data

host_info={
    "files_info":get_files_in_system_data(bid=bid),
    "processes_info":get_processes_in_system_data(bid=bid),
    "domain_info":get_domain_info_data(bid=bid)
    }
Once host enumeration was complete, we created the prompt and sent it to Gemini:
def generate_prompt_from_data(data: dict) -> str:
    """
    Generate a prompt based on the provided data.
    """
    prompt = f"""
    You are a cybersecurity analyst reviewing Cobalt Strike beacon activity. Your task is to analyze the provided beacon data and identify:
    1. Security Solutions Detected: List any antivirus, EDR, or other security solutions.
    2. Notable processes, development tools and applications observed in the compromised machine.
    3. Potential Security Risks and Vulnerabilities
    4. Next steps for adversary simulation and red team operations.

    The provided data includes list of files in the system, processes running and domain information. Here is the host data for analysis:
    {json.dumps(data, indent=2)}
    """
    return prompt


prompt = generate_prompt_from_data(host_info)
generated_response = genai_client.generate(prompt)
The complete code for the example can be found here.
Seeing it in Action
We added the above experiment to the py2rest Jupyter notebook so that users can easily interact with the REST API and Google Gemini.
After running the last recipe “AI Assistance for Data Analysis” we got a list of the security solutions detected in the compromised machine. We also discovered notable processes, development tools, and applications that could represent potential security risks and vulnerabilities to finally provide the next steps for our engagement.
This video demonstrates setting up the OpenAPI SDK for Python and running the examples described:
Video 5: OpenAPI SDK for Python setup and py2rest examples.
Conclusion
We hope that you have enjoyed the examples in this post, and that you feel inspired to experiment and have fun with Cobalt Strike too.
Most of all, we hope it has shown that it is possible to take part in the security conversation by simply tinkering, having fun, and experimenting with the product. Everyone can make meaningful contributions to the community regardless of their experience.
Keep us posted and submit your projects to the Community Kit to make our users stronger together.
Lastly, if you have any idea or suggestion, please use our new feedback form where you can directly submit feedback on Cobalt Strike. You can find a link to the form on our support page under the “Support” header. You can also access this form directly from your Cobalt Strike client viaHelp->Support.